In this topic: Hide
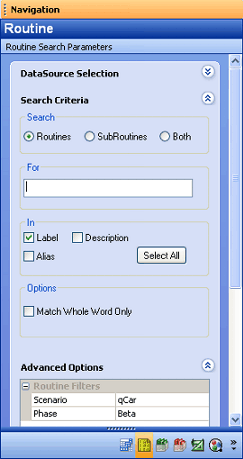
A search for every Routine can be performed, or the search can be narrowed down using the Search Criteria options. Set your search parameters and then click Search. Only one search can be performed at a time.
Alternatively, the Search ( )
toolbar button can be used to activate the search.
 Notice
Keep
in mind that when deleting a routine with DataUtility, any associated
subroutines will not be automatically removed. Subroutines must be deleted
separately from routines.
 Search
Define the scope of your Routine Search by selecting one of the three radio buttons:
· Routines - searches for only routines
· Subroutines - searches for only subroutines
· Both - searches for routines and subroutines
Enter any text you wish to search for in routine strings. Select one or more of the In options to designate where the sting will be searched.
The three categories (Label, Description, and Alias) refer to which part of the routine string (entered in the For field) the search will look at. Select one or more of the following options.
· Label - matched to the Routine Label
· Alias - matched to the Routine Alias
· Description - matched to the Routine Description
Click Select All to check all three boxes at once.
Select the Match Whole Word Only check box to discount partial text matches from the search results.
 Example
Typing 'Decklid
Assembly' in the text edit field and selecting the Match Whole
Word check box would return only the 'Decklid Assembly' routine. A
routine with a label such as 'Decklid OTR' would not be included because
only the first part of the label was a match.
The Advanced Options section of the Routine Search window contains a list of available Routine Filters that can be used as search parameters.
· Key and Restricted Filters - the second column is a dropdown menu populated with predefined filter labels
· Unrestricted Filters - the second column is an edit field where any text can be entered
Once a search has been performed, your Routine results can be sorted and edited in the result display region. If the columns are not in the column header, look in the Columns section on the right side of the Data Utility interface and add them to the column header section. Any changes made to a will be highlighted in red until the change is either Reverted back to the original value, or the change is Committed to the Database.
Access Codes are user defined strings added to the routines. The only reason to use Routine Access Codes is to restrict user access (through Site Manager) to specific Managed Routines.
 Notice
Routines
cannot have more than one access code.
If a Routine has an Alias assigned, the label(s) will appear in the Alias column.
Routine Codes are unique identifiers that are only used with Routines that belong to a Site DataSource.
If a Site Routine does not have a user-defined Routine Code when DataUtility is run, DataUtility will generate a code to assign to the Routine. DataUtility adds a generated integer (based on the Site Code) to the end of the label to create a unique Routine Code. When DataUtility is opened, and there are generated Routine Codes, the following message will appear:
· If you select Yes, the generated Codes will be committed to the Database and the cells will appear white:
· If you select No, the generated Codes will be highlighted in Red until the change is committed to the database:
If the Routine is unmanaged (or is not part of a Site), the following text will be in the Routine Code cell: <No Site, No Code>
When the Data Processed Monitor option is selected on a Routine, DataSmith Batch will trigger any Data Processed Scheduler jobs to be sent to the Job Queue each time Batch has finished processing data for that Routine.
The DataSource column is a read-only field that displays the label of the DataSource in which the Routine lives.
The Description column displays any descriptions that have been given to the Routine, or you can add a description to the Routine.
When the End of Subgroup Monitor option is selected on a Routine, DataSmith Batch will trigger any End of Subgroup Scheduler jobs to be sent to the Job Queue each time Batch has finished processing a Subgroup from that Routine.
The Feat Count column will show the count of the number of Features that are in a Routine.
When the Force Dynamic Processing option is selected on a Routine, DataSmith Batch will trigger CM4D Scheduler to process Dynamic jobs even if a Static job has already been triggered for the same Routine. If this option is not enabled, and a Static and a Dynamic job exist for the same routine that was triggered by data being processed through Batch, then only the Static job will be sent to the Job Queue.
The Hand column lists the handedness of the Routine, when available.
The Image Count column will show the count of the number of Images that are assigned to a Routine.
The Label column contains the Routine label.
The Max Samples field refers to the maximum number of samples, or Sample Limit, that are loaded in a Query.
· In CM4D Workcell, this value is used by as a target for the number of Samples to display at a given time. This is not a hard limit, as the number of samples in a query may be more or less than the target, depending on the circumstances.
· In DataArchiver, this value is the number of Samples that determines the cutoff for Excess Samples archive option. See here for more information.
For all other applications, this field is set to zero, as it is not applicable.
The Parent column will display the parent Routine, if one exists.
The Samp Count column will show the count of the number of Samples that are in a Routine.
The Stats Run Rule column contains which Stats Run Rule is set on the Routine. Options include:
· Use Routine
· Use 7
· Use 14
· Use 21
· Unknown
The Subgroup Size column allows you to view or edit the default Subgroup size of a Routine.
When Sync Left;/Right is selected for a Routine, the resulting action is different depending on where and how that Routine is being used.
· May apply if the Routine has either Left or Right Handedness, and has a partner Routine (same Routine Label) with the opposite Handedness.
· Does not apply if used with Routines that have Both Handedness or No Handedness.
Click on the following options to learn the function of Sync Left/Right in each application:
 Example
You
have two Routines - "Door ^ LH" and "Door ^ RH". These
Routines are for the Left and Right doors of the same vehicle, and "Sample
One" measurement data will be collected from the same points on each
side. Because of the correlation of these parts, you may want to always
see data from both of these parts in the same Reports. With Sync Left/Right
enabled for both "Door ^ LH" and "Door ^ RH", two
things will happen:
1. If DataSmithBatch processes "Sample One" into the database
for "Door ^ RH", a job (Report and/or Event) will not be generated.
However, once "Sample One" for "Door ^ LH", any relevant
jobs will then be triggered.
2. Once "Sample One" is available for both Routines, if
it triggers a Dynamic
job, then both the "Door ^ LH" Routine and the "Door ^
RH" Routine will be loaded into the Query and data from both Routines
will be included in the same Report and/or Event.
The Result will be one Report and/or Event containing "Sample One"
data for both "Door ^ LH" and "Door ^ RH".
The Type column lists the row item as either a Routine or a Subroutine.
The Unit column allows you to select the default measurement unit for a Routine, either Millimeters (MM) or Inches (IN). If the Document Defaults determine the unit type, rather than the Routine data, the Unit column will display Unknown.
To modify a single characteristic for a Routine, for example, double click a Routine Label in the Display Region, enter a new name, then click off the label or hit the Enter key to set the change.
Other actions applicable for a single Routine are accessible by right-clicking on the Routine row.

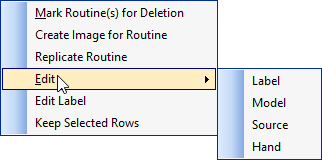
Routine characteristics can also be modified using the multiple select function. When more than one routine is selected, right click on a column of the highlighted routines and choose one of the Edit options available in the context menu.

The menu is dynamic, based on the type of column was clicked. The menu will also contain a global Edit menu for every column currently available in the display region. In the example above, the menu was opened from the Routine Label column, but the Edit context menu shows other options as being available for modification as well.
The type of edit dialog that appears depends on the property type being modified. For example, if you are modifying a label, a dialog containing a text field will appear. Numbers will initiate a value dialog (only numerical values will be accepted). Any field that contains a menu while being edited individually will open a dialog containing radio buttons for each of the pre-defined options for that particular column.
 Tip
Tip
Because
duplicate Key Labels cannot exist
in the Database, if you try to edit multiple label fields, only the first
label will be modified.