To connect CM4D Enterprise to a Site database, you will need to configure SiteManager for the CM4D Databases and users. If you have the Authentication license, you will also need to assign privileges for each user.
1. Run SiteManager.exe.
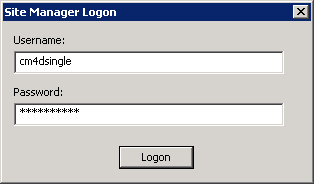
2. The first time you log in, use the following credentials:
a. Username: cm4dsingle
b. Password: cm4dsingle
c. Click Logon.
a. Click the New Site button.
i. Enter the Site Information for the Site database that you are managing.
(1) Enter the Label of your Site database.
(2) Enter a unique Site Code.
(3) Fill in the rest of the fields as desired (optional).
b. Click the Save button.
c. Repeat this step for each Site you want to manage in the current database.
 Tip
Tip
Typically,
there is only one CM4D Site database.
4. Go to the Managed DataSources tab.
a. Click the New button.
i. Enter the DataSource information for the CM4D databases that will belong to this Site. See the section above, Configuring DbConnect, and use the same database connection information.
ii. Click the Test DataSource Connection button.
(1) If a Successful Site DB connection has been made, click OK.
(2) If you receive errors, click OK.
· Failed connection- check that your connect information was entered correctly, that the database server is running, or that the user ID has permissions to access that database.
· Wrong schema version - CM4D database must be upgraded to the correct Schema.
b. Click the Save button.
5. Repeat Step 4 for each CM4D Database you want to add to the current Site.
6. Go to the Users tab.
a. Click the New button to create a new User.
i. Enter the User Information for the CM4D Service user.
 Notice
This
CM4D user must be the same user ID that was used to run the CM4D
Services. See here
for more information.
(1) Set the Default Site to the Site Database created in Step 3.
(2) If you are using the EventSmith services, be sure to enter a valid E-mail address.
b. Create a new User for each network user that you want to give access to CM4D Web.
c. Change the password for the cm4dsingle user to something other than the default password.
Tip
The
user cm4dsingle cannot be deleted
and will always have the privilege to make changes in SiteManager.
d. Click Save.
7. Go to the Groups tab.
a. Click the New button to create a new Group.
i. Enter Admin for the Group Name.
ii. Select
the Users row and click the ellipses
button ( ).
).
(1) Add the CM4D Admin User you created in Step 6a.
(2) Click OK.
iii. Enable the following Access Privileges:
(1) Check Site Access for the Site you added in Step 3.
(2) Check Data Source Access for the CM4 Database you added in Step 4.
(3) Check Routine Access for Any Routine.
iv. If you are using Authentication, enable the following Data Privileges:
o Data Manager
o Developer
o Event Manager
o Document Manager
o Change Log Manager
o Batch User
o Batch Manager
o Filter Manager
o Scheduler User
o Scheduler Manager
o Event Administrator
b. Create a New group.
i. Enter Services for the Group Name.
ii. Select
the Users row and click the ellipses
button ().
(1) Add any Batch Job or Scheduler Job users you created in Step 6b.
(2) Click OK.
iii. Enable the following Access Privileges:
(1) Check Site Access for the Site you added in Step 3.
(2) Check Data Source Access for the CM4 Database you added in Step 4.
(3) Check Routine Access for Any Routine.
iv. If you are using Authentication, enable the following Data Privileges:
(1) Data Manager Privileges - set those options you want to allow your job users to complete (i.e., create, modify, or delete objects in the database).
(2) Analyst
(3) Batch User
(4) Scheduler User.
c. Click Save.
d. Create a New group.
i. Enter Web for the Group Name.
ii. Select
the Users row and click the ellipses
button ().
(1) Add any CM4D Web users you created in Step 6b.
(2) Click OK.
iii. Enable the following Access Privileges:
(1) Check Site Access for the Site you added in Step 3.
(2) Check Data Source Access for the CM4 Database you added in Step 4.
(3) Check Routine Access for Any Routine.
iv. If you are using Authentication, enable the following Data Privileges:
(1) Analyst
e. Click Save.
1. Go to the Results DataSource tab and enter the required information.
Notice
The
Results database object may not exist at the time of initial configuration
if this is a brand new installation (Test Connection will FAIL - this
is ok). The information still needs to be entered here since it will be
used by DbMigrator to create the database object when the tool is run.
2. If Enable Results Datasource is not checked, select the box to turn on the Results database.
3. Enter the required database information.
a. Server Name - Enter the name of the database server. If using a named instance include the instance name with the server.
b. Database Name - Enter the name of the Results Database.
c. Windows Authentication - Select one of the two available methods of authentication for connecting to the databases:
i. Windows Authentication - Set the dropdown to 'True'.
ii. SQL Authentication - Set the dropdown to 'False'.
(1) DataBase UserName - Enter the user name of the SQL user login; must have the 'dbowner' privilege level in SSMS. This is the login used by DbMigrator to create/modify the Results database in SQL Server.
(2) Password - Enter the password for the SQL user.
(3) Confirm Password - Re-enter the SQL user password.
d. Click Test Connection.
i. If successful, click OK and continue to the next step.
ii. If the connection fails on an existing Results database, check your settings and then test again.
iii. If the connection fails in a new installation (before Results db is created), this is ok and you can continue to the next step.
4. Click Save.
5. Click the Save and Exit button.