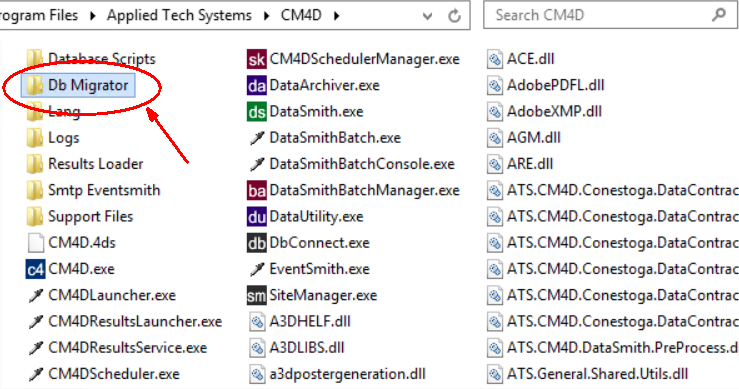
This topic includes information for a DBA or other qualified user to configure and run DbMigrator outside of a CM4D installation. DbMigrator is a simple tool that creates and updates the CM4D Results database. The tool is included with the CM4D Server installation and can be obtained from any user with access to the CM4D Server installation folder:
The DbMigrator folder can be copied to and run from any location:
Requirements
To run DbMigrator, the following requirements must be met:
.NET Framework 4.7.2 (or higher)
SQL Server Role - 'dbcreator'
SQL Server Feature - 'Full-Text'
Enable SQL Server Feature - Full Text
The Results database requires the Full-Text and Semantic Extractions for Search feature in SQL Server. If this feature is not already enabled, you must re-run the SQL Server setup to add the required feature.
To enable this feature:
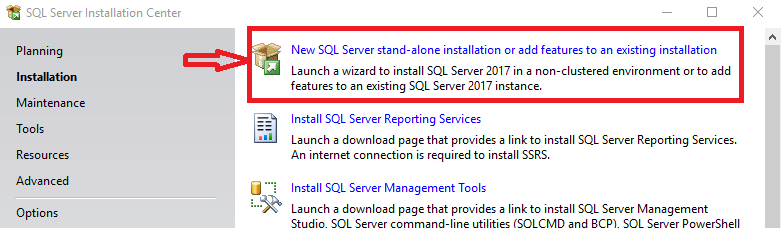
Run the SQL Server Installation.
Go to 'Installation'.
Click 'New SQL Server stand-alone installation or add features to an existing installation'.
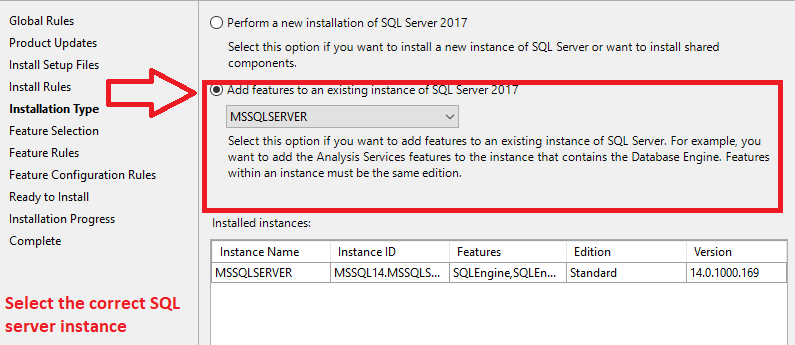
Go to 'Installation Type'.
Select the SQL Server instance for which you want to add the feature.
Go to 'Feature Selection'.
Expand the Features tree Instance Features > Database Engine Services.
Select the check box 'Full-Text and Semantic Extractions for Search'.
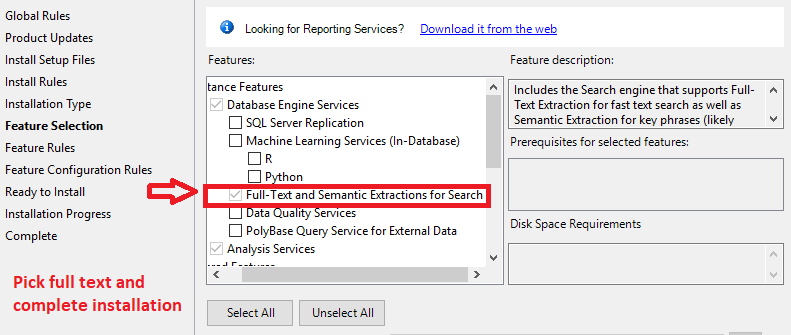
Complete the installation to apply the changes.
Once the Full-Text feature is enabled, continue with the Results database steps below.
Connection Configuration
There are three available methods for configuring the Results database information for DbMigrator. At runtime DbMigrator will check for each of these methods (in this order) and use the first successful connection it finds. If the database information is not provided by any of the three methods, the DbMigrator will fail.
Make a record of the method used for creating the Results database, as you will likely use the same method to update the Results database in future releases.
Command Line
Single connect string, or
Individual parameters (preferred)
Application Configuration File
-
-
ATS.CM4D.Conestoga.DbMigrator.exe.config
-
Connection String line is not included in the default config file provided with install
-
Manually enter string
-
CM4D Site Database - requires the Results Db information is saved in Site Manager, and has a user assigned that has a sufficient privilege level.
-
-
Cm4d.4ds
-
Site Manager
-
Default DbMigrator configuration for fiscal start month/day
-
Order of execution:
1. Command line at runtime:
a. Connection string supplied as argument, it uses this as connection string
b. If data source and catalog are supplied it tries to create a connection string
2. If connection string in DbMigrator config is present, that one is used
3. If none of the above applies, it tries to retrieve it from CM4D Site database
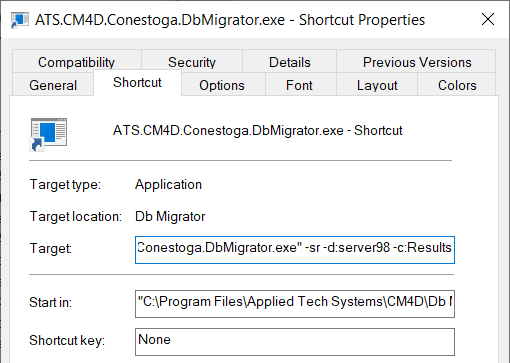
Command Line
Intended way of use -arg1:value1 -arg2:value2 -arg3 (arg3 would be ones that are used without value, -silentrun for example).
| Argument | Abbrev. | Value Description | Usage |
|
-silentrun: |
-sr: |
Used to silence verbose logs in the console when doing the migration. | n/a |
|
-connstring: |
-cs: |
Fully qualified connection string. Takes precedence over all other arguments. If connString is not supplied, it checks for individual arguments (-u, -p, -d, -c) for connection. |
-connstring:"Data Source=atsserver001;Initial Catalog=ConestogaResultsDb;User Id=cm4ddbmigratorservice;Password=123!@#;multipleactiveresultsets=True;" |
|
-user: |
-u: |
Supplies the database user. If using Windows Authentication, do not provide this. |
-user:cm4ddbmigratorservice |
|
-password: |
-p: |
Password for the database user. If using Windows Authentication, do not provide this. |
-password:123!@# |
|
-datasource: |
-d: |
The machine name of the Database Server. If applicable, include the instance name. |
-datasource:atsserver001 |
|
-catalog: |
-c: |
The name of the Results Database. |
-catalog:ConestogaResultsDb |
Command Line Examples
With full connection string:
C:\Program Files\CM4D\Db Migrator\ATS.CM4D.Conestoga.DbMigrator.exe -silentrun -connstring:"Data Source=SERVER98;Initial Catalog=Results;User Id=cm4duser;Password=pwtemp;multipleactiveresultsets=True;"
With full connection string and short names for arguments:
C:\Program Files\CM4D\Db Migrator\ATS.CM4D.Conestoga.DbMigrator.exe -sr -cs:"Data Source=SERVER98;Initial Catalog=Results;User Id=cm4duser;Password=pwtemp;multipleactiveresultsets=True;"
With deconstructed connection string and SQL Server Authentication:
C:\Program Files\CM4D\Db Migrator\ATS.CM4D.Conestoga.DbMigrator.exe -sr -user:cm4d -password:cm4dpass datasource:SERVER98 -catalog:Results
With deconstructed connection string and windows authentication:
C:\Program Files\CM4D\Db Migrator\ATS.CM4D.Conestoga.DbMigrator.exe -sr datasource:SERVER98 -catalog:Results
Without connection string in arguments:
C:\Program Files\CM4D\Db Migrator\ATS.CM4D.Conestoga.DbMigrator.exe -silentrun
With silent run omitted:
C:\Program Files\CM4D\Db Migrator\ATS.CM4D.Conestoga.DbMigrator.exe
Application Configuration File
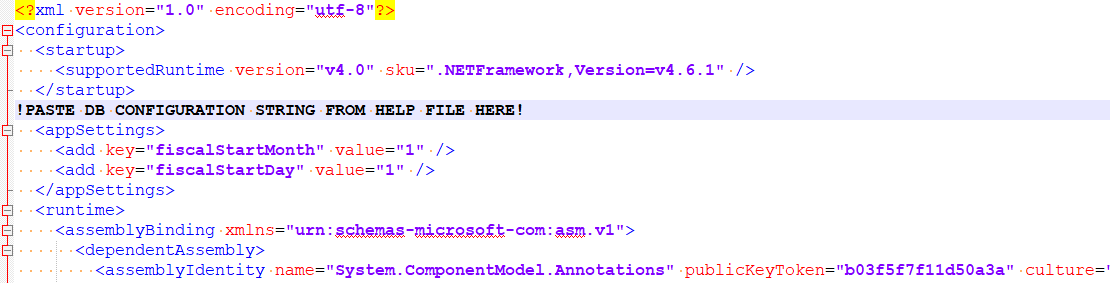
If no connection information is provided via the Command Line, DbMigrator will pull the information from the Configuration file. By default, the Database connection string is not included with the DbMigrator config file. You need to paste the string into the file manually and configure the information.
Copy one of the following strings, according to your database authentication type:
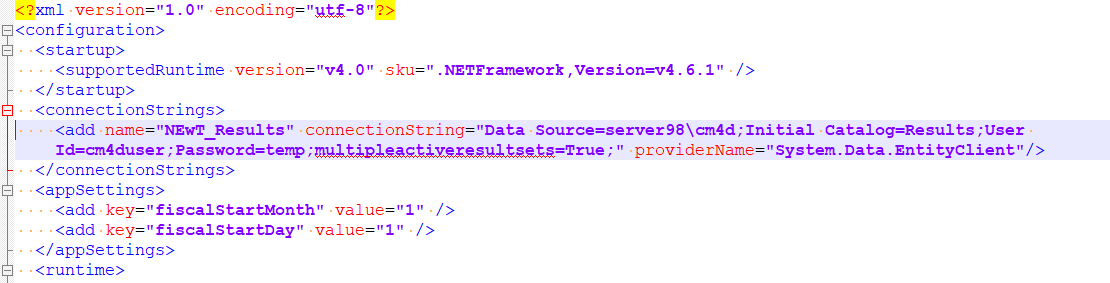
SQL Authentication:
<connectionStrings>
<add name="NEwT_Results" connectionString="Data Source=(local);Initial Catalog=Results;User Id=user;Password=password;multipleactiveresultsets=True;" providerName="System.Data.EntityClient"/>
</connectionStrings>
Windows Authentication:
<connectionStrings>
<add name="NEwT_Results" connectionString="Data Source=(local);Initial Catalog=Results;Integrated Security=SSPI;multipleactiveresultsets=True;" providerName="System.Data.EntityClient"/>
</connectionStrings>
Edit the file ATS.CM4D.Conestoga.DbMigrator.exe.config.
Paste the copied string between the </startup> and <appSettings> tags:
Set the following:
Data Source - The machine name of the Database Server. If applicable, include the instance name.
Initial Catalog - The name of the Results Database.
fiscalStartMonth - Set the month of the start of your fiscal year. Enter a value of 1-12. By default, this is set to "1" for January.
fiscalStartDay - Set the day of the month as the start of your fiscal year. Enter a value of 1-31. By default, this is set to "1" for the first day of the month. Make sure to use a day that is valid for the set month.
If you are using SQL Authentication, also set the following:
User Id - The name of the SQL user that will be used to create/modify the database object. This user must have a sufficient privilege level in SSMS to perform this task.
Password - The password for the SQL user.
Save the file.
Run the DbMigrator application.
CM4D Site Database
If no other connection information is provided (via Command Line or Configuration file) DbMigrator pull the information from the CM4D Site database, as configured in Site Manager.
If you are running DbMigrator on a system that has CM4D Server installed locally, this is the recommended method to use. This is also the only method that allows you to use Windows Authentication.
Run Site Manager to set the Results database connection in Site Manager.
- Go to the Results DataSource tab.

- If Enable Results Datasource is not checked, select the box to turn on the Results database.
- Enter the required database connection information.
- Server Name - Enter the name of the database server. If using a named instance include the instance name with the server.
- Database Name - Enter the name of the Results Database.
- Windows Authentication - Select one of the two available methods of authentication for connecting to the databases:
- Windows Authentication - Set the dropdown to 'True'.
- SQL Authentication - Set the dropdown to 'False'.
- DataBase UserName - Enter the user name of the SQL user login; must have the 'dbowner' privilege level in SSMS. This is the login used by DbMigrator to create/modify the Results database in SQL Server.
- Password - Enter the password for the SQL user.
- Confirm Password - Re-enter the SQL user password.
- Click Test Connection.
- If successful, click OK and continue to the next step.
- If the connection fails on an existing Results database, check your settings and then test again.
- If the connection fails in a new installation (before Results db is created), this is ok and you can continue to the next step.
- Click Save.
Edit the file ATS.CM4D.Conestoga.DbMigrator.exe.config.
Set the following:
fiscalStartMonth - Set the month of the start of your fiscal year. Enter a value of 1-12. By default, this is set to "1" for January.
fiscalStartDay - Set the day of the month as the start of your fiscal year. Enter a value of 1-31. By default, this is set to "1" for the first day of the month. Make sure to use a day that is valid for the set month.
Save the file.
Run the DbMigrator application.
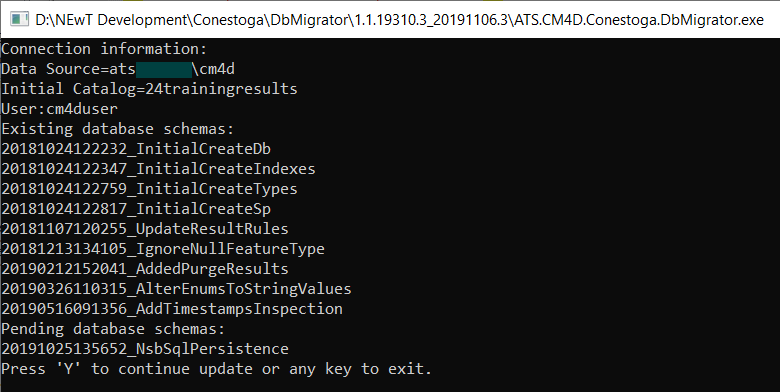
Run DbMigrator
Run ATS.CM4D.Conestoga.DbMigrator.exe.
When prompted, hit Y to continue.
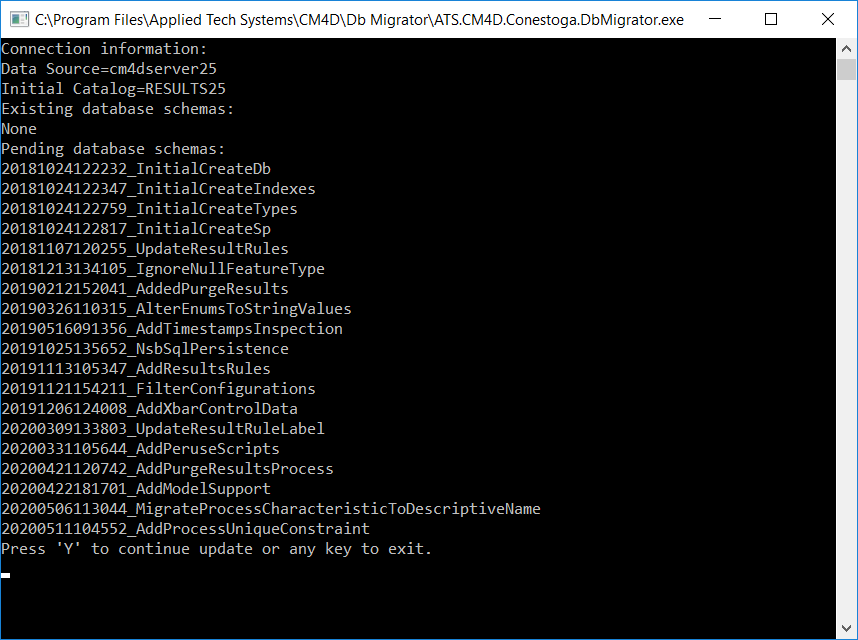
Wait for the process to complete. When it is finished running, the Command Prompt will read ''Successful migration. Press any key to exit application".

Database Properties (Manual)
The DbMigrator tool creates the db object with the correct properties. However, if you created the Results database object in SSMS before running the DbMigrator (not recommended), there are some settings that must be set manually in SQL server. Your SQL Server may already use some of these settings by default, but you should confirm these settings are correct or you may have issues with the Results database.
Options
- Recovery Model - Simple
If you decide to use the Full option, be aware that your disk space may be consumed rapidly due to the way the Results database functions. Unless you have a very specific reason to use Full, the Simple option is sufficient (the CM4D software has built-in methods recovery options available for this database).
Other Options - Miscellaneous
- Allow Snapshot Isolation - True
- Is Read Committed Snapshot On - True
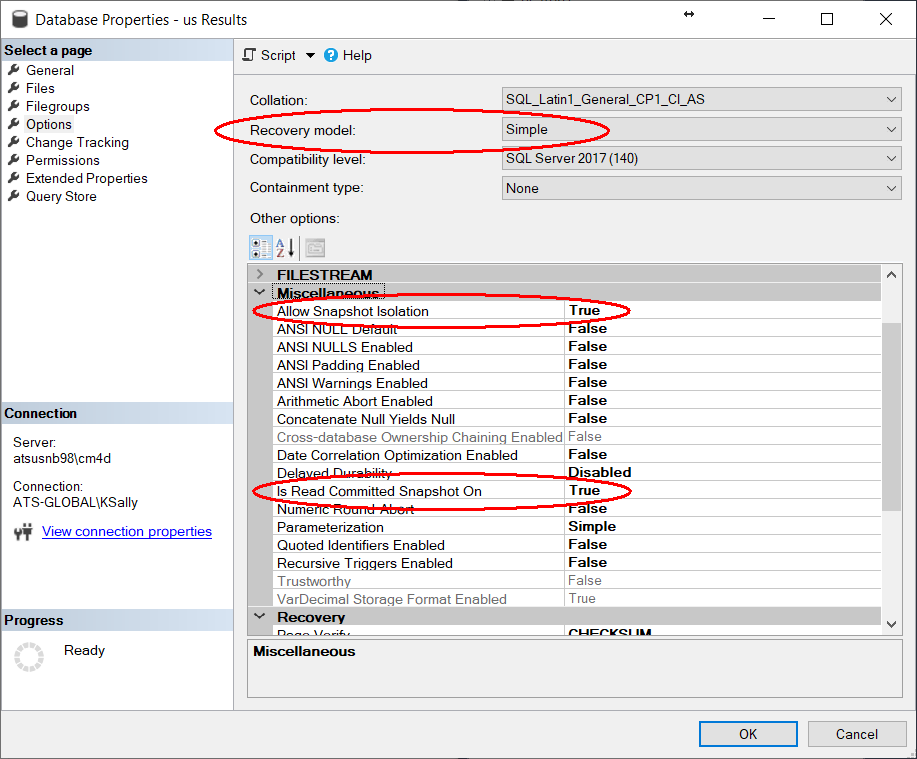
Check the Results Db Properties
After running the DbMigrator tool, open SQL Server to confirm that the database object was created with the correct properties.
Run SSMS.
Right-click on the Results database created by DbMigrator.
Modify the Properties.
Go to the Options page and check the following options are set:
Recovery Model - Simple
Allow Snapshot Isolation - True
Is Read Committed Snapshot On - True
Click OK.
Update the Results Database
The update process for the Results Database is very simple - obtain, connect and run the new version of DbMigrator.
Obtain the updated version of DbMigrator (provided with the updated version of CM4D Server). The version of the DbMigrator must correspond to the version of CM4D.
Connect DbMigrator the same way as you did for the new instance (command line, configuration file or CM4D Site db). The only difference is the Db object will already exist, so just confirm that you are using the correct connection method/information.
Run DbMigrator. The message before you hit 'Y' to proceed will show any pending changes.