AutoReport is a function which will automatically lay out a report based upon selected criteria. A view, an annotation (such as a chart) and a DataSet are required. When using Auto Report, Multiple Sift Rules can be useful for managing the order of the propagated charts. Using multiple sift rules allows a user to impose some order on the propagated charts. For example, if you want to see 'Level one' points in the report first, or if you want to see 'closure panels' at the beginning of the report.
AutoReports can be used to create the basic layout of a report, which can then be converted into a ReportTweak report. However, once converted it cannot be reversed.
AutoReport can only be run from the first Sheet of the SheetSet, and cannot be applied to the Title Sheet.
To access the AutoReport Setup dialog, open the menu Sheet > AutoReport.
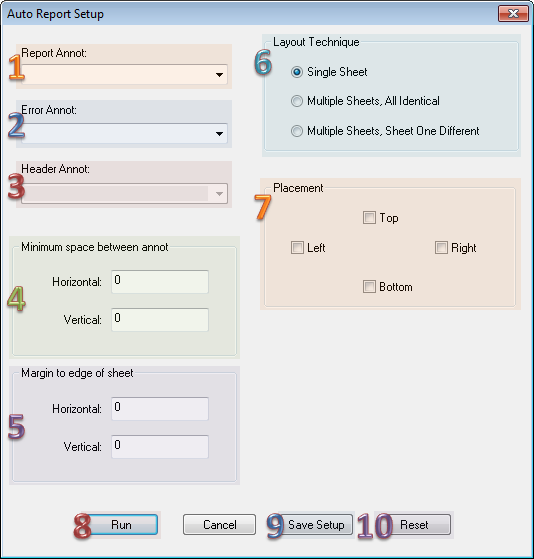
AutoReport Setup

1. Report Annot
The Report Annot menu contains a list of all of the annotation on the sheet. Auto Report will propagate the annotation selected from the Propagation Annot menu. In CM4Di, only one annotation will be propagated in a Report Type.
2. Error Annot
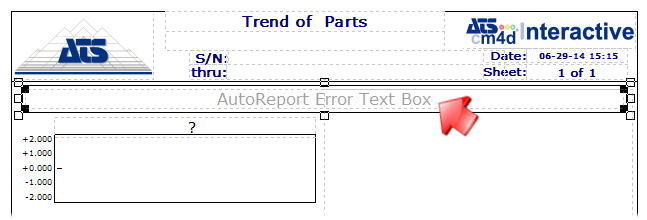
Assigns an annotation to be displayed only if the report contains an error condition that prevents the report from displaying. If no error occurs, then this annotation is not displayed in the report.
In the image below, the Text annot is shown in Classic.

Once resolved in Interactive, the error annot appears like this:

3. Header Annot
Assigns an annotation that is used to designate the beginning of the AutoReport. This option is only available with the Layout Technique "Multiple Sheets, Sheet One Different".
When the Header annot is set up, other annotation can be placed in the area above the Header, but these extra annotation will not appear on any subsequent sheets in the AutoReport. Instead, the Header annot forms a divider on Sheet 1, after which the annot designated as the Report annot are populated as with any standard AutoReport. The Header is then repeated at the beginning of each sheet created by the AutoReport.
The most common use of the Header annotation is with Table annotation that begin partway down the first sheet, and fill each of the following sheets in the report.
See the following topics for examples of this:
AutoReport Example: Multiple Sheets, Sheet One Different Layout with Table Annot
AutoReport Example: Multiple Sheets, Sheet One Different Layout with Chart Annot
AutoReport Example: Multiple Sheets, Sheet One Different Layout with Table Annot; No Title Block
4. Minimum space between annot
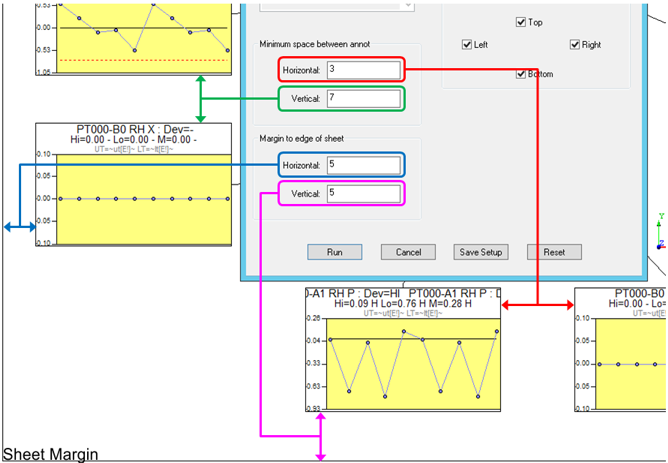
 When an annotation is propagated by Auto Report, the amount of space between the annotation will be determined by the value entered in the Minimum Space Between Annot setting.
- Horizontal - the minimum horizontal distance between annotation in the report.
- Vertical - the minimum vertical distance between annotation in the report.
Depending on other settings in the Auto Report dialog, the space between the annotation could be expanded or reduced. annotation may be scaled in order to accommodate the view or fit all of the annotation on a single sheet. When the annotation are scaled, the space between them is also scaled. When there is no view, and Multiple Sheets, All Identical is selected, the annotation and the space between them will not be scaled.
It is recommended that the stub length of an annotation be half that of the minimum space between annotation, to avoid overlap.
5. Margin to edge of sheet
Enter a value to set up the margin to the edge of the sheet.
- Horizontal - the minimum horizontal distance between the annotation and the Sheet Margin.
- Vertical - the minimum vertical distance between the annotation and the Sheet Margin.
6. Layout Technique
When the radio button next to Auto Report is selected, Auto Report will propagate and arrange all of the features in the selected routine or subroutine on one or more sheets. For the Multiple Sheet layouts, the number of sheets created is limited by the Max Sheets setting in Document Defaults dialog.
Single Sheet
Auto Report will attempt to fit all of the features of a DataSet onto a single sheet by resizing the annotation as it arranges them. Click here to see an example.
If the annotation become so small that it cannot be seen, the sheet will appear to be blank. If the sheet remains blank, you will need to reduce number of features selected in the DataSet.
Multiple Sheets, All Identical
Auto Report will display all of the features in a DataSet on as many Sheets as required to accommodate all the annotation (up to the Max Sheets). The annotation will not be resized. Click here to see an example.
Multiple Sheets, Sheet One Different
Auto Report will display all of the features of a DataSet on as many Sheets as required to accommodate all the annotation (up to the Max Sheets). The annotation will not be resized. Click here to see an example.
This layout technique uses only one Placement option, and the spacing and margin options apply differently than when applied to the other layout techniques.
7. Placement
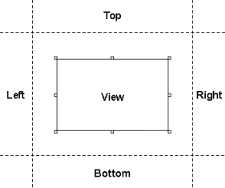
The following options can be used to customize how Auto Report displays the view and annotation within the sheet pane.
|
|
|
|
|
|
|
Placement for Multiple Sheets, First Sheet Different
If you are using the layout technique, Multiple Sheets, First Sheet Different, the Placement indicates the direction from which the AutoReport will be run from the header annotation. For example, if you want to run the annotations downward on the sheet from the header annot, you should set the Placement to 'Bottom". If you want the annotation to run to the right of the header annot, set the Placement to "Right".
8. Run
Executes Auto Report on the sheet. The annotation will be propagated around the view.
9. Save Setup
Saves the settings of the Auto Report dialog, but will not propagate the annotation around the view.
10. Reset
Clears the changes you have made to the AutoReport Setup dialog.
Undo AutoReport Layout
To remove the sheets generated by Auto Report, select the first sheet of the SheetSet, then select Undo AutoReport Layout from the Sheet menu. You will be left with the single annotation that was used to create the AutoReport in the first place.
Undefine AutoReport
The proper sequence would be to run Undo AutoReport before running Undefine AutoReport. At times, AutoReport is used to initiate a template, but then disconnected to customize the report.
