There are eight required steps before CM4D Workcell can be run:
I. DataSmith Translator
For use with Workcell, you need to develop two .DataSmith translator files: Actuals and Nominals. Each file can only have ONE config. A standard translator file may be used, but keep in mind that CM4D Workcell only processes certain types of files:
One Actuals translator for the Samples:
- Only the samples in the data files will be processed.
- Only one routine and one sample are allowed in each file, unless the file has synchronized left and right routines that are used in the same query. In which case, the left and right samples must be for the same routine.
- Routines must exist in the database prior to running Workcell.
- Each translator (*.4Datasmith) file can only have one Config.
A Nominal translator is optional. You can define one for use with Workcell, but it must have only ONE config as well.
When a new version of CM4D Workcell is installed, you may need to open and close DataSmith one time to establish the location of your translator.
II. Workcell Startup Document
CM4D Workcell uses a startup document specific to Workcell. If your document is not a Workcell type managed document, or you are not the owner of the Workcell managed document, the following error message will appear when you try to run Workcell: "Startup template must be a managed workcell document.
It is best to manage the document as a Workcell type managed document prior to defining the events in the DataSet(s).
Start with an existing CM4D Interactive startup template or create a new CM4D Interactive document in CM4D Classic:
- Define static queries. These should be complete, functional queries that refer to a specific routine and include sample load settings. The document can have zero, one, or more static queries.
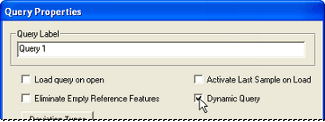
- Define one dynamic query. This is a placeholder query similar to the queries used in Dynamic Managed documents used by CM4D Scheduler. This query should not refer to a specific routine. To make a query a dynamic query, select the Dynamic Query checkbox in the Query Properties dialog. The document can have zero, or one, dynamic query.

- Manage the document as a Workcell Managed Document in CM4Dc. The managed document type is the only difference between a Workcell Document and a regular CM4Di Document. A Workcell Managed Document is the only type that will open in Workcell.

- Define DataSets with monitored events.
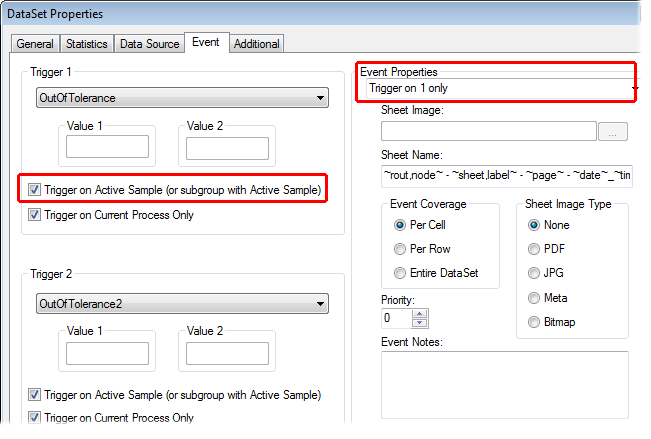
- Setup the event(s) as desired. It is recommended to select the Trigger on Active Sample if Workcell will be used to Alarm on the Data Processed Monitor option. This will avoid yielding alarms on previously triggered samples when the new sample triggers the alarm, as any triggers outside of the currently active Sample will be ignored when events are processed.


- Select the Process external alarm events checkbox.
- Setup the event(s) as desired. It is recommended to select the Trigger on Active Sample if Workcell will be used to Alarm on the Data Processed Monitor option. This will avoid yielding alarms on previously triggered samples when the new sample triggers the alarm, as any triggers outside of the currently active Sample will be ignored when events are processed.
- The alarming in Workcell will observe the active rows in the blue (DataSet) grid. If you choose Event Coverage Per Row, the number of rows will reflect the active rows in the blue grid.

- Set up sheets with reports. As with CM4Di startup templates, these reports need an annotation in an Auto Report that uses the DataSet as the DataSource.
- Setup the sift rules in the Document Defaults (as with CM4Di startup templates). The Hide Rows with No Data and the 3 Show ONLY Triggered options may be helpful for setting up a useful alarm report. The Elimination section is generally the only Sift Rules you will use while running Workcell and can be modified from the Workcell User Interface.

3. Modify Routines
Using DataUtility or CM4D Interactive, modify any routines that will be used for alarming in CM4D Workcell to be monitored. Set the Monitor flag to Data Processed or End of Subgroup. This is the same setting that is used by CM4D Scheduler event processing.


4. Subscribe Events
Using EventSmith, subscribe to any events (DataSet events) that will be used for alarming in CM4D Workcell. In EventSmith, the DataSource, Event (DataSet event), and report must be defined for any events used for alarming in Workcell.
5. Define Folders
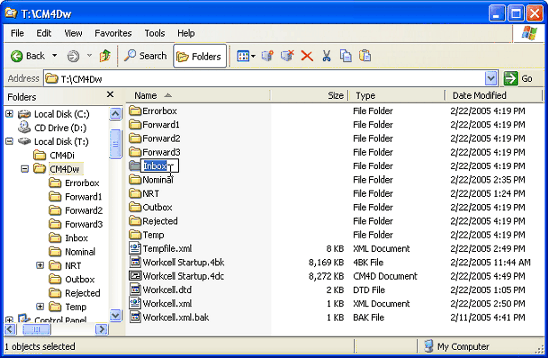
Define the folders that will be used by CM4D Workcell. These folder names are fully user definable. If you use the default names (e.g. Inbox, Rejected, etc.), Workcell will automatically detect when they are created within the Workcell home folder.

If you would like to assign alternate names for these folders, make sure the connection paths correspond in the Paths tab of the Workcell Settings dialog.
All Workcell folders must exist, be writable by the user, and be local to the Workcell computer (or referenced by a UNC path). Mapped drives are not supported as valid Workcell folder paths.
6. Configure
Configure the data collectors to send data to the Workcell Inbox.
7. CM4D.ini File
Setup the path to the Workcell folder in the [Workcell] section of the cm4d.ini file. The Workcell folder name is user defined, but it must be local to the Workcell computer (i.e., the folder cannot be on a mapped drive, nor can it be referenced by a UNC path).

Setup the reference CM4Di startup document. The startup document must be a Workcell type managed document.

Modify the tree value.

Workcell forces the Tree value programmatically using the values in the Cm4d.ini file. This means that if you are running in Workcell mode, no matter what this value is set to, Workcell will use the "Unique" NavTree node type.
8. Workcell Folder
Place the files Workcell.dtd and Workcell.xml in the Workcell Home folder (e.g. Home="C:\Workcell").
These files are provided with your ATS CM4D Installation.