Creating a CM4D Interactive document (or Startup Template) is similar to creating a CM4D Classic (CM4Dc) document. There are, however, a few important requirements to keep in mind as you create your CM4Di document. It is important that the names of your DataSet, annotation and the sheet used in your CM4Di document are the same. CM4Di combines elements of each, the DataSet, annotation and the sheet, by referencing their names. All sheets of the CM4Di Document need to be the same size, or your reports will not be displayed correctly in CM4Di. All of the views in your CM4Di Template need to be the same size as well. As you are creating your CM4Di Template, you should be aware of how Auto Report will arrange annotation. The number of sheets that Auto Report will create is limited by the Max Sheets setting in Document Defaults dialog. Multiple sift rules are used to separate the points of DataSets into groups, so that when Auto Report is run, the sheets will be grouped according to their sift rules. For more information about how to set up Multiple Sift Rules see the topic DataSet Properties.
When CM4Di is opened, it looks for the file designated as the CM4Di Template in the CM4D.ini file.
The following instructions will show you how to create a basic CM4Di document which will display a view and annotation when opened in CM4Di. More instructions have been provided in the section of this topic called Additional CM4Di Functionality.
Create a Document
Start with a new CM4D document.
Add the DataSource or DataSources you would like to use in your CM4Di document. Create a new query.
Choose a name for your report.
Create a new SheetSet (the Main Set can not be used in a CM4Di Document). In the SheetSet Properties dialog:
Rename "Sheet 1", giving it the name of your report.
Set your Sheet Size and Orientation using the menus. All the sheets in the CM4Di Template must be the same size.
Set the Interactive Usage Type to Report, Summary, or Drill Down.
Create a new DataSet.
Rename the DataSet, giving it the name of your report.
All DataSets and DataStacks in your CM4Di document should use the Active query as their DataSource.
Create a new view using the New View (![]() ) tool.
) tool.
Select the DataSet you created in step five as the DataSource of your view.
Create a new annotation.
In the General tab of the Annot Properties dialog, rename the annotation, giving it the name of your report.
In the DataSource tab of the Annot Properties dialog, select the DataSet you created in step five as the DataSource of your annotation. Select Use Only Row 1.
In the Leader tab of the Annot Properties dialog, select the radio button next to Use DataSource Feature. Under Feature Located In View, select your view, View 1.
For templates, make sure to select all possible 'Attach at' locations to ensure that the leader lines in your reports are displayed correctly once run in CM4D Interactive.
Save the changes you have made to your document.
Select Sheet in the menu bar, then select Auto Report. For more information about Auto Report, see the topic Auto Report.
In the Report Annot menu, select the name of your annotation. (Note: If the name of your annotation does not appear in the Report Annot menu, close your document and open it again.)
Under Layout Technique, select Multiple Sheets, All Identical.
Under Placement of Annot on Report, select the check boxes next to Allow on Left, Allow on Right, and Allow on Top.
Click Save Setup to save your settings in the document. Click Run to save your changes and execute Auto Report (propagating the annotation), or click Reset to restore the default settings of the Auto Report dialog.
Save the changes you have made to your document and close CM4D.
Configure the INI File
To view your CM4Di Document file in CM4Di, you will need to set up the cm4d.ini file properly. The cm4d.ini file contains settings which tell CM4Di where to find the folder that contains the CM4Dc document to use. Change the settings in your cm4d.ini file.
Browse to your cm4d.ini file and open it.
The settings for CM4Di are under the heading [CM4Di].

Home= Enter the full UNC path to the location of the folder the CM4Di document resides in.
Base= Enter the name of the CM4Di document.
Save your cm4d.ini file.
Open CM4Di to view your CM4Di document in CM4Di. For instructions on how to use CM4Di, see the CM4Di documentation.
Below are additional instructions which explain how to further enhance your CM4Di document. More SheetSets can be created which contain different types of reports. A header can be added to your SheetSets. Another annotation can be added to a CM4Di report, which will not be propagated, such as a table. A Drill Down SheetSet can be added which may contain larger, more complicated annotation displaying information about a single feature. Reports can be linked to sheets containing Drill Down annotation.
Adding Another Annotation to a Report
Another annotation can be added to a report. The second annotation will not be propagated. Auto Report can only be used for one annotation in a CM4Di SheetSet.
Add More SheetSets
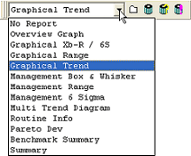
Follow instructions one through ten above to create additional SheetSets for your CM4Di document. The CM4Di Report toolbar will contain a menu of all of the different reports that exist in your SheetSets. Make sure that all of the views are the same size in each SheetSet.
Report Toolbar in CM4Di

Adding a Title Block
A title block can be created on the Title Sheet of your SheetSet, and will appear on all of the sheets in the SheetSet. If a title block is used, the size of the sheet pane will be determined by the size of the title block. A title block can be a shape or a text box.
A title block must be created on the Title Sheet of the SheetSet, be contained within a single rectangle, lie along one of the edges of the sheet outline, span from one end of the sheet edge to the other (entire length of sheet), not reach the center line of the sheet that is parallel to the edge that it lies along.
Drill Down SheetSet
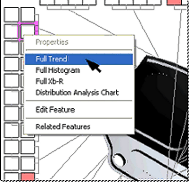
When a Drill Down SheetSet is added to the CM4Di Document, the sheets of the Drill Down SheetSet can be linked to the reports in CM4Di by using the Linked Report function. The SheetSet can be given any label, but the Drill Down Interactive Usage Type must be assigned to the SheetSet in the SheetSet Properties dialog. The SheetSets have been configured to display data from a single row in a DataSet. For the annotation, sheets, and DataSets (that have one or more annotation) to work in CM4Di, it is unnecessary to give them the same name. When Linked Reports have been defined in the CM4Di Document, CM4Di will use the names of the sheets within the Drill Down SheetSet. They will appear when you right click on a single annotation or report.
Linked Reports
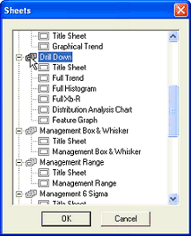
The Linked Report function creates a link between one of the annotation in a CM4Di SheetSet and one of the Drill Down sheets. In the example below the Drill Down SheetSet has been created with five sheets: Full Trend, Full Histogram, Full Xb-R, Distribution Analysis Chart, and Feature Graph. Linked Reports will be defined for an annotation used in a CM4Di SheetSet.
Right-click the annotation and select define from the Linked Report menu.

The Sheets dialog will appear. Select one of the sheets in the SheetSet with the Drill Down Interactive Usage Type. After clicking OK, the annotation will be linked to the sheet that was selected.

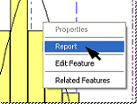
Save the CM4Di Document and open CM4Di. The linked report can be viewed by right-clicking one of the reports. Select the name of the Drill Down report to display the report. Right-clicking the drill down report and selecting Report from the menu will return to the report.

