Annot Properties - Leader Tab
The Leader tab of the Annot Properties dialogs allows you to modify the size and appearance of the leader lines attached to that annotation.
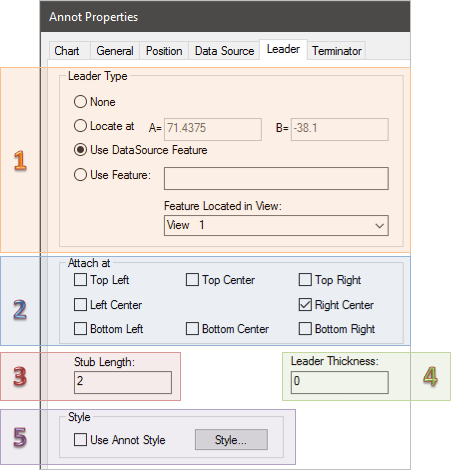 1. Leader Type
Select one of the following to choose your leader type.
None
You select this button to clear an existing leader, if any, and indicate that no leaders are desired for this annotation.
Locate At
Used to locate the leader’s arrow at a specific end-point on the sheet. Specify the sheet position in the " A=" and " B=" edit boxes. " A=" relates to the horizontal position, " B=" relates to the vertical position.
Use DataSource Feature
Select this button to use the feature selected for the annotation’s DataSource property. The DataSource property must resolve to a single feature or no leader will appear.
Use Feature
You can make the leader line point to a specified feature by selecting Use Feature and entering the name of the feature in the box. Since the same feature can appear in many different View annotation, you must also select a view from the Feature Located in View list.
2. Attach at
By selecting the check boxes, you can indicate where you would like your leader lines to attach. For example, if you want your leader lines to attach only to the bottom center of an annotation, you would select only Bottom Center.
If you are creating a CM4Di Startup Template, make sure to select all possible attachment locations to ensure that your reports are displayed correctly once run in CM4D Interactive.
3. Stub Length
Stub length refers to the length of leader line attached to the source annotation, before it turns toward its destination.
4. Leader Thickness
Enter a numerical value in the leader thickness box to adjust the thickness of the leader line. A value of zero defaults to a thickness of one.
5. Style
Use this button to edit the style properties for the leader. Leader style properties will affect the leaders line and arrow appearance. See Style Properties for more information.
Can we improve this topic?