DataSmithBatch Manager
The DataSmithBatch Manager is the user interface for defining the settings used by the DataSmithBatch service for processing jobs.

Enter filter text here - Enter a string to filter down the entire grid to only rows containing text matching the string entered. This filtering is dynamic and will update the grid as you type.
Drag a column header here to group by that column - See the topic DataSmith Batch Manager Grid Controls for information on how to use the grouping and sorting options available in the Grid area.
Columns - The available columns can be used to sort and group the results of a search.
Field Chooser - To access any additional or removed columns, right click in the column header area and select Field Chooser. Drag the column names into position in the column header area and close the Field Chooser dialog.
If you are using a Site Database with Authentication, you must have the "Batch Manager" privilege in Site Manager to be able to run DataSmith Batch Manager and create or edit Batch jobs.
Batch Processor Settings
The Batch Settings are global settings which will be applied to every job created in the DataSmith Batch Manager.
File Path
The File Path field indicates the location of the DataSmithBatch.settings file, which is the file where all of the settings and jobs defined using the Batch Manager are saved. The DataSmithBatch settings file lives in the CM4D install folder (Program Files\CM4D) by default, but can be assigned any local directory. Clicking Make Default sets a user-defined path as the default directory in the System Registry. Every time a new path is selected, a settings file will be created in the chosen directory. All previous setting files will remain and can be accessed by re-selecting the file path in the File Path browse field.
The user running DataSmith Batch Manager must have permissions on the registry to assign the Default Batch Settings path. If the user running the Batch Service does not have the required permissions, the following message will appear when you click the Make Default button: "See your Administrator for access permissions to the registry."
Retry Interval (Minutes)
The Retry functionality in DataSmith Batch provides a means of an automatic recovery, should your Database or DataSmith file server connection fail. Any files being processed at the time of the failed connection will be sent to a corresponding Retry folder (RetryDatabase, RetryOutBox, or RetryErrorBox) that is automatically generated by DataSmith Batch within the main Batch Folder. DataSmith Batch will scan the Retry folders to determine if there are any files present. If any of the three Retry folders contain files with a timestamp older than the set number of minutes, those files will be pushed back into their respective folders for processing.
It is recommended to leave the default Retry setting of 30 minutes, unless specific problems (e.g., problems with file recycling, frequent Database drops, etc.) require a faster retry time.
Concurrent DataSmith Processes
More than one DataSmith Process (thread) can be run at a time in order for DataSmith Batch to process multiple data files simultaneously. However, this number must be set according to the hardware DataSmith Batch is running on to avoid overloading the system.
On a system with a single processor, any more than two concurrent processes will likely congest the system. On a server machine with multiple processors, however, more than two concurrent processes may be acceptable, although this should be monitored and adjusted accordingly so that the server does not become overloaded.
Max Cached DB Connections
The Max Cached DB Connections setting refers to the number of Database connections that are permitted to be stored at one time. Once the set number of connections has been filled, the oldest Database connection will be thrown out first in order to make room for a newer connection cache.
Batch Processor Jobs
The Batch Processor Jobs section lists all of the batch jobs available and allows you to change the properties applied to each Batch job individually. All Batch property settings are stored within the DataSmithBatch.settings file.
Sorting
Batch Jobs may be sorted alphabetically (ascending or descending) by clicking on the column you want to sort by, or within Groups. See the DataUtility documentation for more information on the Grouping mechanism.
Multiple Select
More than one Batch job may be selected at one time by using the standard Windows multiple select keys. Multi-select may be useful when setting the Job Status of more than one job, or when selecting which jobs you want to monitor in the File Count dialog.
To select one row at a time, hold the Ctrl key and click on the rows that you want to select with the cursor. Release the Ctrl key when you have finished making your selection.
To select a range of rows, click the first row that you want to select, hold the Shift key, and then click the last row in the series of rows that you want to select. Release the Shift key when you have finished making your selection.
Batch Folder
The Batch Folder is the central hub of the Batch Processor, and must be on a local drive on the system where the Batch Processor is running. When the Batch Service is started, the Processing folder and the three Retry folders will be automatically generated as subfolders of the Batch Folder. Where the Batch Service generates the Inbox, Out Box, and Error Box is dependent on the paths entered in each respective field within the Batch Manager.
See the topic DataSmith Batch Folders for more information and examples.
Batch User
The Batch User is the user that will be used to run the Batch job. The user names available in the Batch User column will depend on whether you are using a Site Database or an unmanaged database. See here for more information on the requirements for Batch Job Users for either a Site Database or an Unmanaged Database.
A disabled menu (grayed out) may indicate that either you are not connected to a Site Database or there are not any users available with the Batch User privileges.
In order for the Batch processor to run, there must be a user selected from the Batch User menu. If a user is not chosen (this field is blank by default when a new batch settings file is used), Batch will log the error "File Status: File Has Errors! DataSource "[DataSource Name]" has lost connection!".
Cause for Unreasonable
An existing cause can be assigned to unreasonable data by entering a valid cause label in the Cause for Unreasonable field. If you enter a valid label, causes will be assigned where values exceed reasonable limits. If you leave this field empty, or enter a bad cause label, no causes will be assigned. Cause Labels can also be assigned using the Output Setup dialog in DataSmith.
- A feature has reasonable limits (i.e. both a high and a low reasonable limit). When reading in each actual, the actual is checked to see if it is between the high and low values. If it is not between the limits, then the value is considered not reasonable, and the cause will be assigned.
- If reasonable limits have not been defined for that actual's feature characteristic, no comparison can be made as to what is reasonable or unreasonable, so causes cannot be assigned.
- When processing files in DataSmith, feature characteristics are not calculated.
If there are reasonable limits for a Position characteristic, but the data file only contains X, Y, and Z characteristic values, a check for reasonable limits cannot be performed. For this case, the X, Y, and Z characteristics in the data file should have reasonable limits.
Configs
DataSmith Batch will only processes the Configs listed in the Configs section of the Batch Properties if set to Process. The Configs list is populated automatically based on the DataSmith Document selected for the current job. If your DataSmith file contains multiple Configs, and you do not want to use all of them, select only the desired Config(s) and leave the unwanted Configs check boxes unselected.
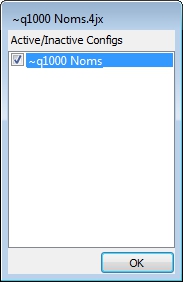
If a new DataSmith document is selected, but has the same Config name as the previous translator, Batch Manager will register the matching Configs as the same Config, and the new Config will remain active (set to "Process"). If the new Config label does not match the previous label, the Config will then be reset to the default "Inactive".
There must be at least one Config enabled in order to validate the Batch process, so if you only have one Config in your translator file than make sure that it is selected (made Active). If there are no Active Configs in this section, DataSmith Batch will not be able to process data.
DataSmith Document
Enter the local (or UNC) path in the field or Browse to the DataSmith file (*.4datasmith) that will be used to translate your data files.
Batch Manager will automatically populate the Configs column dialog with the Config labels that exist in the selected DataSmith file. Please note, however, that all Configs are unchecked by default. At least one Config must be set to Active (check box selected) in order for DataSmith Batch to be able to process any data.
Default DataSource
The default datasource is the datasource automatically selected for processing data by DataSmith Batch. Any DataSources available in the Site or in your Cm4d.4ds file will appear in the DataSources list. The default datasource is determined differently depending on whether or not you are using a Site database.
Site
A Site database is able to use Routine Codes or Associations to identify which DataSource a particular file is connected to.
No Site
If DataSmith Batch cannot identify a DataSource (Database) ID, as indicated by the Routine code or Association, during processing, it will output the data to the default DataSource selected in the Default DataSources menu of Batch Manager. If a site Database is not being used, you must select a default DataSource for each job from the DataSources section of the Batch Job Properties.
Errorbox
The Errorbox folder stores any files that the translator could not process for one reason or another. When a file is moved to the error folder, a .ERR log file is generated to correspond each data file, listing the reason for the error. The Batch ErrBox is defined as a relative folder by default, but can be assigned any user-defined directory (local or UNC path).
Exc Specs
Batch retrieves the entire contents of the Inbox (as specified by the *.* wildcard parameters unless you specify which file types you want to retrieve. To retrieve all files except those with a specific file extension, type the file extension between the two wildcard symbols (*.*). The Exclude field is a semicolon delimited list and is not case sensitive. Exclude is also defined as an OR operation (not AND), meaning that a file only has to match one of the specs to be excluded.
Example 1: To retrieve all files except those with the extension .err, enter the following: *.ERR in the Exclude Specs field.
Example 2: Multiple Exclude specs such as "J56", "S197", or "Q84" would be entered as "*j56*;*S197*;*q84*".
Inbox
The Inbox folder is the first destination for all data files that will be processed by DataSmith Batch. The Batch Processor will retrieve data from the folder designated as the Inbox and transfer it to the Processing folder to be processed. The Batch Inbox is defined as a relative folder by default, but can be assigned any user-defined directory (local or UNC path).
Inc Specs
Batch retrieves the entire contents of the Inbox (as specified by the *.* wildcard parameters) unless you specify which file types you want to retrieve. To retrieve only files with a specific file extension, type the file extension between the two wildcard symbols (*.*). The Include field is a semicolon delimited list and is not case sensitive. Include is also defined as an OR operation (not AND), meaning that a file only has to match one of the specs to be included.
Example 1: To retrieve only files with the extension .tab, enter the following: *.tab in the Include Specs field.
Example 2: Multiple Include specs such as "J56", "S197", or "Q84" would be entered as "*j56*;*S197*;*q84*".
Job Label
Define a name for your job using the Job Label field. Job labels should be only be used once.
Jobs used in CM4D Upload Portal Jobs - If a Job Label is changed in DataSmith Batch Manager, any upload portal settings and permissions for the job in Configuration Manager will no longer be associated to that batch job.
Job Permissions
Job Permissions may be set for each job by double-clicking the field. If none of the check boxes are selected for any of the Job Permissions, DataSmith Batch will not process any data. At least one permission must be selected (Update Samples is the most commonly used).
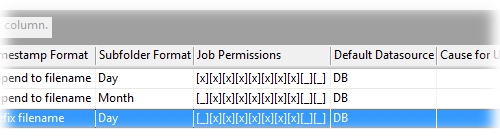
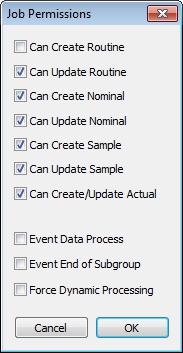
Each [_] represents a permission (in order as they appear in the Job Permissions dialog), and if the permission is enabled, the field will appear a an [x]. The image above shows the default permission settings as they appear in the image of the Job Permissions dialog below.
Since the first seven Create/Update permissions are the same in DataSmith, see the topic Output to Database for more detail on those permissions.
If you are using a Site Database, these Job Permissions are not enough to allow changes to the data in the database. In addition to the Batch User permission in SiteManager, the Batch Job User must also be assigned the appropriate Data Manager privileges in order to be able to add new data or make changes to existing data in the database. The most common privileges given to Batch Job users is the Create Sample and/or Modify Sample.
Event Data Process
When the Event Data Process option is selected in the DataSmith Batch Job Permissions and the monitor flag is set on the routine using DataUtility, DataSmith Batch will place events in the Scheduler Job Queue.
Event End of Subgroup
When Event End of Subgroup is selected in the DataSmith Batch Job Permissions and the monitor flag is set on the routine using DataUtility, DataSmith Batch will place events in the Scheduler Job Queue.
Force Dynamic Processing
When the Force Dynamic Processing option is selected in the Job Permissions and the flag is set on the routine (using DataUtility or DataSmith), DataSmith Batch will trigger CM4D Scheduler to process Dynamic jobs even if a Static job has already been triggered for the same Routine. If this option is not enabled, and a Static and a Dynamic job exist for the same routine that was triggered by data being processed through Batch, then only the Static job will be sent to the Scheduler Job Queue.
Job Status
The Job Status category is the traffic signal, so to speak, for the DataSmith Batch processor.
Active
When the Job Status is set to Active (highlighted in Green), DataSmithBatch will process data files for the selected job.
Suspended
If the Job Status is set to Suspended (highlighted in red), all processing is stopped for that job. DataSmithBatch will not check that In Box for files. Setting the Job Status to Suspended will not interfere with the completion of currently processing data; Batch will simply resume at the point it left off when Status returns to Active.
Update Pending
If a the Job Status field (Active or Suspended) is highlighted in yellow, the Job Status has been changed and must be saved before the new Status will take effect. If Batch Manager is closed before the change is saved, the pending status update will be lost.
Status Legend
A legend is available in the user interface to remind you what each color in the Status field indicates. These colors only apply to the Job Status field.

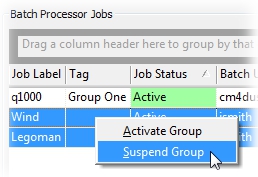
Group Activate/Suspend
The Batch Processor Jobs grid allows you to Activate or Suspend more than one job at a time. Once the jobs you want to set the status on are selected, right click on one of the highlighted rows and select either Activate Group or Suspend Group.
Max_Files
Max Files refers to the maximum number of data files you wish to process at one time from one Inbox. This number is per DataSmith process, as set in the Concurrent DataSmith Processes section of Batch Manager.
Outbox
The Outbox folder contains a copy of all the files that DataSmith Batch successfully processed and marked with a date/time stamp. The Batch Out Box is defined as a relative folder by default, but can be assigned any user-defined directory (local or UNC path).
Subfolder Format
Processed files can be organized in subfolders by day or month in the Out Box and Error Box. For example, if Day is selected from the Subfolder menu, a subfolder labeled with the current day's date will be created to hold processed files in the Out Box. If any errors occur during processing, then a parallel subfolder labeled the same way will be created in the Error Box. Folders are only created on days when files are processed. The same would apply if Month is selected, with the exception that folders would be created only once a month as files are processed.
Tag
A Tag is a user-defined text string that may be used for sorting or organizing jobs within the Batch Processor Job grid.
Timestamp Format
When a file is passed from the Inbox to the Processing folder, DataSmith Batch will apply the date/time stamp and a new file extension to the data file as specified in the Timestamp Format section of the Batch Manager.
If you use one timestamp format, then decide you wish to use another, the old time stamp will not be deleted from the filename of data files that have already been processed. DataSmith Batch will simply begin using the updated Timestamp Format for all subsequent files. If a file is being reprocessed, and already has a timestamp assigned to it, as long as the current Batch timestamp format is set to the same format as the reprocessed file (i.e. the filename formats match exactly), the timestamp will be updated to the new date and time.
If the file Body-In-White ^ LH_DMIS000115_06-02-21_11-40-14.dmo is reprocessed one month later, the file name would then be labeled Body-In-White ^ LH_DMIS000115_06-03-21_08-23-55.dmo. The only part of the filename that would be modified would be date/timestamp.
Prefix Filename
Adds the time stamp to the beginning of the filename (year_month_day_hour_minute_second_filname.txt).
Append to Filename
Adds the time stamp after the filename, but before the extension (filename_year_month_day_hour_minute_second.txt).
New
To create a new Batch job, click the New button.
Copy
If you would like to copy a job and all associated property settings, select the job row in the grid and click the Copy button. The copied job will be duplicated and assigned a default name (Copy1 of..., Copy2 of..., etc.). The job name can then be modified in the Job Label column.
Remove
If you wish to delete a job, select the job row in the Batch Processor Jobs grid and click the Remove button. Click OK to confirm deletion of the job.
Field Chooser
If you do not have all of the listed columns showing in the Batch Processor Jobs grid, click the Field Chooser button located on the bottom of the DataSmith Batch Manager user interface, to the right of the File Counts button. Select the field you wish to use from the Available Fields dialog, drag and drop it into the Batch Processor Jobs column header.
See the topic Grid Controls for information on how to use the grouping and sorting options available in the Grid area.
File Counts
The File Counts dialog shows the number of files that are currently in each Batch folder. To open the File Counts dialog, click the File Counts button located on the bottom of the DataSmith Batch Manager interface, between the Remove and Field Chooser buttons. Only the Batch jobs that are selected (highlighted) in the main grid area will be counted. To select more than one Batch Job, use the multiple select options.
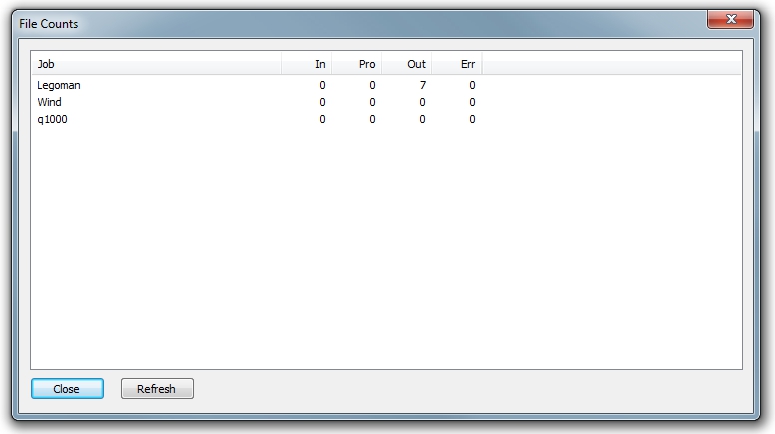
When the DataSmith Batch folders are counted, only the four main batch folders (Inbox, Processing, Outbox, and Errbox) will be counted, along with the most recent first-level sub-folders (day or month). If you are not using subfolders, all files in the main four folders will be counted.
If you have subfolders created by month, only files in the four main folders and any subfolders for the last month will be counted. Any files that exist in a previous month's subfolder will not be included in the count.
Close
To exit the File Counts dialog, click Close.
Refresh
To refresh the display of the File Counts dialog, click Refresh. Although DataSmith automatically refreshes the File Counts dialog on a regular basis, you can force a refresh manually to ensure up-to-date counts.
Revert
The Revert button will restore the DataSmith Batch Manager and any jobs to the last saved state.
Save
The Save button will save any changes made within the DataSmith Batch Manager.
Save & Exit
The Save & Exit button will save any changes and then close the DataSmith Batch Manager.
Exit
The Exit button will close the DataSmith Batch Manager without saving any changes.
Can we improve this topic?