 ) so the view has a blue border.
CM4D Reporter is easier to operate with a mouse. The mouse button controls are slightly different when manipulating the sheet area than when editing a view image in a report. In order for the 3D Image controls to be active, the View must be in Edit Mode. To put a View into Edit Mode, double click the view area or click () so the view has a blue border.
|
|
Display Frame |
Hides or restores the frame surrounding the sheet in the display region |
|
|
Rotates the report aspect between Landscape to Portrait. |
|
|
|
Switches the report size between standard and extended. |
|
|
|
Zoom Tool |
Zooms the viewing area of your sheet by clicking the zoom tool icon and drawing a box around the area you want to zoom |
|
|
Zoom Fit |
Zooms the report to fit within the report window area. |
|
|
Zoom Fit 3D |
Zooms the image to fit within the borders of the view area. |
|
|
Edit View |
Puts the View into Edit Mode. |
|
|
Allows you to add or move a leader line to a View image. |
Drilldown Reports are further refinements of a single annotation which display the data for that feature in several types of charts, graphs, and tables on a single sheet.
1. To view a Six Pack report, or drill-down of a single feature double-click the annotation, or right-click on it and select Six Pack from the menu.
2. To return to the main report, double-click anywhere on the Six Pack Report, use the Backspace key, or right-click and select Report from the menu.
With the Sample Control Toolbar you can select which sample you would like to view or activate for the report. The name of the current sample is displayed in the menu in the center of the toolbar.

1. To view different samples of your data, use the Sample Control area of the toolbar. Use the red arrows to navigate to a different sample.
2. To navigate to a specific sample, select the sample label from the dropdown menu.
The Sheet Control toolbar may be used to navigate between sheets when a report contains more than one sheet.

1. Each Sheet displays a set of features, so you can use the dropdown menu to select a specific sheet. If you want to view all of the sheets in the report, select Array from the menu.
2. As with the red Sample Control buttons, use the blue navigation arrows of the Sheet Control to move from one sheet to another.
By default, the only toolbar buttons available to zoom the sheet are the Zoom Fit and Zoom Tool buttons. Click ( ) to zoom the report to the available report area. Use (
 ) to click and drag an area of the sheet that you want to zoom to.
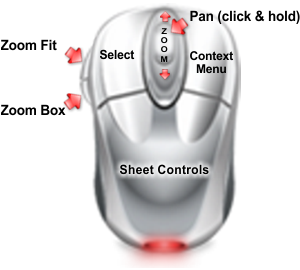
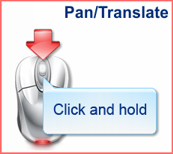
Additionally, you can use the mouse buttons and scroll wheel to manipulate the zoom and position of the sheet.
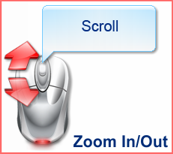
1. Scroll the mouse wheel to zoom the main report display in and out.
2. Hold down the mouse wheel to pan, or drag, the sheet within the display window.
3. To fit the sheet to the size of your display window, select the () from the tool bar.
If you have a 3D image for your part, you can also manipulate the orientation and zoom of the image in the report. By default, the only toolbar button available to zoom the 3D image is the Zoom Fit 3D button. Click ( ) to zoom the image to the available view area.
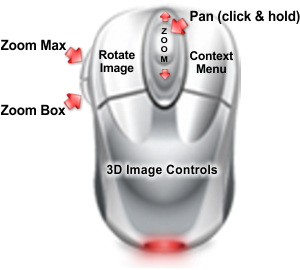
Additionally, you can use the mouse buttons and scroll wheel to manipulate the zoom and position of the image within the view.
1. To do this, click on the image or use the Toggle Edit Mode ( ) button.
2. When the view is in Edit Mode, it will have a purple border.
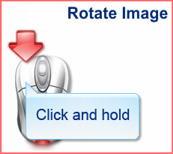
3. Click and hold with the left mouse button to rotate the image within the view on the report. To zoom the image in and out, scroll the mouse wheel back and forth.
4. You can also right-click to Zoom Max, In, or Out, as well as to orient the image along specific axes. Clicking outside the purple border will close Edit Mode.
To view a video tutorial on how to use CM4D Reporter, visit our YouTube channel here: http://youtu.be/FREiLtjIUh0.


