It is common for users of the same system (or group of interconnected systems) to be able to change the display language by choosing from a list of available languages.
The Languages blade of the System Configuration plug-in is used for the following:
Install new language pack
Replace existing language pack
Disable/Enable language
Set the default language for all applications
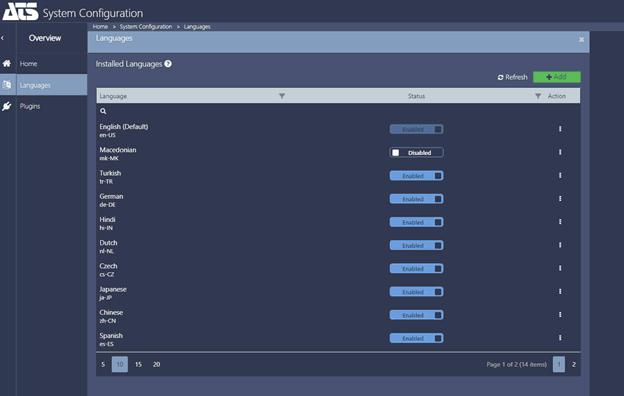
The Languages blade provides an overview of the installed language packs in the system. The enabled languages are available to users across all applications
Language packs are available for different languages. Each language pack contains localised resources for one language and culture. The language-culture pair can be read from the name of the language pack file.
LanguagePack.v1.ATS.de-De.xlsx.
Each language pack can contain localised resources for one or more applications. During the installation process, a blade with these applications will be shown.
Install new Language Pack
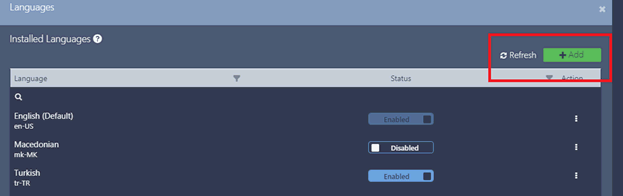
Open the System Configuration plug-in and navigate to the Languages blade.
Click on the Add button in the top right corner of the blade.
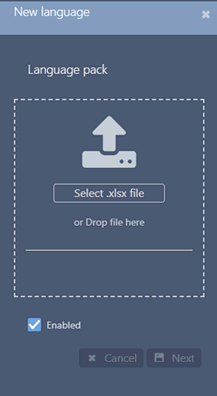
Select the language pack file or drag and drop it to the area indicated.
If the language is to be made available immediately across all applications, select the Enabled check box.
Press Next.
A blade with the language pack details is shown.
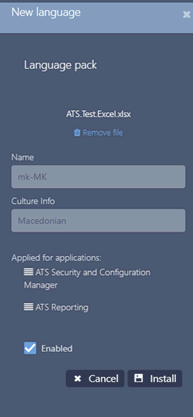
This blade displays the language name and culture, and the list of the applications that will be affected after the installation of the language pack. The list also provides information on the content of the language pack and contains localized resources only for those applications.
Press Install.
If the language pack is installed successfully, the changes are applied immediately and the language can be made available system-wide.
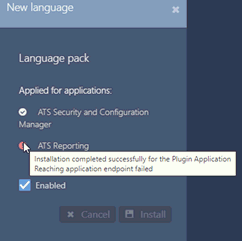
There may be instances where the installation of the language pack is not completely successful for all applications. In this instance a red icon with an exclamation point indicates the affected applications.
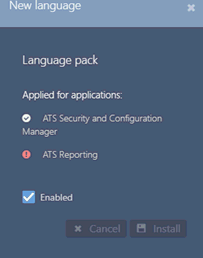
The reason for the failure can be identified by hovering over the affected application.
Replace existing Language Pack
Open the System Configuration plug-in and navigate to the Languages blade.
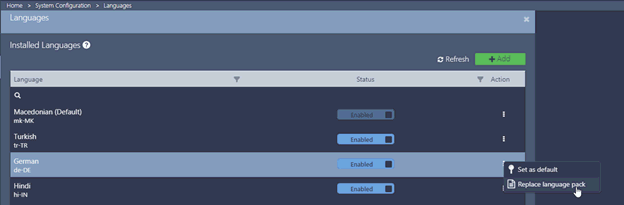
From the grid of available languages, click the ellipsis adjacent to the language to be replaced to open the context menu.
Select Replace language pack.
Follow steps 3 to 7 of the Install new Language Pack section above to install the new language pack.
Enable/Disable Language
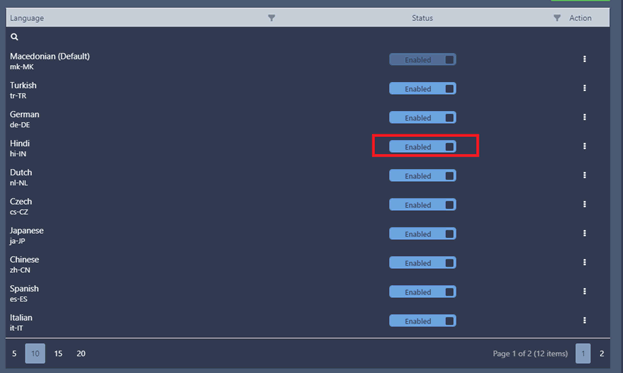
Changing the state of a language can be achieved by clicking on the switch to enable or disable individual languages from the grid.
Open the System Configuration plug-in and navigate to the Languages blade.
From the grid of available languages, press the Enabled or Disabled switch adjacent to the language to disable or enable the language pack.
Changes made to the state of a language are applied immediately across all applications. Only the list of enabled languages will be shown in the event a user wishes to change the display language.
Should a language that was in use be disabled, all applications that used the disabled language pack will revert to the default language.
Set Default Language
The current default language is always shown at the top of the grid and is indicated with the word Default.
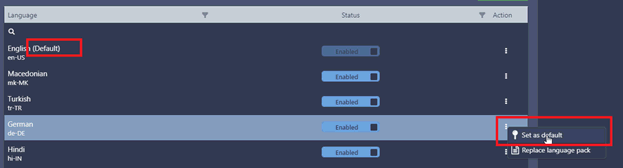
To change the default language:
Open the System Configuration plug-in and navigate to the Languages blade.
From the grid of available languages, click the ellipsis adjacent to the desired language to open the context menu.
Select Set as default..
A successfully set a default language message is displayed to indicate that the language has been set as the default.
If a disabled language is set as default, then this language will be automatically enabled.
Configure Supported Languages
The supported languages are configured centrally for ATS Configuration Manager and all installed plug-ins. In the event that a language pack is not configured for a certain plug-in, the default language will be used.
The available languages that be selected are configured in the appsettings.json file located in C:\\inetpub\wwwroot\ATS.ConfigurationManager.
This file can be edited with a text editor.
The text editor must be run with administrator privileges so that changes can be saved.
The language settings must be specified in the following format:
"ISO-639 Language Code-ISO-3166 Country Code": "LanguageLabel"
For example:
"en-US": "English"
The LanguageLabel is the text (caption) of the language option that appears when selecting languages from the Change language user option.
These settings should be grouped under the languages configuration group in the appsettings.json file. The example below shows the configuration of three languages: English, Macedonian and Turkish.
Sample language settings:
"languages":
{
"en-US": "English",
"mk-MK": "Македонски",
"tr-TR": "Türkçe"
}
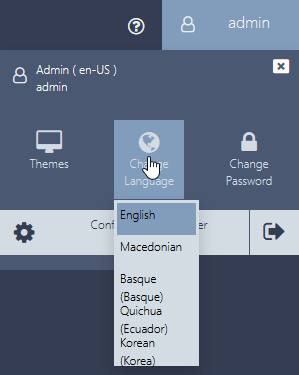
Languages in the Change Language user option are displayed in alphabetical order..
When configuring languages with specific encoding it is important to save the settings file (appsettings.json) with the UTF-8 encoding.