Inspect allows the user to work in multiple languages.
To display buttons, parts, components, and other items in an operator's native language, you can specify the language to use as part of the user's profile from the Users menu. After specifying a user's language, the administrator must provide the translated terms for each of the elements that should appear in the user's native language.
The default language is specified when the database is created and cannot be changed.
At initial setup, the number of languages required to be supported for Data Collect is pre-set. If an additional language needs to be added later, contact ATS for assistance in making the necessary modifications.
By selecting a Current Language you can enter translations in that language for items that the user is going to deal with (plants, parts, concerns, etc.).
The list of available languages can be modified in Configuration > Language Setup > Languages by setting languages to active or inactive.
1. Click the language drop-down list in the toolbar.
2. Scroll through the list and select the desired language.
The following steps will add translations for Parts that have already been added to the database. This method also applies to all other translatable items:
1. Make sure that the current language, in the language drop-down list in the toolbar, is set to the language that the Part is going to be translated into.
2. Click the Parts toolbar button.
An asterisk (*) in the Description column identifies the parts that have not yet had a translation specified for the current language.
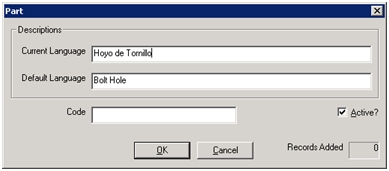
3. Select the Part to be translated and click Edit....
4. In the Current Language box, type the native language equivalent.
5. Click OK to return to the previous dialog box.
6. Repeat as necessary to define native language equivalents for all desired parts and then click Close to close the Parts dialog.
7. After you have defined the elements, assign the language to a user.
A language can be assigned to a user in Security Manger.
For further information refer to the Security Manager documentation.
When the user next logs in to his/her station, the native language equivalents appear. Items that do not have a translation appear in the default language, flagged with an asterisk.
Each report in the Reporting application has a specific name and is placed into a specific category. Using Inspect Admin, users can easily change the names of the individual reports or the names of the categories in which the reports are placed.
1. Click Configuration > Language Setup > Reporting > Report Categories.
2. Highlight the category you wish to rename and click Edit.
3. In the Current Language field, type the translated report category name.
4. Click OK – the report category is renamed.
1. Click Configuration > Language Setup > Reporting > Reports.
2. Highlight the report you wish to rename and click Edit.
3. In the Current Language field, type the translated report name.
4. Click OK – the report is renamed.
As units are repaired and inspected, their defect status and repair status change. For example, a unit's repair status may change from being "Not Repaired" to "Partially Repaired" before reaching "Completely Repaired." For some plants though, these terms may not apply. Administrators can therefore easily change the names used for Defect and Repair Statuses to names that will apply for their facilities.
1. Click Configuration > Language Setup > Defect > Defect Statuses.
2. Highlight the defect status you wish to rename and click Edit.
3. In the Current Language field, type the translated defect status name.
4. Click OK – the defect status is renamed.
1. Click Configuration > Language Setup > Defect > Repair Statuses.
2. Highlight the repair status you wish to rename and click Edit.
3. In the Current Language field, type the translated repair status name.
4. Click OK – the repair status is renamed.
Administrators can change the names for several different CAP-related items:
● Comment Types
● Statuses
● Types
● Audit Statuses
● Audit Types
The process for changing any of these items is as follows:
1. Click Configuration > Language Setup > CAP > {item}.
2. Highlight the item you wish to rename and click Edit.
3. In the first field, enter the new name of the item.
4. Click OK. The item is renamed.
For further information on CAPs please refer to the CAP Reports section.