 ). The following screen will appear.
In this Topic Hide
Entering Fixed Socket Information
Entering Flex Socket Information
Entering IBM WebSphere MQ Information
To use a communications server you must register it first.
1. Select the General tab.
2. Click the Communication icon (). The following screen will appear.
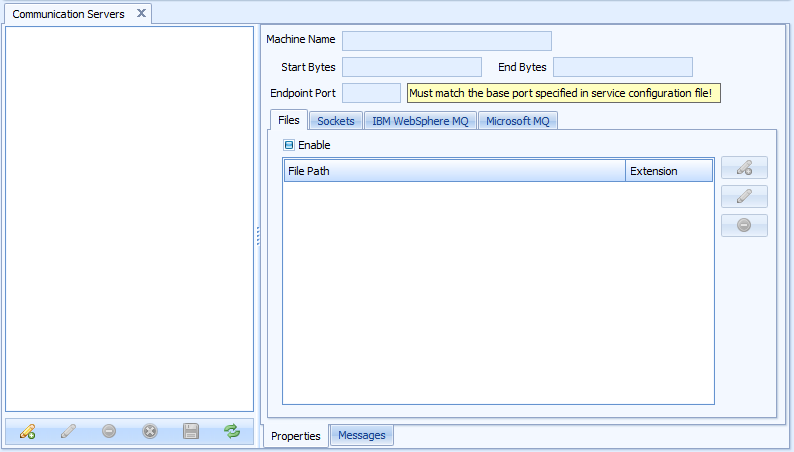
3. Click the add icon ( ) in the bottom left corner.
4. In the Machine Name field type the name of the server.
5. In the Start Bytes and End Bytes fields enter the characters that signify the start and the end of a message.
These characters must be a single byte and cannot appear anywhere else in the message.
6. Modify the WCF Comm Server Endpoint Port if required. The default is 8400.
Use the Files section to specify the settings for setting up ASCII text files. If you are not using text files, you do not need to enable it.
7. Click the Files tab.
8. Click the Enable checkbox to turn file changes on.
9. Click the add icon () in the Files section.
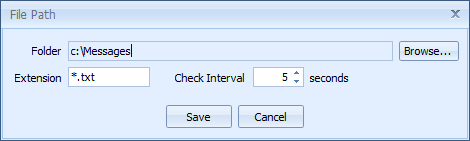
10. Click Browse and select the directory you wish to monitor for text files.
11. In the Extension field, enter the extension (wildcards are allowed) for the type of files you want Comm Service to read.
12. In the Check Interval field, enter how often (in seconds) you want Comm Service to check for files.
Use the Sockets section to setup a “TCP/IP” connection. If you are not using TCP/IP to send data, you do not need to enter information here.
13. Click the Sockets tab.
14. Click the Enable checkbox to turn file changes on.
The checkbox is checked by default where messages are received on the specified port number (socket listen port).
15. In the Fixed Port field, enter the TCP/IP port number that the service should monitor.
Ensure that this port number is not being used by another application running on the server.
The Flex Socket Ports list identifies the TCP/IP ports that do not adhere to the prefix/suffix format. The Flex Socket Ports can be used to handle messages from devices where formatting the data to these standards is not possible. Each port will be configured to receive a single message type (since there is no embedded “message ID” that identifies the type of data).
You can add new ports, edit existing ones or delete ones you no longer need.
16. Click the add icon () in the Flex Sockets section.
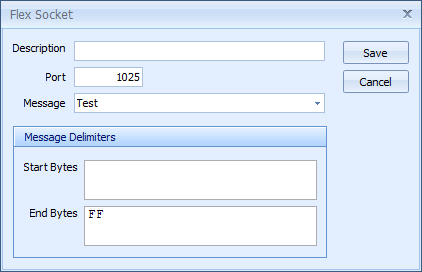
17. In the Description field, enter a unique description for the socket.
18. In the Port field, enter the TCP/IP port number that the service should monitor.
Ensure that this port number is not being used by another application running on the server. This value must be unique and cannot be the same as the port for the Fixed Socket messages.
19. Click the Message arrow and select one of the message types defined for Comm Servers.
For information on configuring Comm Service Messages, see here.
20. In the Message Delimiters section specify the Start Bytes and End Bytes for the message.
21. Click Save.
Add an IBM WebSphere MQ connection as follows:
22. Click the IBM WebSphere MQ tab.
23. Click the add icon () in the tab.
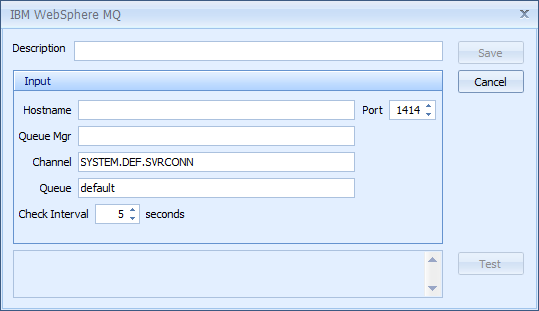
24. In the Description field, enter a unique description for the connection.
25. In the Port field, enter the MQ port number that the service should monitor.
Ensure that this port number is not being used by another application running on the server.
26. In the Channel field, enter MQ channel from which the application will read messages.
27. In the Queue field, enter the MQ queue name.
28. Click Save.
Add a Microsoft MQ connection as follows:
29. Click the Microsoft MQ tab.
30. Click the add icon () in the tab.
31. In the Description field, enter a unique description for the connection.
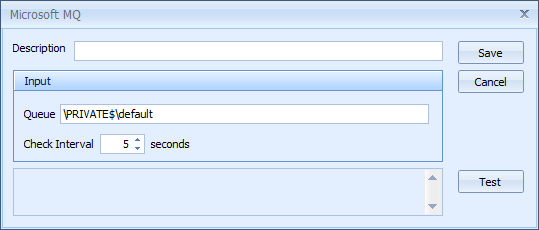
32. In the Queue field, enter the MQ queue name.
33. In the Check Interval field, enter how often (in seconds) you want Comm Service to check for files.
34. Click Save.
35. Click the save icon ( ) in the bottom left corner to save the server information.
It is possible to view the actual messages received by the server as follows:
36. Select a server from the list on the left.
37. Click the Messages tab at the bottom of the screen.
A list of the messages for that server is displayed.