In a general sense, the area/cell relationship allows components to be tracked by origin of build, allows technicians to specify the origin of a quality concern and allows reports to be filtered.
There are three main ways to configure production areas and cells.
● Assembly
Areas and Assembly Cells
Assembly areas/cells are defined as the production area and cell where
the component was installed on the product. A component is associated
to an assembly area/cell in Admin (see here).
When a concern is marked on a component it is then automatically linked
to that assembly area/cell. Inspect Reporting can then run quality reports
based upon where the part was installed.
● Recording
Areas and Recording Cells
Recording areas/cell are defined as the Inspection station where the defect
was entered. In Admin, you assign every inspection station a recording
area and cell. Inspect Reporting can then run quality reports based upon
where defects were entered.
● Responsible
Areas and Responsible Cells
Responsible areas/cells are defined as the production area and cell where
the root cause of the defect originated. The Inspect Repair operator can
select the Responsible Area and Responsible Cell selections on his/her
concern screen at a repair station. Inspect Reporting can then run quality
reports based upon the defects caused by a particular area or cell. The
responsible area does not necessarily have to be within your own facility.
Keep in mind that the vendor who supplies the parts could also be the
responsible area and/or cell.
The cells can now be associated to the Areas that contain them as follows:
| Area | Frame (FR) | Paint (PT) | Assembly & Inspection (AI) | N.A. |
| Cell | CNC (CNC) | Bath (BATH) | Wheel (WH) | N.A. (N.A.) |
| Cutting (CUT) | E-Coat (EC) | Pre-Assembly (PA) | ||
| Welding (WELD) | Enamel (EN) | Handlebar (HB) | ||
| Sanding (SAND) | Oven (OV) | Derailleur & Crank (DC) | ||
| Repair Frame (FR) | Decal (DE) | Packing (PK) | ||
| Repair Paint (PR) | Shipping (SHIP) |
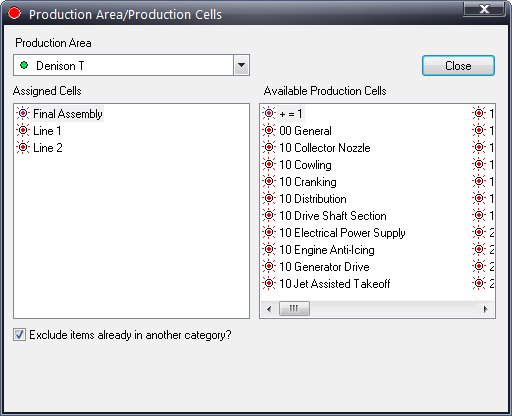
1. Click Plants > Areas > Area/Cell Relationships.
2. Use the Production Area drop-down list to select an area.
3. In the Available Production Cells list, highlight a cell and drag it into the Assigned Cells area. You can also select and drag multiple cells by holding down Ctrl and selecting the required cells.
4. To rearrange the order of the assigned cells, simply select a cell and drag it to a new location in the list.
5. Click Close.
You have now defined the layout of the plant in which the bike is being manufactured. In the next step you will define the shifts and crews that will be working within the plant.