 ).
).
In this Topic Hide
To see how this item is associated to other items refer to the Item Relationship topic here.
Add parts for all the items that need to be inspected. In an automotive inspection process, for example, you might define fenders, doors, engines, axles, window regulators, spark plugs, and so on. Any part or component that is to be inspected should be defined as a part in Inspect. Note that if your facility has a code for a part, that code can be entered in the Parts dialog box.
To prepare for your Inspect launch, you can save a lot of time (and possible data entry errors) by obtaining part information from existing sources, such as a parts database or an Excel spreadsheet.
After you add parts, you can assign them to image views or part categories for a product at a particular inspection station. The parts you add comprise a global parts list, which are not restricted to specific areas of the plant. If there are other administrators adding parts for other areas, be sure to avoid duplicating parts.
1. Select the Products tab.
2. Click Parts
().
A list of the existing parts and part folders is displayed.
3. Click the add icon ( ) below the right-hand pane.
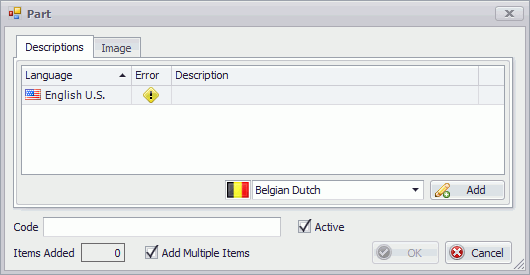
4. Enter a description and code for the part.
5. If required, enter a description
in another language by selecting the language from the drop-down list
and clicking the add icon (). You can then
enter a description in that language.
6. If required, add an image in the Image tab. For a description of how to add an image see here.
7. Click OK.
The part is added to the list.
Part Folders are used to make a large list of parts more manageable, since folders reduce the amount of scrolling you need to do.
8. Select the Products tab.
9. Click Parts
().
A list of the existing parts and part folders is displayed.
10. Click the add icon () below the Folders
pane.
11. Enter a description and comments, if required.
12. Click OK.
The folder is added to the list.
13. Drag a part into the part folder.
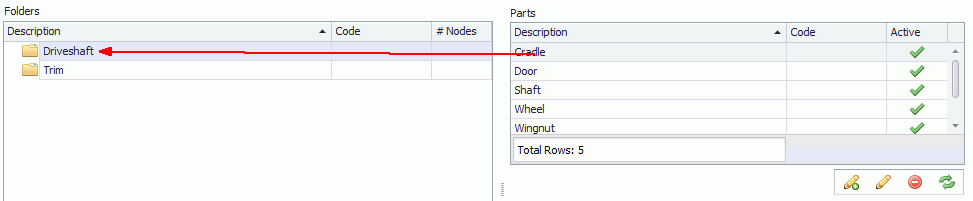
The part has now been added to the folder.
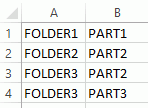
Parts and part folders can be specified in an Excel spreadsheet and then imported directly to the Inspect database.
There are three different import options. Each one requires a separate spreadsheet and different information as shown below:
Data being imported |
Information required in first two columns |
Parts |
Part description, Part code |
Part Folders |
Part folder description, Part folder code |
Part Folders / Parts |
Part folder code, Part code |
1. Create a new spreadsheet.
2. Fill in the required information as listed in the table above.
There is no header row.
If you are importing part folders and parts then you can include as many combinations as you like, as shown below.
3. Save the file with a descriptive name.
4. Select the Products tab.
5. Click Parts
().
A list of the existing part folders and parts is displayed.
6. Import as follows:
o Parts
- Click the Import button ( )
below the right-hand pane.
)
below the right-hand pane.
o Part
Folders - Click the Import button
()
below the left-hand pane, select Folders
and click OK.
o Part
Folders / Parts - Click the Import
button () below the left-hand pane, select Part Folders/Parts and click OK.
The Import Wizard window opens.
7. Click Next.
8. Either enter a file path or click the folder icon to locate and open the spreadsheet.
The spreadsheet information is checked to see if it is valid. Invalid data will be highlighted in red.
9. If required, select the Errors tab to see which data is incorrect.
Errors must be fixed in the original spreadsheet. You can then click
the Refresh button ( ) in the wizard to re-import
the spreadsheet.
) in the wizard to re-import
the spreadsheet.
10. Click Next.
11. If required, disable any items you don't want to import.
12. Click Next.
13. Click Finish.
The data is imported to the Inspect database.
You can divide a part into more than one section by creating sub-parts. For example, the door on a passenger vehicle could be divided into upper door and lower door or some other combination.
A sub-part paired with a location becomes a sub-component. Sub-components are invisible to the inspector collecting defects but are useful for giving greater location detail when tracking defects.
To add sub-parts carry out the following steps:
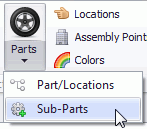
1. Select the Products tab.
2. Click Sub-Parts in the Parts sub-menu.
A list of the existing sub-parts is displayed.
3. Click the add icon ().
4. Enter a description in the default language.
5. Enter a short description. The short description is the same for all languages.
6. Click OK.
The sub-part is added to the list.
See here for information on creating sub-components using sub-parts.