View applications in the Applications grid
The Applications grid can be loaded by clicking on Open on the Security Card and click Applications menu option. The Applications grid shows information for all registered applications in two columns: Name (application name) and Status.
Each row in the Applications grid has a context menu, which can be opened by clicking on the context menu icon (...). There are two context menu option available: Open and Assigned rights.
View application details in the Application details blade
Selecting the Open option from the context menu loads the Application details blade on the right of the window. The Application details blade displays details about the Application such as its Name and Application ID.
The Application details blade has five tabs:
Properties: Displays details for the specific application, such as name, application ID, Application Status and description.
Rights: Lists the Rights that have been assigned to the application.
OAuth Clients: Displays the Name and Client ID of the application. After opening a client from the grid, details about the OAuth client are shown in the following tabs: Properties, Urls, Api Access, Secrets, Grant Types and Card Configuration. All tabs are informative and read only, except Card Configuration. In the Card Configuration tab three properties can be set and edited, Show on landing page, Redirect url and Upload image. If the Show on landing page property is selected, the card will be shown on the landing page with the uploaded image, and it will redirect to the url previously configured in the Card Configuration tab.
OAuth API resources: Specifies the APIResource, Display name and Description of the application.
Webhook receivers: Specify the Webhook name, URL, Description and Status.
All data in these tabs is read-only when in view mode.
View assigned rights in the Assigned rights blade
Selecting the Assigned rights option from the context menu loads the Assigned rights blade on the right of the window. The Assigned rights blade displays a grid of all users and their rights, which are associated with the respective application.
Application status
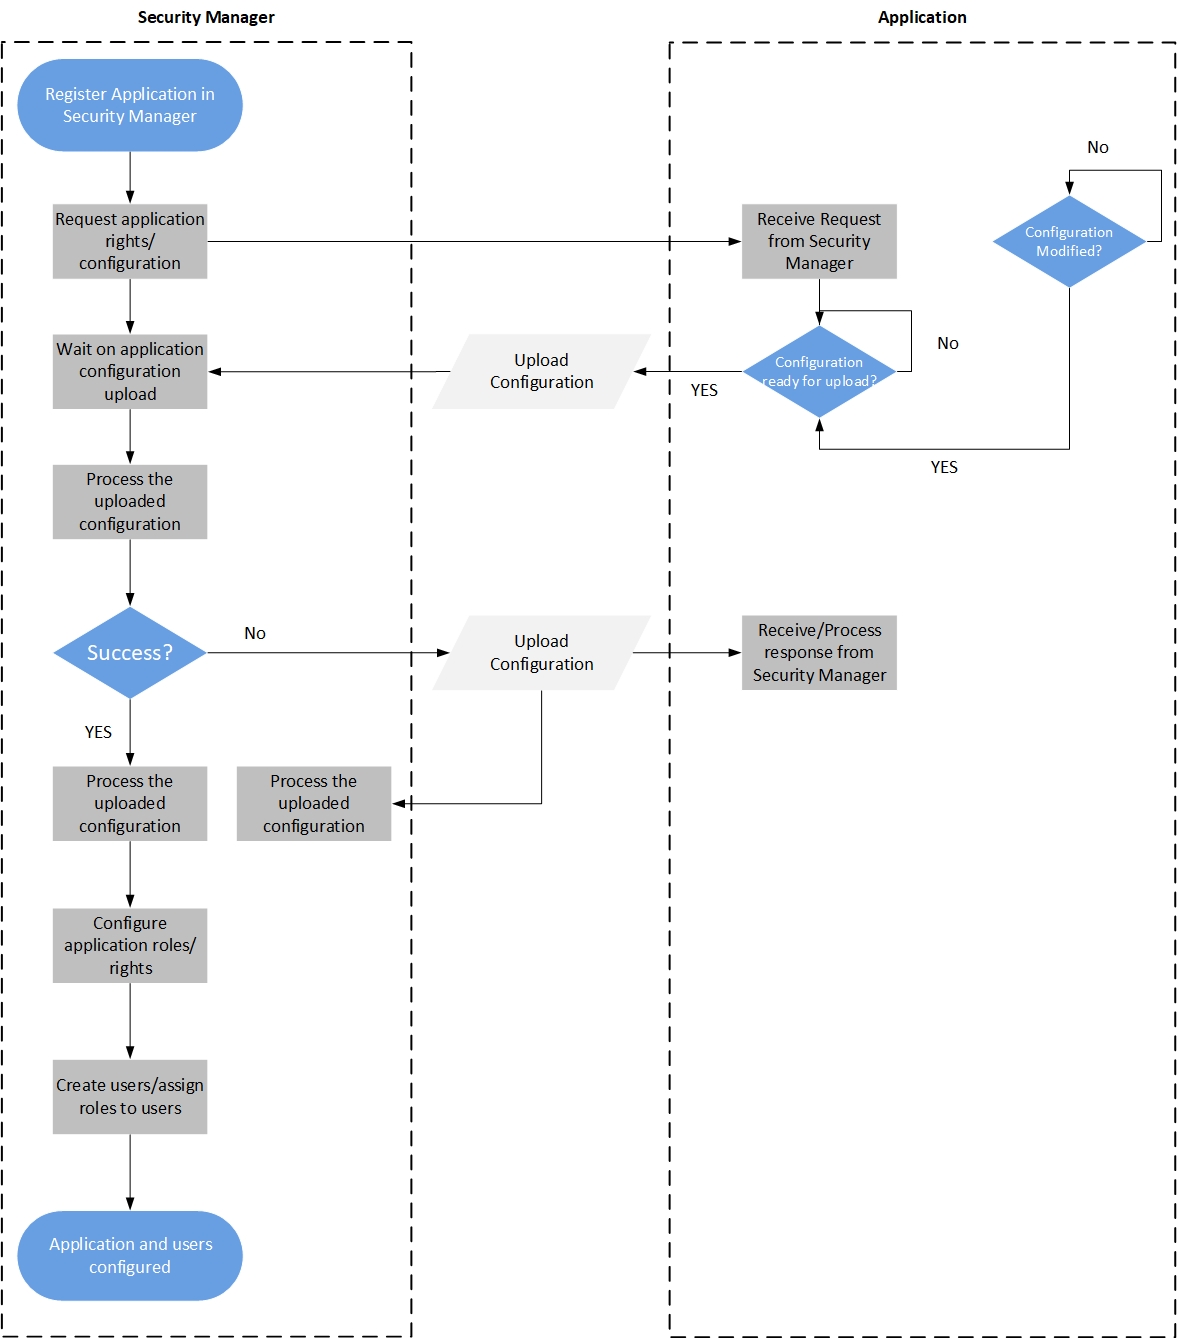
When an application is registered or added in ATS Security it is only a "placeholder" that specifies an endpoint to which ATS Security can communicate to get the actual application configuration. ATS Security sends a request to the new application for rights upload. The application receives this request and then uploads its configuration. In this workflow, an application can be in one of the following states:
Created: Application has been created.
Waiting on configuration upload: Following creation, ATS Security sends a request to the application to upload its configuration. This request would then be accepted by the application.
Request for upload failed: ATS Security was unable to send the request to the application.
Configuration uploaded: The application status after successful upload of the application configuration in ATS Security.
Failed upload: Applications in this state have failed to receive the configuration from the application.
The workflow diagram of the different application states is depicted below:
Edit applications in the Applications grid
Each row in the applications grid has a context menu which you can open by clicking on the context menu icon (...). The context menu options available in "edit" mode are:
Open
Assigned rights
Delete
Delete an application
Deleting an application removes all clients (client applications) and rights for an application from the ATS Security database. Clients from this application will no longer be able to authenticate users through ATS Security.
To delete an application:q
Select the Delete option from the application's context menu.
Click on the Yes button in the confirmation pop-up window.
A success notification appears once the delete operation is successfully completed. The deleted application is no longer visible in the applications grid.
Edit application from Application details blade
Selecting the Open option from the context menu loads the Application details blade on the right of the window. The Application details blade displays details about the application such as its Name and Application ID.
The Application details blade has five tabs:
Properties: Displays details for the specific application, such as name, application ID, Application Status and description.
Rights: Lists the Rights that have been assigned to the application.
OAuth Clients: Displays the Name and Client ID of the application. After opening a client from the grid, details about the OAuth client are shown in the following tabs: Properties, Urls, Api Access, Secrets, Grant Types and Card Configuration. All tabs are informative and read only, except Card Configuration. In the Card Configuration tab three properties can be set and edited, Show on landing page, Redirect url and Upload image. If the Show on landing page property is selected, the card will be shown on the landing page with the uploaded image, and it will redirect to the url previously configured in the Card Configuration tab.
OAuth API resources: Specifies the APIResource, Display name and Description of the application.
Webhook receivers: Specify the Webhook name, URL, Description and Status.
The Properties tab is loaded initially. There are Save and Save and close options at the top of the Application details blade - Profile tab.
Two options, Save and Save and close, are disabled until the contents of the fields are modified.
When clicking the Save option all the entered data is saved and the same blade stays opened.
When clicking the Save and close option all the entered data is saved, the blade is closed, and the user is redirected to the parent blade.
In addition, if the form fields in a details blade remain unchanged it is possible to work with the "parent" grid (the applications grid). Once modifications are made in the Application details blade the Applications grid becomes "disabled" and grid interactions are no longer possible until the changes are saved or the details blade is closed.
Navigating to another tab in the blade without explicitly saving any changes made in the previous tab will cause the changes to be lost. Clicking on the X button in the blade header closes the Application details blade, with any changes which were not saved being lost.
Edit application properties
To edit the application properties:
Make the desired changes in the Profile tab.
The Save and Save and close option becomes enabled.
Click on Save or Save and close.
In case some of the mandatory fields are empty or fields with custom validation have "invalid" values the Save or Save and close action will not be executed.
First fix all invalid form fields and then click Save or Save and close.
If the Save option is clicked, all entered data is saved and the application details blade remains open. If the Save and close option is clicked all entered data is saved, the blade is closed, and the user is redirected to the parent blade.
An appropriate push notification will appear depending on the outcome and the successfully edited user will appear in the top position of the Applications - All applications grid.
Request application rights
Depending on the application status the Request right option is displayed in the Application details blade - Properties tab. Click on this option to request rights for an application. An appropriate push notification will appear depending on the outcome.
Refresh application status
Applications can upload their updated configuration any time and this upload operation is not evoked from the user interface of ATS Security. While viewing or working with the application properties (Application details blade - Properties tab) it is possible to fetch the new i.e. current updated status of the application by selecting the Get status option. An appropriate push notification will appear depending on the outcome.
Select the Rights blade to view the new/updated rights in case of a successful rights upload operation. These are the rights that can be assigned to a role in the system and then provided in the authorisation token of the user assigned this role.
Upload application background image for the login page
When adding or editing an application you can upload an image to be used as background for the login page. Users viewing the login page from the client of an application with uploaded background image will see the application specific background image. For applications without uploaded background images the default background image will be displayed on the login page.
The same background image will be used for the following pages:
Change password
Forgot password
Reset password
User locked page
Error page(s)
Add Applications
Applications are registered with:
Name - unique name for usage in ATS Security UI
Description - optional property for closely describing the application
Photos - logo photo, background image to be displayed on login page when redirected from a client of this application
When the application is "pinged" by ATS Security on the Access Rights URL endpoint it receives the application ID under which this application is registered in ATS Security. Using this ID the application needs to upload its configuration to ATS Security. The application configuration consists of a list of clients (client applications) and API Resources protected in ATS Security. Also the application configuration contains the list of rights which can be assigned to users of the application. Optionally the application configuration can contain a section defining custom user fields which are relevant only in the application context.
- The values for these fields are set on user level as described in the Edit user application specific fields section.
Register new application
Applications are added or created through the Add application form blade.
The Add application form grid can be loaded by clicking on Add Application on the Applications Card.
To create a new application from the Add application blade:
Provide a name for the application. This name must be unique.
Provide a description for the application (optional).
Optionally upload a logo image and/or background image for the application. When no background image is uploaded the default ATS Security background image will be displayed in the login and related pages the user can access while not logged in.
Click on the Save or Save and close button.
If the Save option is clicked, all entered data is saved, the current blade is closed and an application details blade is shown. If the Save and close option is clicked all the entered data is saved, the blade is closed, and the user is redirected to the parent blade.
An appropriate push notification will appear depending on the outcome and a successfully created application appears in the top position of the Applications grid.