View users in the Users grid
The Users grid can be loaded by clicking on the Users icon on the Security Card. The Users grid shows information for the configured Users in four columns; Name, Username and Status.
Each row in the Users grid has a context menu, which can opened by clicking on the context menu icon (...). There are four context menu options available; Open, Delete, Deactivate and Effective rights.
The grid can be filtered by selecting one of the options from the Select Filter drop down menu:
Active users
Deactivated users
Locked users
By default, all users registered with ATS Security are displayed regardless of their status.
The Users - All users grid shows information for all users in four columns: Name (display name) and Username (used for login of local users), and Status. Each row has a context menu which you can open by clicking on the context menu icon (...). There are two context menu option available in view mode: Open and Effective rights.
Possible values in the Status column are:
Active: Active user accounts.
Deactivated: User accounts that have been deactivated.
Pending approval: Self-registered accounts that are yet to be approved.
E-mail not confirmed (since dd.mm.yyyy): Self-registered accounts that have not yet confirmed the registration e-mail address.
Locked: Indicates users accounts that are locked.
View user details in the User details blade
Selecting the Open option from the context menu loads the User details blade on the right of the window. The User details blade displays details about the User such as its Display name and user name.
The User details blade has the following tabs:
Profile: Displays details for the specific user, such as Display name, user name, account, contact information and the values assigned to the user for custom application fields.
Roles: List the Roles that have been assigned to the user.
All data in these tabs is read-only when in view mode.
View effective rights in the Effective rights blade
Selecting the Effective rights option from the context menu loads the Effective rights blade to the right of the window. The Effective rights blade displays a grid of all rights, which a user has and grouped by application. Each application has rights associated with it, so the grid contains all rights that a certain user has within each registered application.
Edit users in the Users grid
Each row in the users grid has a context menu which you can open by clicking on the context menu icon (...). The context menu options available in edit mode are:
Open, Delete, Deactivate, Effective rights: Displayed for active users.
Open, Delete, Activate, Effective rights: Displayed for deactivated users.
Open, Delete, Deactivate, Effective rights, Unlock: Displayed for locked users.
Open, Delete, Approve. Effective rights: Displayed for pending accounts.
Open, Delete, Effective rights, Resend invitation: Displayed for accounts that are yet to confirm their e-mail address.
Delete a user
To delete a user:
Select the Delete option from the user's context menu.
Click on the Yes button in the confirmation pop-up window.
A success notification appears once the delete operation is successfully completed. The deleted user is no longer visible in the users grid.
Deactivate/Activate a user
Only active users are allowed to login through ATS Security authentication. Deactivated users will be unable to log in despite providing valid login credentials.
To deactivate an active user:
Select the Deactivate option from the user's context menu.
Click on the Yes button in the confirmation pop-up window.
A success notification appears for when the user is successfully deactivated. The user is no longer visible in the users grid - active users view. To see deactivated users select the Deactivated users filter in the Users grid.
Steps to activate a deactivated user:
To activate a deactivated user:
Select the Activate option from the user's context menu.
Click on the Yes button in the confirmation pop-up window.
A success notification appears when the user is successfully activated. The user is no longer visible in the users grid - deactivated users view. To see active users select the Active users filter in the Users grid.
Unlock a locked user
Users can become locked after exceeding the maximum number of password attempts. Locked users cannot login to ATS Security until their account is explicitly unlocked by an Administrator or until the lockout duration expires and their account is automatically unlocked.
For further information on Lockout options, please click here.
To unlock a user account:
Select the Show only locked check-box in the Users - All users grid All users view.
Select the Unlock option from the user's context menu.
Click on the Yes button in the confirmation pop-up window.
A success notification appears for successfully unlocked user. The user is no longer visible in the users grid when the Show only locked check-box is checked. To see the unlocked user remove the check from this check-box.
Approve registration for a user
Users that register from the login page (when user self-registration is enabled) will end up in the Pending approval state when Administrator approval is required for self-registered accounts. The Users icon in the Security card in ATS Configuration manager home page and in the Users card in ATS Security home page will show a modified user icon when there are accounts in the Pending approval status.
Clicking on this icon will load the Users - All users grid filtered to show only the Pending approval accounts. To approve a pending account from the users grid:
Click on the Pending registrations button in the Users - All users grid All users view. This will load only the accounts with Pending approval or E-mail not confirmed statuses.

Open the context menu  for the user account with Pending approval status.
Select the Approve option from the user's context menu.
Click on the Yes button in the confirmation pop-up window.
A success notification appears for successfully approved user account. The user is no longer visible in the users grid when the Pending registrations button is clicked. To see the approved user load the Active users filter for the users grid.
Resend invitation for not approved e-mail address from registration
Users that register from the login page, but have not yet confirmed their e-mail address end up in the E-mail not confirmed status. There is a possibility to resend invitation.
To resend the invitation for an account with not approved e-mail address from registration:
Select the Resend invitation option from the user's context menu or from the user profile blade
Click on the Yes button in the confirmation pop-up window.
A success notification appears once the invitation is successfully sent.
The resend functionality is directly dependant from the SMTP settings configured in the system. Please make sure that SMTP settings (from Settings/SMTP Settings) is configured.
Delete accounts that have not been confirmed by user
Users that register from the login page, but have not yet confirmed their e-mail address are assigned the E-mail not confirmed status. An e-mail address (user) in this state can be re-used for a fresh registration only when removed (deleted) from the system.
To delete an account with an unapproved e-mail address from registration:
Select the Delete option from the user's context menu.
Click on the Yes button in the confirmation pop-up window.
A success notification appears once the delete operation is successfully completed. The deleted user is no longer visible in the users grid.
Edit user from User details blade
Selecting the Open option from the context menu loads the User details blade on the right of the window. The User details blade displays details about the User such as its Display name and user name.
The User details blade has the following tabs:
Profile: Displays details for the specific user, such as Display name, user name, account, contact information and the values assigned to the user for custom application fields.
Roles: List the Roles that have been assigned to the user.
The Profile tab is loaded initially. There are Save, Save and close, Unlock and Change password options in the top right corner of the User details blade - Profile tab.
The Unlock option is enabled only for users which are locked. Two options, Save and Save and close, are disabled until the contents of the fields are modified.
When clicking the Save option all the entered data is saved and the same blade stays opened.
When clicking the Save and close option all the entered data is saved, the blade is closed, and the user is redirected to the parent blade.
In addition, if the form fields in a details blade remain unchanged it is possible to work with the "parent" grid (the users grid). Once modifications are made in the User details blade the Users grid becomes "disabled" and grid interactions are no longer possible until the changes are saved or the details blade is closed.
Navigating to another tab in the blade without explicitly saving any changes made in the previous tab will cause the changes to be lost. Clicking on the X button in the blade header closes the User details blade, with any changes which were not saved being lost.
Edit user profile
The user profile data is divided into four sections in the Profile tab:
Identity section: Contains display name (for Windows users only), user name, first name, last name and Language fields for the user, user photo. Username is read-only.
Account section: Contains account details such as its status (active or deactivated), valid date from and valid date to which are optional that indicate the period that the account is valid and the authentication e-mail to which ATS Security sends notifications for this user. When password expiration is enabled the Account section contains details about password expiration date and a "Password never expires" user-level setting field.
Contact info section: Contains contact details for the user such as address, phone, city, ZIP code etc.
Application Info: Displays the values assigned to the user for custom application fields such as User code, Location and Street. The content of this section may be empty if none of the registered applications have uploaded any specific fields. If present, the fields in this section are grouped by application.
To edit the user profile:
Make the desired changes in the Profile tab.
The Save and Save and close option becomes enabled.
Click on Save or Save and close.
In case some of the mandatory fields are empty or fields with custom validation have "invalid" values the Save and close action will not be executed.
First fix all invalid form fields and then click Save or Save and close.
If the Save option is clicked, all entered data is saved and the user details blade remains open. If the Save and close option is clicked all entered data is saved, the blade is closed, and the user is redirected to the parent blade.
An appropriate push notification will appear depending on the outcome and the successfully edited user will appear in the top position of the Users - All users grid.
Deactivate/Activate a user
The Deactivate and Activate operations for a user can be completed from the user profile tab. An Active check-box in the Account section of the user profile tab can be ticked/unticked to activate/deactive the user account.
Remove the tick to deactivate a user or tick the check box to activate a user.
The Save and Save and close option becomes enabled.
Click on Save or Save and close.
If the Save option is clicked, all entered data is saved and the user details blade remains open. If the Save and close option is clicked all entered data is saved, the blade is closed, and the user is redirected to the parent blade.
An appropriate push notification will appear depending on the outcome and the successfully edited user will appear in the top position of the Users - All users grid.
Unlock a locked user
A user can be unlocked by using the Unlock option in the User details blade - Profile tab.
Select the Unlock option to unlock a locked user account.
Click on the Yes button in the confirmation pop-up window.
A success notification appears for successfully unlocked user.
Approve registration for a user
Users assigned the Pending approval status can be approved by using the Approve registration option in the User details blade - Profile tab.
Select the Approve registration option to approve a pending user account.
Click on the Yes button in the confirmation pop-up window.
A success notification appears for successfully approved user. If SMTP settings are not configured (from Settings/SMTP Settings) then the notification would be extended with information that e-mail notification won’t be sent to the user.
Change user password
The Change password option on the User details blade – Profile tab is present only if the user is a local user. For external users, there is no Change Password option in the Profile tab.
This option is not always enabled.
To change a User’s password, the User should be assigned a role that contains the ResetUserPassword right.
To change a user's password:
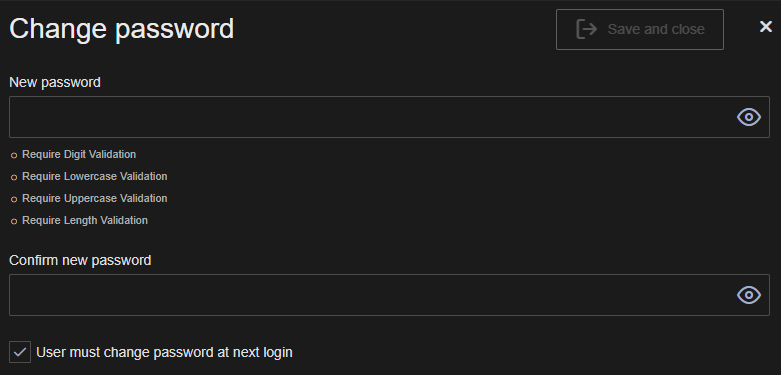
Click on the Change password option in the Profile tab.
A Password reset blade is loaded on the right with two fields New password and Confirm new password.
Provide matching values in both fields - you can use the "eye"  icon in the fields to make the masked values visible.
Select whether the user needs to change password on the next login.
Click on the Save and close button.
The Password reset blade is closed and an appropriate push notification will appear depending on the outcome.
If SMTP settings are not configured (from Settings/SMTP Settings), the following message will be displayed: Email notification for this user will not be sent.
Assign/Remove user roles
To edit the roles assigned to a user open the Roles tab in the User details blade. The roles are displayed in a User-roles grid. This grid has two columns: Role and Rights. For each role there is a context menu which is opened by clicking on the context menu icon (...). The context menu options in "edit" mode are:
Open
Delete
From User-Role details blade
Select the Open option from the user role context menu.
A User-Role details blade is opened on the right describing the user-role relation and which rights the user gets by being assigned this particular role.
Select the Remove option in the User-Role details blade.
Click on the Yes button in the confirmation pop-up window.
The User-Role details blade is closed. A success notification appears for successfully removed role. The removed role is gone from the User-roles grid in the Roles tab of the User details blade.
Using the context menu Delete option
Select the Delete option from the user role context menu.
Click on the Yes button in the confirmation pop-up window.
A success notification appears for successfully removed role. The removed role is gone from the User-roles grid in the Roles tab of the User details blade.
Assign role to a user
Assign single role
Click on the Add button in the top right corner of the User-roles grid.
A Select roles blade opens on the right with a list of roles defined in the system and a search box.
Find the desired role and check its check-box.
Click on the Select button.
The Select roles blade is closed. A success notification appears for successfully added role. The added role is visible in the User-roles grid in the Roles tab of the User details blade.
Assign multiple roles
Click on the Add button in the top right corner of the User-roles grid.
A Select roles blade opens on the right with a list of roles defined in the system and a search box.
Find the desired roles and check their check-boxes.
The number of selected roles appears in the Summary link below the roles list (Summary(x) where x is the number of selected roles in step 3)
Click on the Summary link to see the roles you have selected.
Click on the Delete icon for a role in the Summary list
Select the Update option in the Summary list
The Summary count decreases by 1 (x-1)
Click on the Select button.
The Select roles blade is closed. A success notification appears for successfully added roles. The added x-1 roles are visible in the User-roles grid in the Roles tab of the User details blade.
Assign new role to a user
Click on the Add button in the top right corner of the User-roles grid.
A Select roles blade opens on the right with a list of roles defined in the system and a search box.
Click on the Add new role option above the search box.
An Add role - new role blade opens on the right.
Provide Name and (optionally) Description for the new role, then click the Save and close button.
The Add role - new role blade is closed and the new role appears in the list in the Select roles blade.
Tick the check box of the new role.
Click on the Select button.
The Select roles blade is closed. A success notification appears for successfully added role. The added role is visible in the User-roles grid in the Roles tab of the User details blade.
Create local user
Users have login credentials stored in the ATS Security database. The change and reset password options are available only to local users. Users are created through the Add user form blade.
The Users grid can be loaded by clicking on Add User on the Security Card.
Create user
Provide User name. This is used as login in the login form and it must be in e-mail format. The user name needs to be unique.
Provide a valid e-mail address.
Enter a password and specify whether the user needs to change password on the next login.
Click on the Save or Save and close button.
If the Save option is clicked, all entered data is saved, the current blade is closed and a user details blade is shown. If the Save and close option is clicked all entered data is saved, the blade is closed, and the user is redirected to the parent blade.
An appropriate push notification will appear depending on the outcome and a successfully created user will appear in the top position of the Users - All users grid.
Create external user
External users are created automatically in the ATS Security database upon successful authentication of a user from an external identity provider. For these users no login credentials are stored in the ATS Security database. The change and reset password options are not available for these users.
Import users
The Import users option provides a way for bulk user creation in the system. The import users option alongside with the users imports also their roles and the associated rights.
The Import users option allows for one-time import of multiple users with configured roles and specific role rights. The import option is available to users with the following two rights:
EditUserRoles
BulkImport
The import file is in XML format. There is a validation (XSD) schema for the import XML that can be downloaded from the import blade to verify the validity of the XML before it is "rejected" as invalid by ATS Security.
The import data contains three main sections:
Users
Roles
UserRoles
The Users section is mandatory in each import. The other two sections are optional which means that when importing users it is not necessary to provide roles and user-role assignments, so only user records will be created.
Conditions for successful user import
Conditions that must be satisfied for successful user import:
The attributes UserSource, ImportType, Username and Name are mandatory.
User > Username values must be unique.
User > E-mail for users of UserSource = 6 must be unique.
PasswordHash > When (ImportType = 2 (Inspect) or ImportType = 3 (CM4D)) and UserSource = 6 (Local) the PasswordHash is mandatory.
Salt > When ImportType = 2 (Inspect) and UserSource = 6 (Local) the Salt is mandatory.
Role > Name must be unique.
UserRole combination must be from a Username and Role > Name that are present in the import data (XML).
CustomFields for a user must not contain same applicationID, fieldID attribute combination.
Rights from the same application must be assigned in one node only (no duplicate Application nodes with the same id attribute on Role parent node level).
No duplicate rights from the same application can be assigned to one role.
The uniqueness criteria from above is applied in two locations:
the XML itself should not contains duplicates
a duplicate should not exist in the database (same value should not already be used for a user in ATS Security)
The values for Username, E-mail address and Role name are compared in "normalized" i.e. uppercase mode. This means that role names "Admin" and "admin" will be treated as the same role, so if these two values are provided as Name for "different" roles in the XML these items will be reported as duplicates.
The XSD validation is not able to do case-insensitive uniqueness check, so be aware that Admin and admin values for role name pass the uniqueness role name check in the XSD validation. But, later while processing this case will be reported as an error.
The presence of the User and Role in a UserRole combination means that the import of users feature can not be used for "bulk role assignment" i.e. only to assign roles for existing users.
Duplicate records handling
For duplicate values of Username and Name of a role, the following logic is applied:
When a Username is duplicated in the XML then this is reported as an error and the import can not continue.
When a Role > Name is duplicated in the XML then this is reported as an error and the import can not continue.
When a Username already exists in the database then a warning is displayed for this record in the XML and the import can continue by ignoring that specific user.
When a Role > Name already exists in the database then no new role is created from the XML import, but the existing role is used: rights are assigned to the existing role, existing role is assigned to users from the import.
When an E-mail is duplicated in the XML then this is reported as an error and the import can not continue.
When an E-mail already is used for a local user in ATS Security then this is reported as an error and the import can not continue.
User sources
The following values (1,2,3,5, 6,7 and 8) are accepted for the UserSource element of a User in the XML:
Windows = 1
Google = 2
Facebook = 3
Saml = 5
Local = 6
AzureAd = 7
GitHub = 8
Import types
The ImprotType determines the handling of already existing passwords enabling the imported users to continue using their "old" passwords from the originating system until they explicitly change or reset their password in ATS Security.
The following import types are accepted in the XML - for the ImportType element of a User:
Other = 1
Inspect = 2
CM4D = 3
Users imported with import type = 1 will be forced to change/set their password upon first login.
Errors and Warnings during user import
After successful upload of the XML document for import of users (valid according to the XSD validation schema) the XML is being processed. During the processing errors and warnings are recorded and at the end of the processing reported to the user with as much as possible details. Errors block the import process. No import can be done when even only one error is reported. Warnings contain records of the XML with some specific issues that can be ignored. The user doing the import can decide to "ignore warnings and continue with the import" or cancel the import and make corrections in the XML and then upload the corrected file.
While importing users the following types errors and warnings might appear:
Import errors
The following cases or groups of errors can appear while import:
Username is duplicated (case insensitive) in the XML.
Role is double (case insensitive) in XML.
Admin
admin
admiN
E-mail address is double for local (UserSource=6) users (case insensitive) in the XML
E-mail for local user in the XML already exists in the database for another local user.
[email protected] - [email protected]
Trying to assign a role to a user that is not present in the import data.
Admin - [email protected]
Trying to assign a role that is not present in the import data to a user
Admin1 - [email protected]
Admin1 - [email protected]
In case both the user and the role from the UserRole assignment do not exist in the XML, first an error will be reported on the user. In case the user is fixed but the role remains unmodified upon next import of the same XML the case will generate error of type 6 from above.
Import warnings
The following cases or groups of warnings can appear while import:
Username already exists in the DB
username = [email protected]
Provided import type 2 (Inspect) or 3 (CM4D) and missing hash and/or salt value for a user.
username = [email protected]
Custom user field provided for non-existing application.
[email protected] - 15BA7B97-FCE1-4160-2523-08D50A33254E
Trying to assign right to role from non-existing application
Admin - 15BA7B97-FCE1-4160-2523-08D50A33254E
Trying to assign non-existing rights to role.
Admin - RunRports
Admin - RunRports\86c225a3-468f-424f-8a9f-2cbcb2ea6111
Import steps
To import users in ATS Security:
Load the Users - All users grid.
Click on the Import button.
The Import Users blade is loaded on the right with a file upload field.
Select the previously prepared (and optionally XSD validated) XML file for import.
After a successful XSD validation the processing of the XML file starts and an appropriate waiting message is displayed.
After the processing is completed the processing summary is displayed.
In case of errors the imports can not be made so the complete process needs to be started from the beginning by importing new file.
In case of warnings cancel the import and upload an improved import file OR ignore the rows with warnings and continue with the import but without those records.
In case of no errors and no warnings a success summary is displayed with continue.
Click Submit button for a successfully processed XML with no errors and warnings (6c) OR ignore the warnings (check-box) and also click on the Submit button for an XML file with warnings only (6b).
The import takes place and in case of success the what has been imported summary is displayed to the user. The Import Users blade is closed and the Users - All users grid is refreshed to show the newly imported users.