This topic will cover how to create a Reverse Proxy using Nginx for ATS Security Manager, ATS Start and ATS Configuration Manager.
ATS Security Manager, ATS Start and ATS Configuration Manager work as self-hosted services deployed on a server running on specific ports. On occasion, port maintenance can be an issue for some security policies and reverse proxies are used.
A proxy server is a go-between, or intermediary server, that forwards requests for content from multiple clients to different servers across the Internet. A reverse proxy server is a type of proxy server that typically sits behind the firewall in a private network and directs client requests to the appropriate backend server. A reverse proxy provides an additional level of abstraction and control to ensure the smooth flow of network traffic between clients and servers.
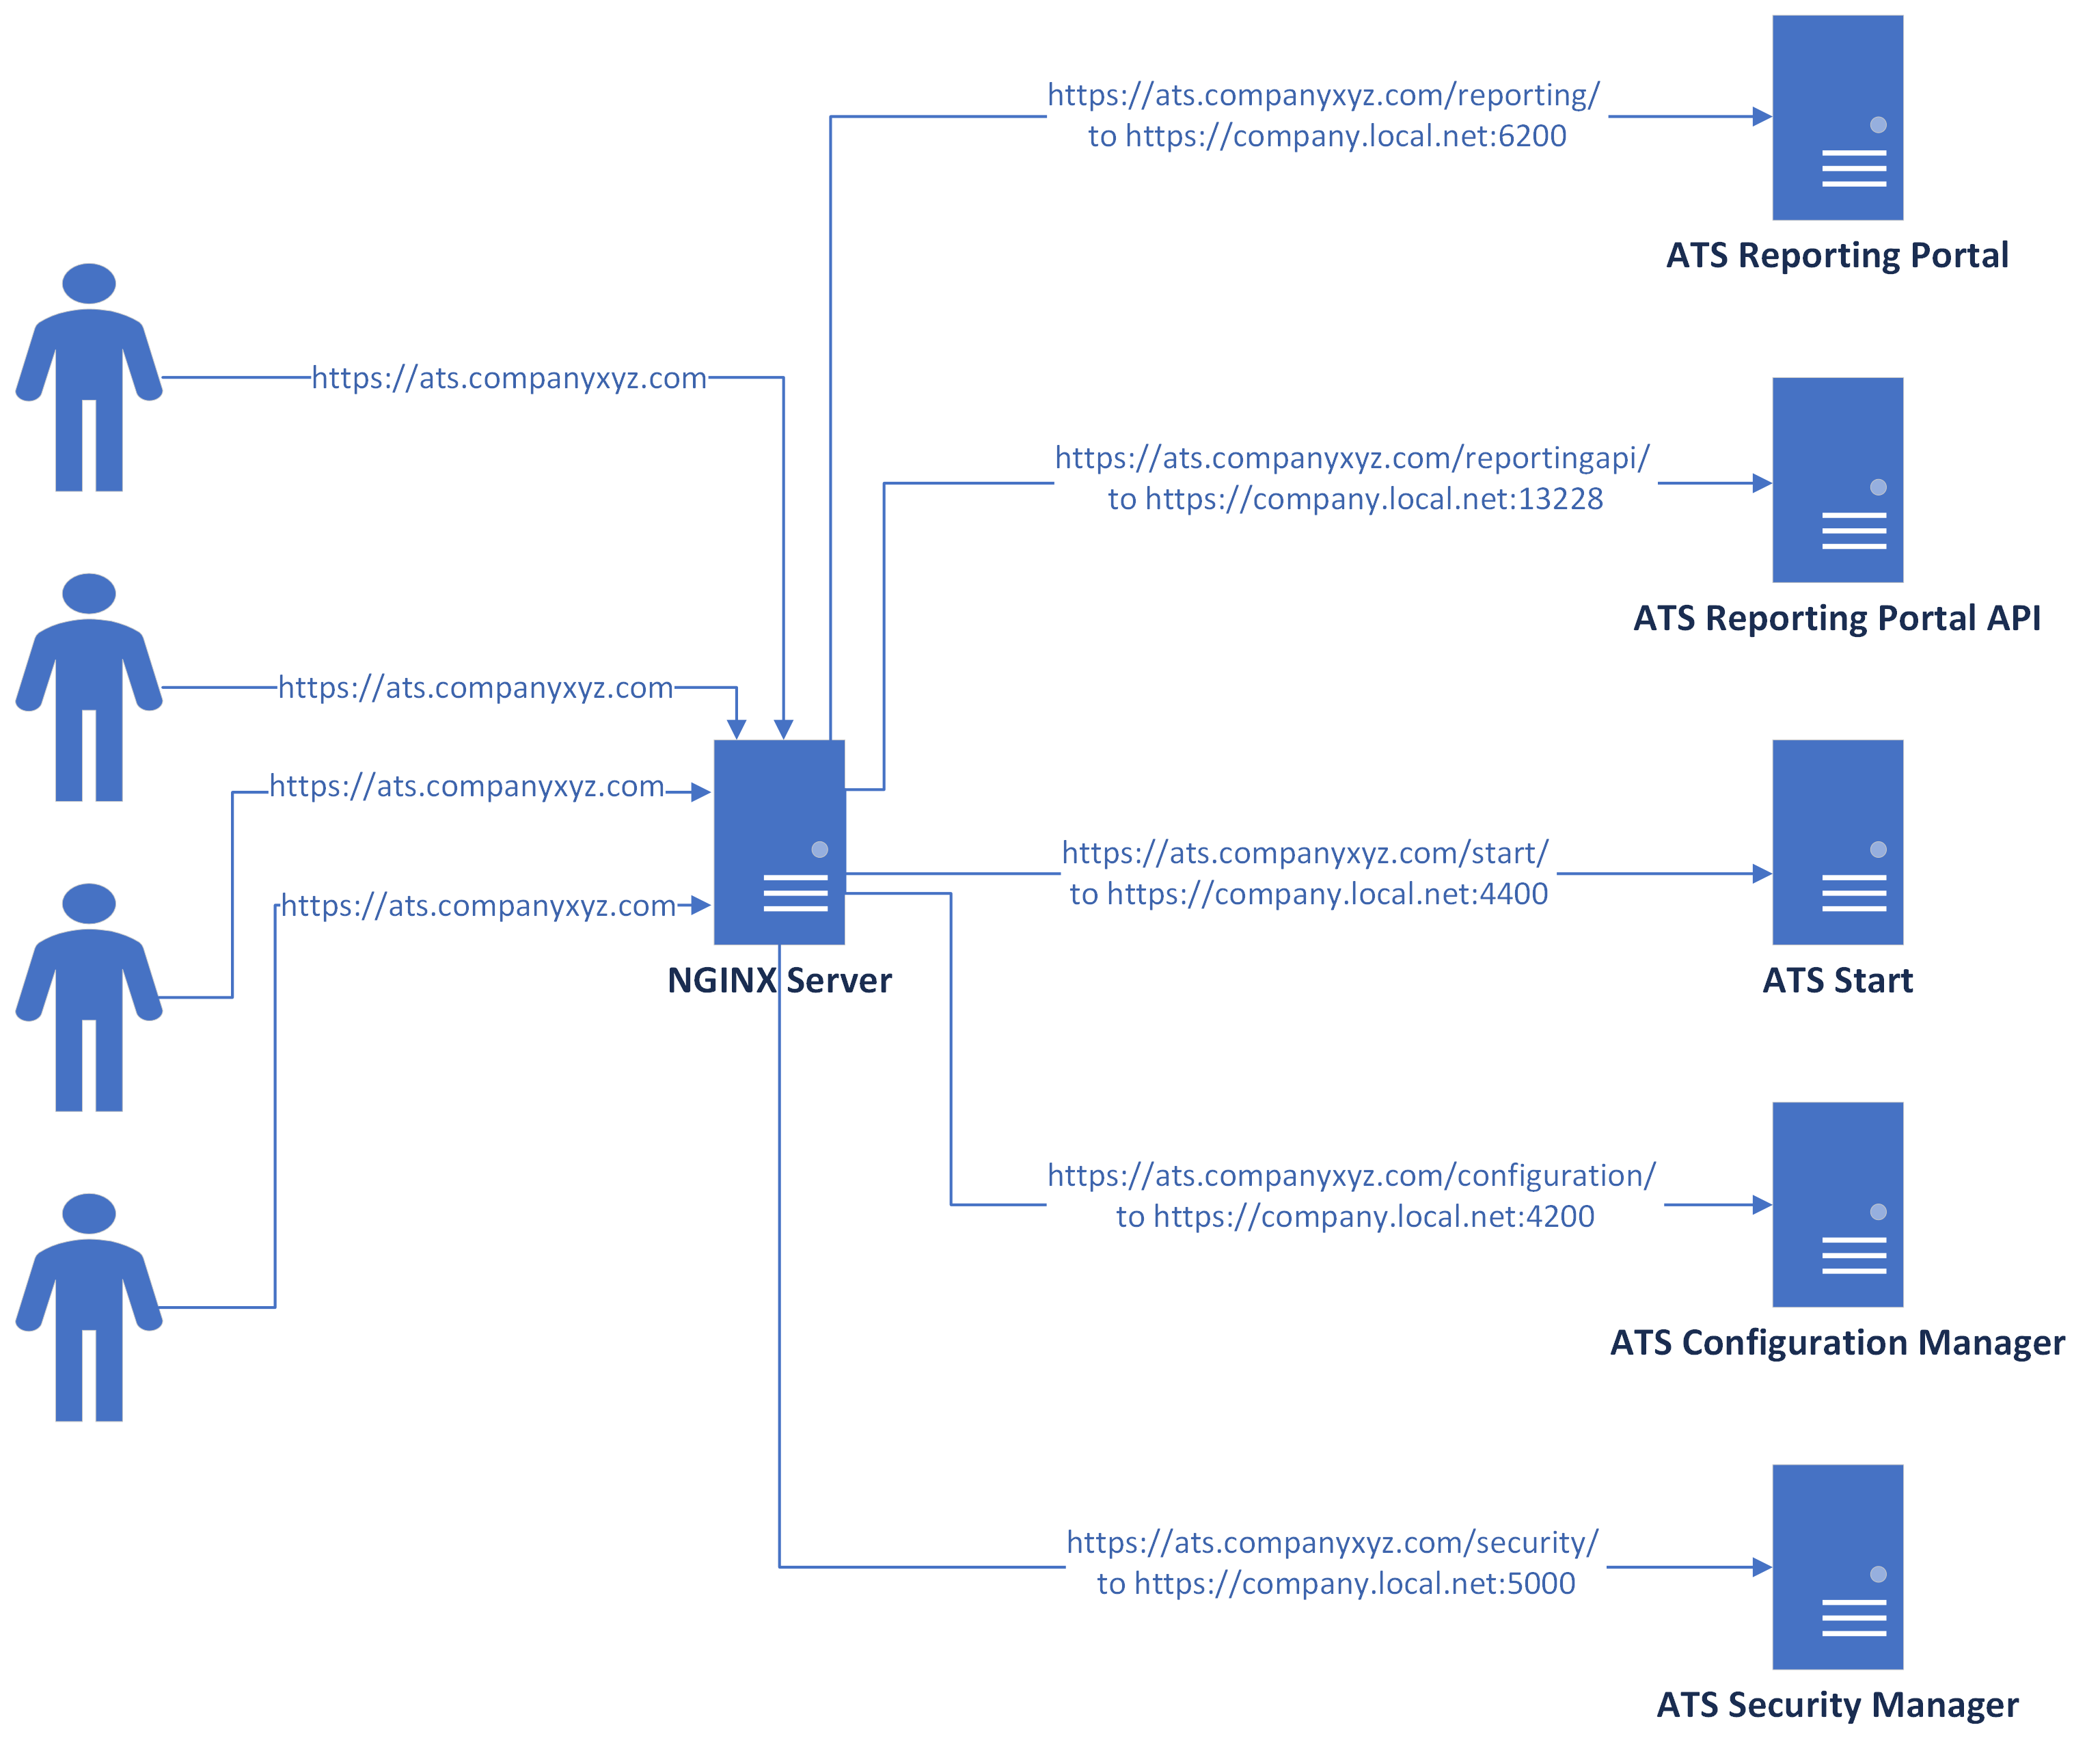
For example, ATS Security Manager is configured to work on the address https://atstestserver.local:5015 , ATS Start is configured on the address https://atsestserver:4400 and ATS Configuration Manager is configured on the address https://atsserver.local:4200. It is always recommended to configure all sites to run on HTTPS. Nginx is also being configured on atsserver.local.
For information on HTTPS configuration, please click here.
It is highly recommended to use a valid certificate for setting up the reverse proxy. For our example we will assume that a valid certificate is present in the form of .crt and .key files.
Follow the steps to configure Nginx as a reverse proxy:
Download the latest version of nginx here.
Unzip and open the configuration file from conf/nginx.conf.
Apply the following changes in the configuration file:
listen 443 ssl;
server_name atsmknb014.ats-global.local;
ssl_certificate path_to_certificate\certificate.crt;
ssl_certificate_key path_to_key\certificate.key;
ssl_protocols TLSv1 TLSv1.1 TLSv1.2;
location /configuration {
proxy_pass https://atsserver.local:4200;
proxy_set_header Upgrade $http_upgrade;
proxy_set_header Connection "upgrade";
proxy_set_header Host $host;
}
location /start {
proxy_pass https://atsserver.local:4400;
proxy_set_header Upgrade $http_upgrade;
proxy_set_header Connection "upgrade";
proxy_set_header Host $host;
}
location /security {
proxy_pass https://atstestserver.local:5015;
proxy_set_header Upgrade $http_upgrade;
proxy_set_header Connection "upgrade";
proxy_set_header Host $host;
proxy_buffer_size 128k;
proxy_buffers 4 256k;
proxy_busy_buffers_size 256k;
}
}
Update the server_name to match the FQDN of the server.
In this example, port 443 is being used, which is the default SSL port. However, the user can choose any port for this purpose.
The path_to_certificate and path_to_key are the absolute path to the certificate files (certificate and key).
Make the ATS Configuration Manager settings changes:
Open the appsettings.json file in the ATS Configuration Manager installation folder and modify the following properties:
Configuration:ATSSecurityManager to point to the new ATS Security Manager https://atsserver.local/security
Configuration:BasePath=configuration
Open the wwwroot folder and for each appsettings.json file edit the url's
wwwroot/security/appsettings.json file change CardsConfiguration:cardDetailsApi=https://atsserver.local/security/api/applications/getCardsCount
wwwroot/systemConfiguration/appsettings.json file change
Configuration:ATSSecurityManager=https://atsserver.local/security/
CardsConfiguration:cardDetailsApi=https://atsserver.local/configuration/api/lang/getDefault
wwwroot/reporting/appsettings.json (if present) change
Configuration:ATSSecurityManager=https://atsserver.local/security/
Make the ATS Start settings changes:
Open the appsettings.json file in the ATS Start installation folder and modify the following properties:
Configuration:ATSSecurityManager to point to the new ATS Security Manager https://atsserver.local/security
Configuration:BasePath=start
Security Manager settings changes
Open the appsettings.json file in the ATS Security Manager installation folder and modify the following properties
ATSSecurityManager:Authority = https://atstestserver.local:5015/
ATSSecurityManager:ATSConfigurationManager=https://atsserver.local/configuration/
ATSSecurityManager:ATSStart=https://atsserver.local/start/
ATSSecurityManager:IssuerUri = https://atsserver.local/security/
ATSSecurityManager:forceHttpInProd=false
ATSSecurityManager:BasePath=/security
Database changes
Open SQL Management Studio and navigate to the Security Manager database
execute the following queries
SET @clientId = (SELECT id FROM Clients where clientId = 'client_id')
PRINT @clientId
insert into ClientRedirectUris (ClientId, RedirectUri) values(@clientId, 'https://atsserver.local/configuration/auth-callback')
insert into ClientRedirectUris (ClientId, RedirectUri) values(@clientId, 'https://atsserver.local/configuration/silent-refresh.html')
insert into ClientPostLogoutRedirectUris (ClientId, PostLogoutRedirectUri) values(@clientId, 'https://atsserver.local/configuration/')
DECLARE @clientId as int
SET @clientId = (SELECT id FROM Clients where clientId = 'start_client_id')
PRINT @clientId
insert into ClientRedirectUris (ClientId, RedirectUri) values(@clientId, 'https://atsserver.local/start/auth-callback')
insert into ClientRedirectUris (ClientId, RedirectUri) values(@clientId, 'https://atsserver.local/start/silent-refresh')
insert into ClientRedirectUris (ClientId, RedirectUri) values(@clientId, 'https://atsserver.local/start/silent-refresh.html')
insert into ClientPostLogoutRedirectUris (ClientId, PostLogoutRedirectUri) values(@clientId, 'https://atsserver.local/start/')
Replace the following:
conf_client_id is the property from the appsettings.json file from ATS Configuration Manager installation folder under Configuration:clientid
start_client_id is the property from the appsettings.json file from ATS Start installation folder under Configuration:clientid
Last step is to restart both services for ATS Security Manager, ATS Start service and ATS Configuration Manager service. If there are issues on the restarting the services investigate the logs for the specific application in their installation folder in the /logs folder. Try to open the link https://atsserver.local/start/.