This channel is only compatible with ATS Inspect version 7 or later. Earlier versions, such as Inspect 6.4, are not supported due to the use of a WCF client for event transmission. This channel relies on a web API endpoint that requires an HTTP client to function properly. The latest version of ATS Bus (2.8) supports both WCF and web API endpoint implementations.
About the Inspect Channel
The ADOS Inspect channel allows ATS Inspect to publish various Inspect events such as Tracking, Inspection, UnitQuestion, Repair and Defect event to ATS Bus via a Web API. The Inspect channel has the following responsibilities:
Provide an endpoint that accepts ATS Inspect events.
Validate the data sent by ATS Inspect.
Returning a success/fail status to Inspect.
The channel provides two endpoints that allow monitoring applications to detect if the channel is up and running:
/health [GET]. Used to provide its health status.
/ [GET]. Provides the name of the channel.
ATS Bus 3.2 and newer features an Inspect Web API channel, which features webhooks that are used by ATS Inspect to notify the user about inspections, repairs, defects, tracking updates and checklist questions as soon as they occur. The webhooks are more real-time than the Event Service because the Event Service queues the events before they are sent. The event service may be queueing a huge number of messages depending on how much data the Inspect event service must process, so it may take a while before the events are received.
The webhook on the other hand delivers the event instantly, without delay. The event service and the webhook deliver the same kind of data where the webhook is more configurable than the event service.
The event service delivers a dataset to ATS Bus that may or may not contain a few additional custom elements but the webhook allows the user to select whether or not to add unit, inspection, defect, repair, tracking and unit question data to the event. Also the webhook’s transformation to B2MML is highly configurable compared to the B2MML transformation used by the Inspect Event Service.
For further information, please see Manage ATS Inspect Web API Channels.
Create or Edit an Inspect Channel
The Inspect Channel uses an XSL transformation, located in {INSTALL}\Transformation\InspectInspectEventsToB2MML.xsl, to translate the ATS Inspect event to a B2MML WorkPerformance or OperationsPerformance message. This file may need to be updated when custom data is added to the Inspect event. Please consult with the Inspect engineers on which content should be added to the XSL transformation to exchange all event information with ATS Bus.
Select the ADOS Bus Stop tab.
Click on Inspect.
A list of the existing channels is shown.
Click Add to create a new bus stop or Edit to modify an existing one.
A new window opens.
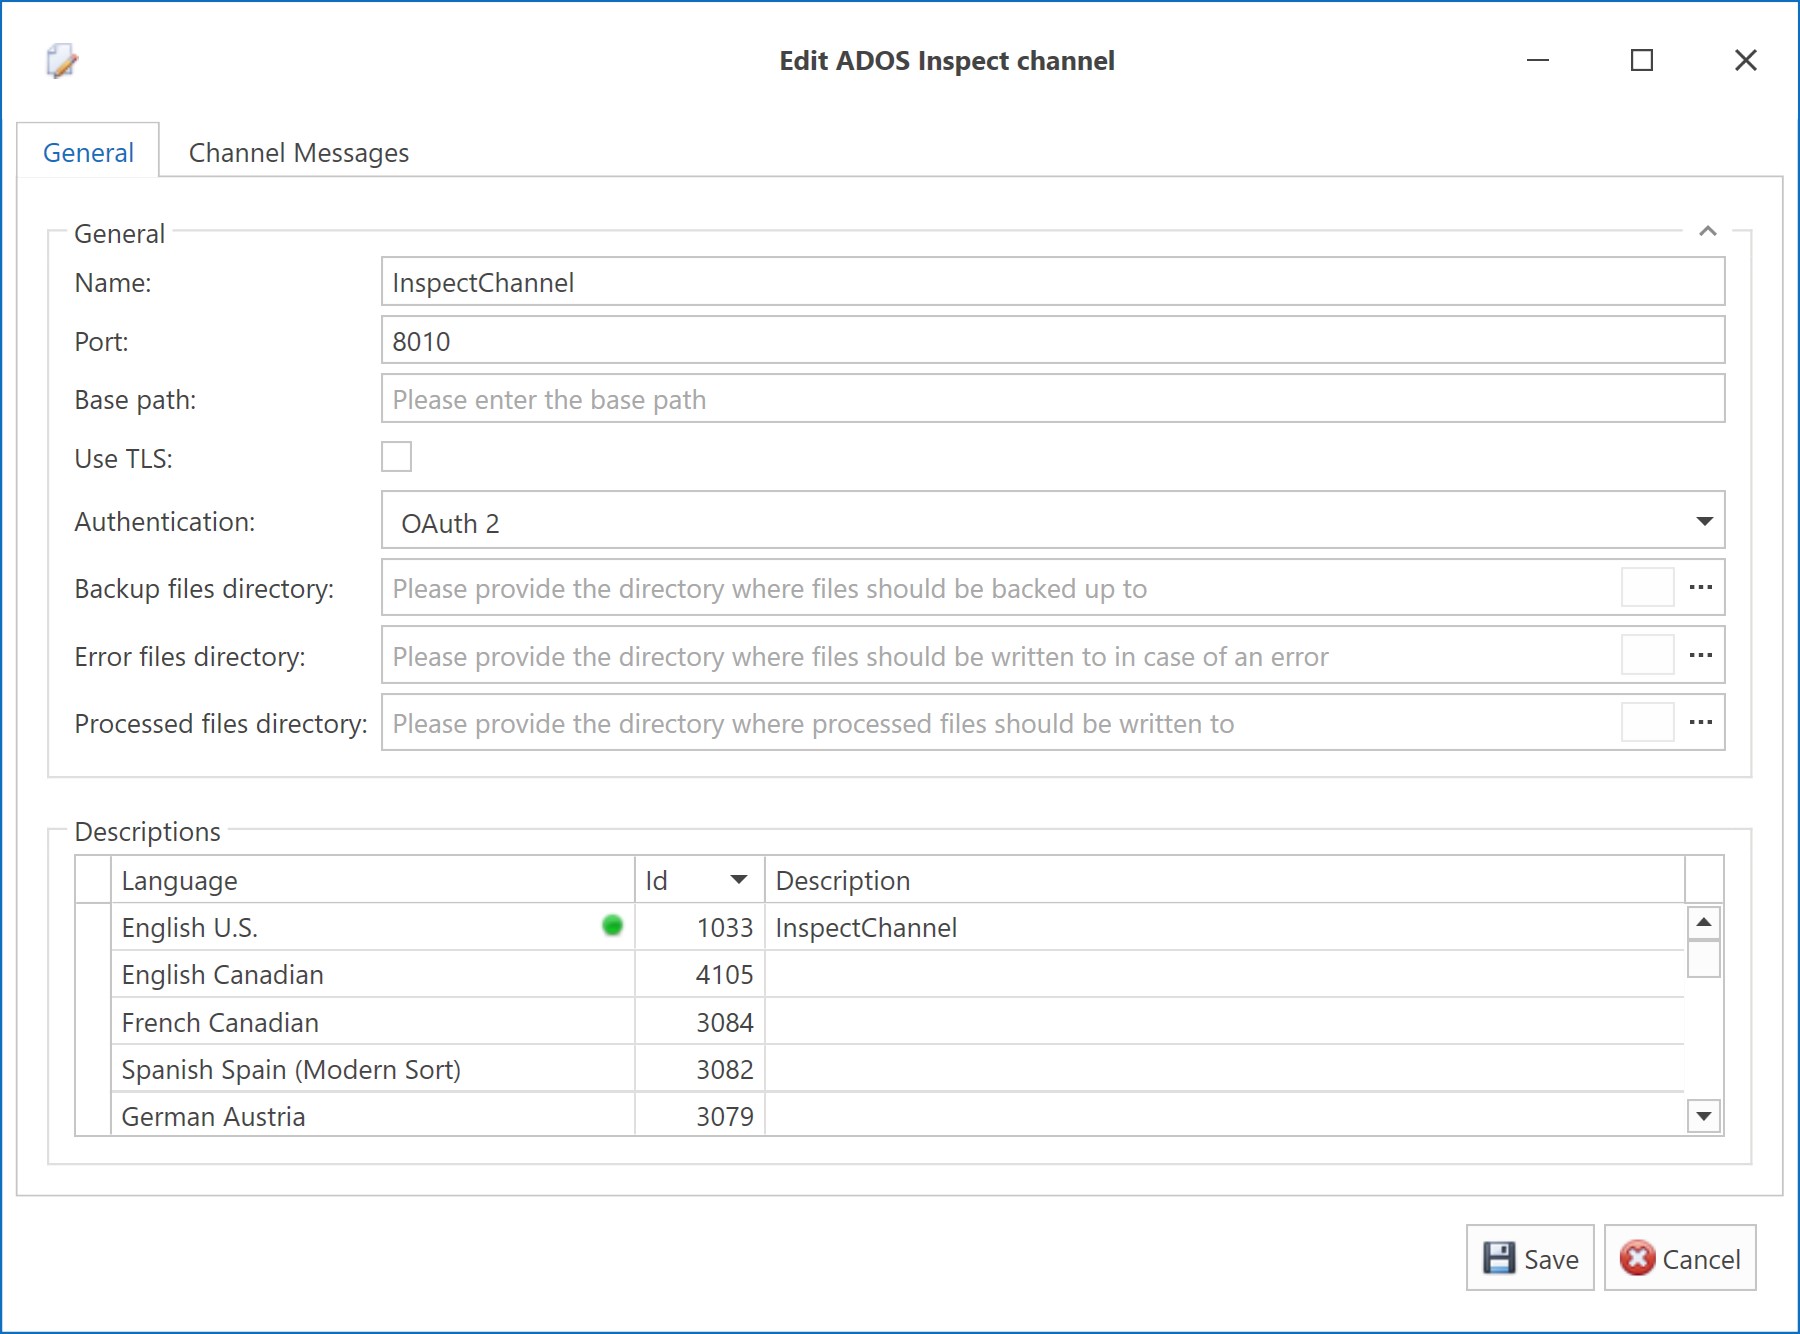
Enter the following information:
General:
Name: A unique name for the channel.
Port: Enter the Port number. The channel will bind to the configured port for all interfaces.
Base path: Enter a base path. The base path is the path prefix that is used for all API paths. For example, this concept is used with hosted evironmentments.
Use TLS: When ticked, the default bus stop certificate (configured in the Kestrel default certificate section in appsettings.json) will be used to encrypt the connection. The channel will create one of the following endpoints depending on the value of Use TLS:
http://{host}:{port}/api/v1/inspect/event when Use TLS is not ticked.
https://{host}:{port}/api/v1/inspect/event when Use TLS is ticked.
Authentication: Select the Authentication method:
None – no authentication.
OAuth2 – the channel enables authentication using OAuth2. OAuth2 requires SSL and therefore the Use SSL checkbox is ticked.
Backup files directory: The the location where the backup files will be stored.
Error files directory. The folder in which messages that could not be processed are stored.
Processed files directory: The directory where the resulting output file is stored when the configured channel message successfully processes the input message.
Channel messages can now be added.
Descriptions:
Enter a description in the default language and any other required languages.
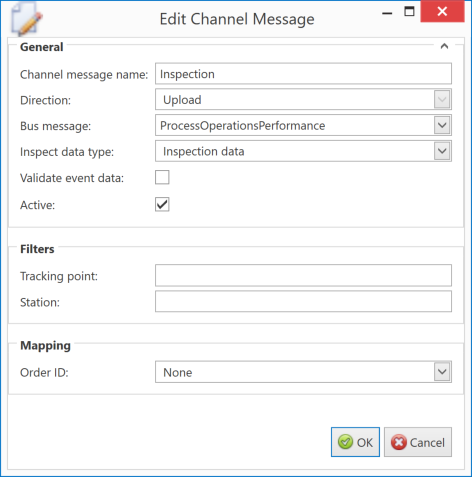
Add or Edit a Channel Message
While editing an Inspect channel select the Channel Messages tab.
Click Add or select a channel message and click Edit.
Enter the following information:
General:
Name: Enter a unique name for the channel message.
Direction: The direction in which the channel message operates. Set to upload to handle events from Inspect and download to send events to Inspect.
Bus message: Select ProcessOperationsPerformance or ProcessWorkPerformance, these are the only supported messages.
Active: Enable so that the channel message can be processed.
Acquisition settings:
Inspect data type:
Defect: Handles an Inspect defect event.
Repair: Handles an Inspect repair event.
Inspection: Handles an Inspect inspection event.
Checklist: Handles an unit checklist question event.
Tracking data: Handles an Inspect tracking event.
Filters:
Tracking point: Filters on TrackingPointCode when a Defect, Repair or Tracking event is processed. Leave empty if not used.
Station: Filters on StationCode. This filter is present for all event types except Tracking events. Leave empty if not used.
Mapping:
OrderID: Inspect does not provide an OrderID so the mapping section allows the user to map the unit’s serial number (Unit Serial) or one of the 3 Identity elements (Unit Identity1..3) to the OrderID. The ProcessOperationsPerformance message stores the value in the OperationsResponse/ID and the ProcessWorkPerformance message stores it in JobOrderID node.
Click OK.
The channel message is added to the channel.
Click Save.
The channel is saved.
Setting up authentication
The ATS Security Manager is used to authenticate users or API’s. The following steps show how to configure a new user for the ADOS Inspect channel. The security rights for an existing user/role can be updated too.
Go to the Configuration manager home page and click on Add Role on the Security panel.
Provide all required information and press Save.
Select/Open the newly created role.
Select the Rights tab.
Expand ATS Bus and select ADOSInspectChannelRead and press Save.
Go to the Users menu on the left hand side, or click on Add User in the Security panel on the Configuration Manager home page.
Provide all required information and press Save.
Open the created user, add the Inspect role and press Save.
A new role and new user have been added. An existing user can select the ADOSInspectChannelRead right too. This is done via the Rights tab in the role configuration.
The authentication can be tested using Postman (https://www.postman.com/) by using an HTTP POST request with the following properties:
OAuth 2.0 authentication (items marked yellow are hard-coded):
Grant type: Password Credentials.
Access Token URL: https://securitymanagerhost:5000/connect/token
Client ID: 5f8e052f-231a-4caa-a4cc-15f66e0a40d7.
Client Secret: n.a.
Username: The user created in step 6 above. The user should have the ADOSInspectChannelRead right configured (see below).
Password: The password of the user configured in step 6 above.
Scope: e99d7691-3806-4c67-8e9a-7b5bdc0915c5\\adosinspect.read-only (Mind the backslash)
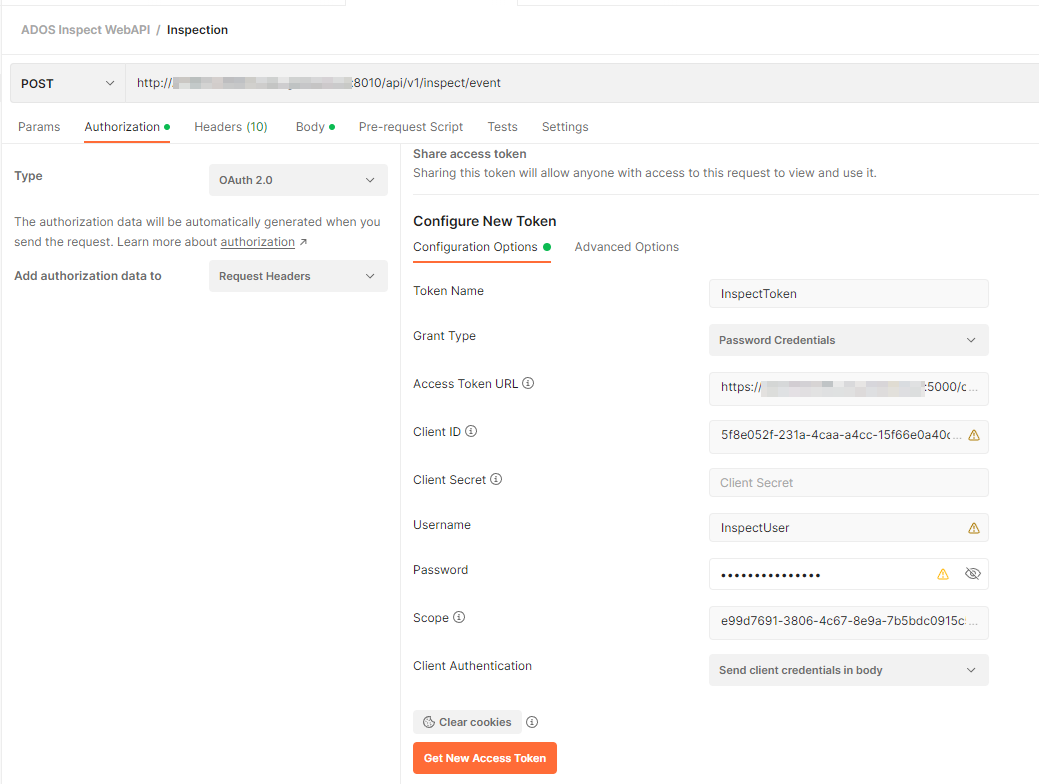
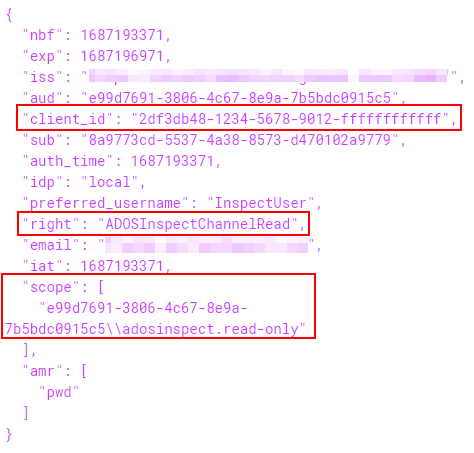
Pressing Get New Access Token should yield a JWT token. You can copy the base-64 encoded string and review it by pasting it into the Encoded section on https://jwt.io/. This website will show the content of the token in human readable format:
Example: Testing a channel message that handles Inspection events using Postman
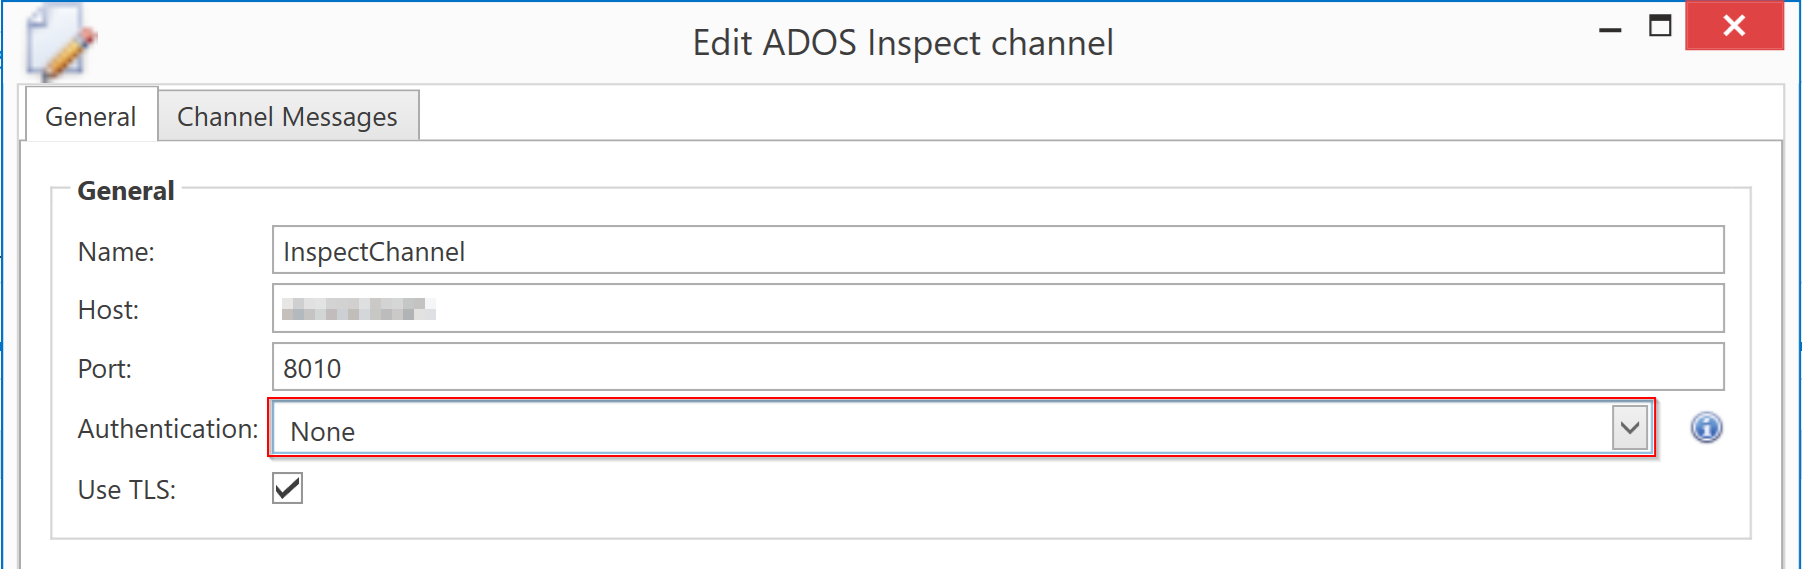
Create an Inspect channel with the following properties:
Add a channel message with the following properties:
Press OK and Save to save the channel message and channel.
Open the ADOS bus stop configuration and fill in all required information in the General tab.
Next go to the ‘Channels’ tab and enable the channel created above.
Save the changes to the bus stop.
Start/restart the bus stop.
Next the Postman request that posts the event to the ADOS Inspect channel has to be finalized. The first part is given in the paragraph ‘Setting up authentication’ the remaining configuration items are explained below:

Body (1): This should contain and XML formatted Inspect Inspection event. These can be extracted from Inspect.
Request: POST (3): URL(2) = https://ADOSBusStopHost:8010/api/v1/inspect/event or http://ADOSBusStopHost:8010/api/v1/inspect/event. The HTTP request type is POST, the URL starts with http or https depending on ‘use TLS’.
The Postman configuration is complete, pressing ‘Send’ (4) will POST the Inspection event to the ADOS bus stop. The HTTP response should be 200 OK
The ADOS bus stop will raise an error that no action is configured. This is correct because the example above did not configure an action.
Detailed Workflow
The Inspect channel validates the content of events using an XML schema and forwards valid events to a handler using an internal ProcessInspectEvent message (this message is visible in ServiceInsight). The Inspect channel notifies ATS Inspect if an event has been processed successfully or not.
The ProcessInspectEvent handler further processes the Inspect event data by transforming it to a B2MML information model using an XSL transformation and validates the outcome using a B2MML schema. Valid B2MML messages will be published according to the action configured in the channel message handling configuration. The XSL transformation produces B2MML OperationsPerformance or WorkPerformance information models.
There are 2 channel message actions available:
PublishOnTheBus: This action will publish a B2MML OperationsPerformance information model. This action should be used when the BusMessage property of the channel message is set to ProcessOperationsPerformance.
PublishWithTopic: This action will publish a B2MML WorkPerformance information model. This action should be used when the BusMessage property of the channel message is set to ProcessWorkPerformance.
UnitQuestionEvent cannot be published as a ProcessOperationsPerformance message although the user interface allows it.
ATS Inspect events may report a station code or a tracking point code depending on the Inspect event and these codes are used as the operation in the B2MML information models. The transformation from an Inspect event to B2MML will apply the following rules:
A Defect event always has a Tracking node containing a TrackingPoint and an optional Inspection node containing a station. If the station exists, the station is used as operation in the B2MML message otherwise the trackingpoint will be used.
An Inspection event always contains an Inspection node and therefore the station code is used as operation in the B2MML output.
The Repair event has an optional Tracking and optional Inspection node and therefore the transformation will report either the station code, tracking point or ‘UNKNOWN’ if the station and tracking point is not provided. If both the Inspection and Tracking node exist, the transformation will use the station code as operation in the B2MML output.
A Tracking event always has a Tracking node so the B2MML output will contain the tracking point as operation.
The UnitQuestion event always has an Inspection node so the B2MML output will contain the station code as operation.
Tracking point and station codes should be configured in the Operations section of the master data configuration and the ADOS bus stop should also select these operations in the Operations tab of the bus stop.