Overview
ATS Bus 3.0 requires the following prerequisites:
ATS Security & Configuration Manager: Version 1.4 or newer. Please visit ATS-Help.com for installation instructions.
The minimum requirement for ATS Bus 3.0 is ATS Security Manager 1.4.
ATS Licensing: Version 3 or newer. Please visit ATS-Help.com for installation instructions.
The minimum requirement for ATS Bus 3.0 is ATS Licensing Manager 3.0. However, version 4.0 operates as a plugin for ATS Configuration Manager allowing licenses to be configured from anywhere on the network. For further information, please visit ATS-Help.com.
An SSL certificate for the REST API’s and Security Manager’s Access Rights URL.
Particular ServiceControl: Recommended version 4.20.2.
Particular ServiceInsight: (version 2.8.0 or newer).
Particular ServicePulse: (version 1.30.0 or newer).
Third party software such as OPC Servers, MTConnect agents and other services may be required by ATS Bus Cockpit to configure ATS Bus. Please refer to their product installation manuals for further details.
The SQL Server authentication should be set to SQL Server and Windows Authentication mode.
WARNING: Anti-malware and anti-virus software influence the performance of ATS Bus. The following directories MUST be excluded from on-access scanning:
- ATS Bus installation directory
- ATS Bus program data directory
- Particular ServiceControl program data directory
- Any directory used by the ATS Bus configuration
Create and Register certificates for TLS/SSL
All ATS Bus versions higher or equal to 2.8 require certificates to secure their Web API’s. A self-signed certificate will work but it is recommended to use a production grade certificate.
The following Web API’s require a certificate to secure their endpoint:
ATS Bus data service. Requires a certificate to secure the configuration API at https://<hostname>:9704.
The default port number is 9704. Ensure that the port specified matches the system configuration.
The data service is not migrated to .NET6 at present so the netsh tool is required to bind a certificate to a port:
netsh http add sslcert ipport=0.0.0.0:9704 appid={GUID_WITH_UPPERCASE_CHARACTERS_CURLY_BRACES} certhash=THUMBPRINT_FROM_CERT_IN_PERSONAL_FOLDER
The appid is a GUID that can be generated at https://guidgenerator.com/. Ensure uppercase alphanumeric characters are used.
Example
netsh http add sslcert ipport=0.0.0.0:9704 appid={A4A30429-936B-4312-A9E1-34500C706AC4} certhash= 99ea86fa52396ca99debbe40dddba78011e4aa63
OT WebService Server channel. This channel uses the default certificate configured by the OT bus stop installer. This can be any certificate in the Personal folder of the local computer certificate store. The default certificate is stored in the Default Certificate section in the appsettings.json file.
IT WebService Server channel. The IT bus stop is not migrated to .NET6 at present so the netsh command is used to bind a certificate to a port. The following example illustrates binding a certificate to port 9876:
Example:
netsh http add sslcert ipport=0.0.0.0:9876 appid={GUID_WITH_UPPERCASE_CHARACTERS_INCLUDING_CURLTY_BRACES} certhash=THUMBPRINT_FROM_CERT_IN_PERSONAL_FOLDER
Example: netsh http add sslcert ipport=0.0.0.0:9876 appid={A4A30429-936B-4312-A9E1-34500C706AC4} certhash= 99ea86fa52396ca99debbe40dddba78011e4aa63
The appid is a GUID that can be generated at https://guidgenerator.com/. Ensure uppercase alphanumeric characters are used.
ADOS Inspect Channel. This channel uses the default certificate configured by the ADOS bus stop installer. This can be any certificate in the Personal folder of the local computer certificate store. The default certificate is stored in the Default Certificate section in the appsettings.json file.
Create a self-signed X509 certificate for ATS Bus bus stops (not recommended)
A temporary certificate can be created using the following PowerShell command:
New-SelfSignedCertificate -DnsName <FQDN>, <Hostname> -CertStoreLocation “cert:\LocalMachine\My” -NotAfter “2030-01-01” -Subject "CN=AtsBusSelfSignedCert"
Where:
<FQDN> is a string holding the computer name including domain name
<Hostname> is a string holding the computer name without domain name
This will create a certificate with the common name AtsBusSelfSignedCert in the Local Computer certificate store at the Personal location. Please copy this certificate to the Trusted Root Authority to ensure that the chain is trusted.
Create certificates for ATS Bus Stops (recommended)
Follow the steps below to create a certificate for the ADOS web API’s that require HTTPS and is the recommended approach. Self-signed certificates should not be used for ADOS web API’s.
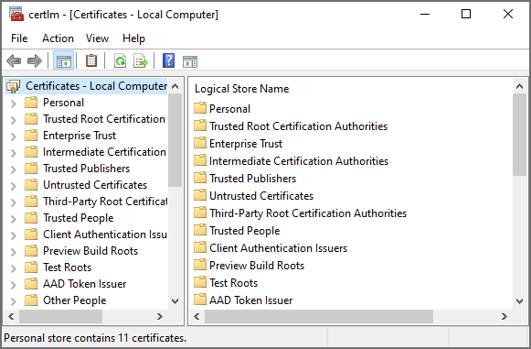
Open the certificate manager for the local computer using the following command: certlm.msc
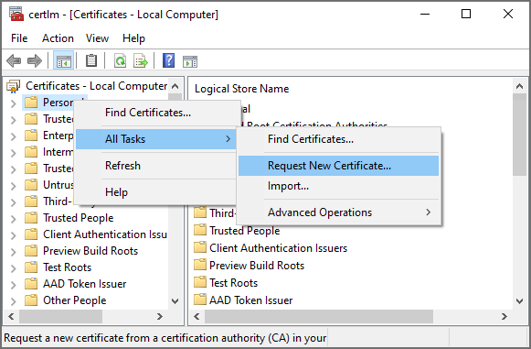
Right click on the Personal folder and select All Tasks > Request New Certificate.
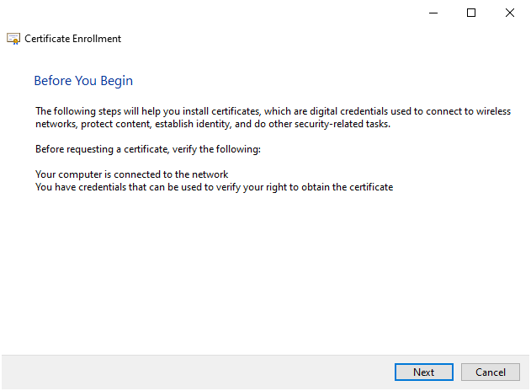
Click Next.
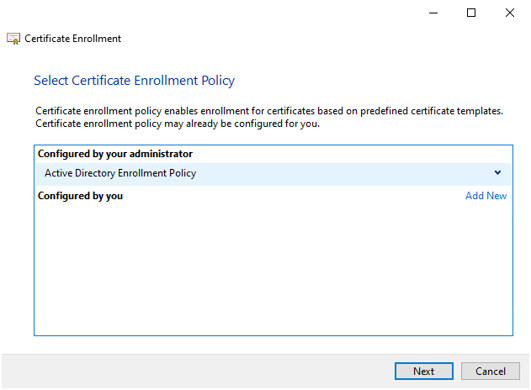
Select the Active Directory Enrollment Policy and press Next.
 #
#
Request a certificate of a specific type that is required for the web API and click Enroll.
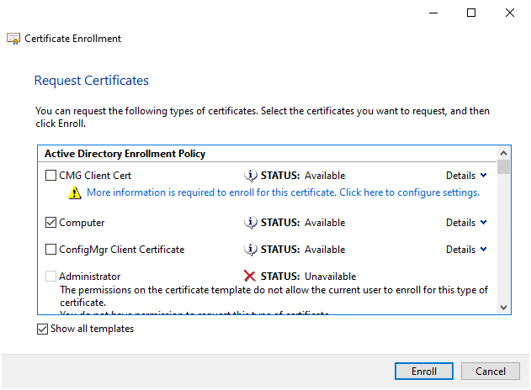
Review the certificate and press Finish.

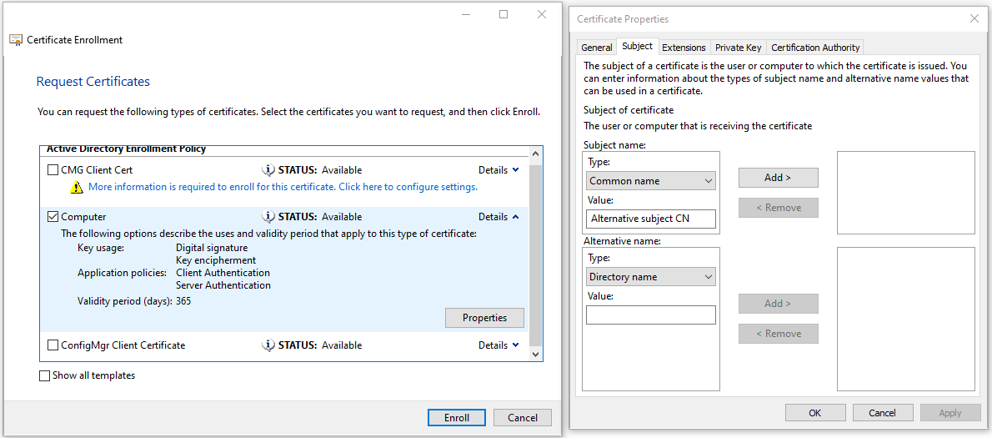
The certificate uses a FQDN in the Subject Alternative Name and therefore the ADOS web API’s (Security Manager, Configuration Manager, License Manager, Bus services, Inspect services, CM4D services) should configure the FQDN everywhere the hostname is required. Clients should then invoke the services using the FQDN otherwise the server responds with HTTP Bad Request.
There may be multiple certificates in the personal store with the same ‘Issue to’ property. This causes an issue when the certificate that has the ‘Server authentication’ set expires earlier than the certificate that does not have that intended purpose set. The ADOS web API’s select the certificate by its subject CN and the longest validity. It does not check the intended purpose.

It is recommended to check if the subject common name can be changed in the certificate type selection window as indicated below:
Install ATS Security Manager
ATS Bus uses ATS Security Manager to authenticate users and API's against a central database. ATS Security Manager is a plugin found within ATS Configuration Manager.
The minimum requirement for ATS Bus 2.8 is ATS Security Manager 1.4.
Install ATS Security and Configuration Manager
Please follow the ATS Security and Configuration Manager installation document before proceeding with the post installation steps.
Installing ATS Security & Configuration Manager
Ensure that the host names provided during the installation match those specified in the SAN section of the certificates used for TLS/SSL.
Install ATS Licensing
ATS Bus uses the ATS Licensing 4.0 plugin within ATS Configuration Manager and allows users to configure licenses from any computer with a web browser.
ATS Bus is also compatible with ATS Licensing 3.0. For further information, please see the ATS Licensing 3.0 installation guide. 
Install ATS Licensing plugin
Please follow the ATS Licensing installation document before proceeding with the post installation steps.
Ensure that the host names provided during the installation match those specified in the SAN section of the certificates used for TLS/SSL.
Ensure that the steps detailed in the Register ATS Licensing application in ATS Security section in the installation guide are followed closely.
Install NServiceBus Monitoring
ATS Bus uses ServiceControl, ServiceInsight and ServicePulse provided by Particular Software to monitor the bus stops and the messaging framework. ServiceInsight shows the messages being handled and failed and it also shows the message details. ServicePulse is used to monitor the message throughput and other performance related items.
ServiceInsight: Diagnostics tool showing messages and conversations. Uses ServiceControl to view all handled messages.
ServicePulse: A health monitor for the bus stops (production monitoring). It processes heartbeat messages from the bus stops and it allows the user to resend failed messages.
ServiceControl: Backend/service that provides information for ServiceInsight and ServicePulse. It's the central service that handles and processes the audit and error messages. The bus stops have a module/library that connects to the ServiceControl service.
Install NServiceBus Monitoring Tools
The ServiceControl and Monitoring instance can be installed on the same computer as the bus stops, but it is good practice to install them on a central computer.
Extract the NServiceBus_Monitor_Node_xxx.zip file included with the ATS Bus installer package. This archive contains the following installers:
Particular ServiceControl 2.1.3 (required when upgrading from ATS Bus 2.0)
Particular ServiceControl 3.8.4 (required when upgrading from ATS Bus 2.5)
Particular ServiceControl 4.20.2 (version used for ATS Bus 2.8)
Particular ServicePulse 1.30.0 (version used for ATS Bus 2.8)
Particular ServiceInsight 2.8.0 (version used for ATS Bus 2.8)
The Particular applications/services should be installed in the following order:
Particular ServiceControl
Particular ServiceInsight
Particular ServicePulse
The Particular software is licensed and the provided license named NServiceBus.License.xml must be installed. Open the ServiceControl Management application and click on the License button at the top right-hand side and import the license from NServiceBus.license.xml.
A warning may be shown that the upgrade protection expired. This message can be ignored as it does not affect Particular ServiceControl, Particular ServiceInsight, Particular ServicePulse or ATS Bus.
Setup a Monitoring Instance
Perform the following steps to setup a ServiceControl Monitoring instance:
Open the ServiceControl management application.
The following window opens.
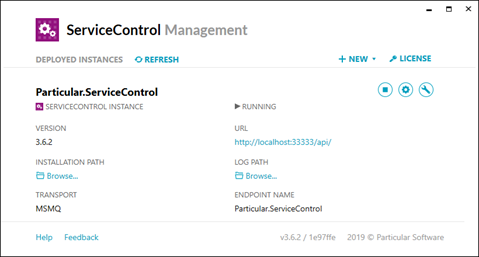
It may or may not show already configured ServiceControl or monitoring instances.
Click +NEW and select Add monitoring instance.
In the new window enter the required information. The transport selected should be the same as the transport used by the bus stops and the ServiceControl instance.
Click Add once all configuration items are provided.
Setup a ServiceControl and Audit Instance
Run Service Control Management.
Older versions of ServiceControl managed audit, error and control messages. ServiceControl version 4.20.2 separates the audit message handling from the error and control message handling and requires the user to configure 2 separate instances. The instances should use the following preferred configuration values:
Transport: RabbitMQ, Azure Service Bus, Azure Storage Queues or SQL Server Transport. This depends on the transport used by ATS Bus.
Audit retention: 2 days. The value could be set to a higher value but that requires more disk space to be used by the embedded ServiceControl database. The approximate storage capacity required depends on the amount of messages being audited * their message size * the retention time.
Error retention: 5 days. This gives the user 5 days to detect errors and retry the messages using ServicePulse or ServiceInsight. The value could be set to a higher value but that requires more disk space to be used by the embedded ServiceControl database. The approximate storage capacity required depends on the amount of messages being audited * their message size * the retention time.
Instance name: The name of the ServiceControl instance. It allows the user to configure a meaningful name for the instance that is shown in the Windows Services application.
The name of the ServiceControl instance is used as the ServiceControl queue name. The name for the ServiceControl instance must match the ‘ServiceControl queue’ in the general NServiceBus configuration in ATS Bus Cockpit.
Audit Queue name: The name of the audit queue. It must match the ‘Audit queue’ in the general NServiceBus configuration in ATS Bus Cockpit.
Error Queue name: The name of the error queue. It must match the ‘Error queue’ in the general NServiceBus configuration in ATS Bus Cockpit.
ServicePort: The default value of the ServiceControl instance is 33333, the Audit instance uses 44444.
Database maintenance port: The default value of the ServiceControl instance is 33334, the Audit instance uses 44445.
Ensure that the drive/directory where the ServiceControl database and logfiles are store has enough storage capacity. The size of the database may exceed 100GB depending on the amount of messages being audited.
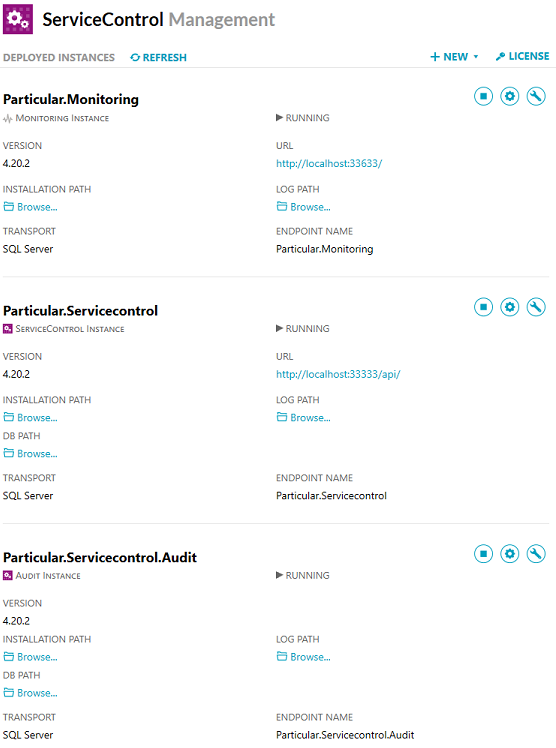
After configuration, the ServiceControl Management application may show the following instances:
Upgrading NServiceBus Monitoring Tools
ATS Bus 2.0 came with ServiceControl 1.47.5, ATS Bus 2.5 came with ServiceControl 2.1.3 and 3.2.2 and ATS Bus 2.8 comes with ServiceControl 2.1.3, 3.8.4 and 4.20.2. These versions of ServiceControl are required to upgrade ServiceControl to a newer version.
Upgrading to ServiceControl 4.20.2 is done in the following order:
Upgrade from ServiceControl 1.47.5 to ServiceControl 2.1.3 if ATS Bus 2.0 is installed.
Upgrade from ServiceControl 2.1.3 to ServiceControl 3.8.4 if ATS Bus 2.0 or 2.5 is installed.
Upgrade from ServiceControl 3.8.4 to ServiceControl 4.20.2 if ATS Bus 2.0, 2.5, 2.6 or 2.7 is installed.
Upgrading from ATS Bus 2.0 to 2.8 requires an upgrade to ServiceControl 2.1.3 first, then to version 3.8.4 and finally to version 4.20.2.
Always create a backup of the ServiceControl Data. Please visit https://docs.particular.net/servicecontrol/backup-sc-database for instructions.
Upgrade from ServiceControl 1.47.5 to 2.1.3
There are 2 methods of performing this upgrade:
In-place upgrade to version 2 (intrusive). This migrates the existing database to a newer version. This upgrade cannot be rolled back and therefore a backup is required! The migration can take a long time depending on the amount of messages in the ServiceControl database.
Side-by-side upgrade to version 2 (less intrusive). This involves running a second instance of ServiceControl to be deployed. Please be advised that the old ‘audit’ and ‘error‘ queues should be renamed as ATS Bus cannot configure different names for the ‘audit’ and ‘error’ queues.
For further information on the methods to perform the upgrade, please visit https://docs.particular.net/servicecontrol/upgrades/1to2
Upgrade from ServiceControl 2.1.3 to 3.8.4
Upgrading to ServiceControl 3.8.4 can be done in place. The ServiceControl application should be upgraded first. The ServiceControl Management tool can then be used to upgrade the ServiceControl instance.
For further information on upgrading the ServiceControl, please visit https://docs.particular.net/servicecontrol/upgrades/2to3
Upgrade from ServiceControl 3.8.4 to 4.20.2
The ServiceControl application should be upgraded first. The ServiceControl Management tool can then be used to upgrade the ServiceControl instance.
The most significant change in ServiceControl 4.20.2 is that the ServiceControl instance does not maintain the 'audit' queue and only maintains the control and error. Audit messages are maintained via a separate ServiceControl Audit instance. Please read the 'Disk space requirements' section at the URL below as it details the impact on disk space and compacting the ServiceControl embedded database.
For further information on upgrading the ServiceControl, please visit https://docs.particular.net/servicecontrol/upgrades/3to4
ServicePulse (1.30.0) and ServiceInsight (2.8.0) can be installed after ServiceControl is installed and running.
Register ATS Bus application in ATS Security
Before starting the installation, the ATS Bus application needs to be registered in ATS Security.
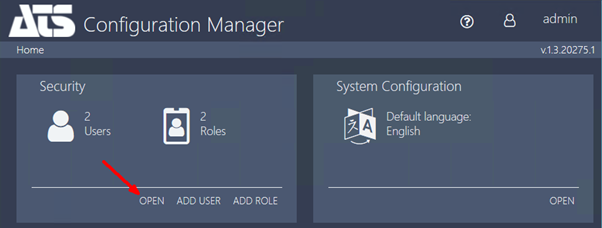
Browse to the ATS Security URL and login with a user that has rights to edit applications.
Click the Security card and press Open.
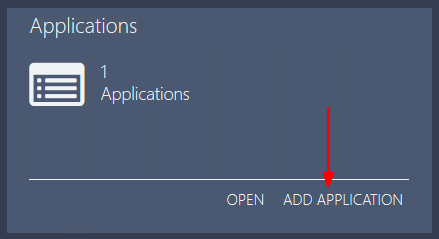
Click the Applications card and press Add Application.
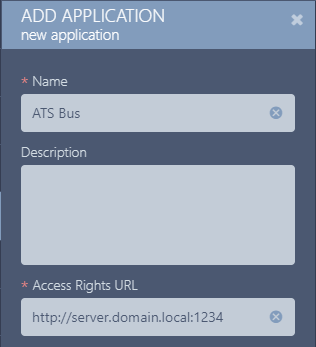
Enter the following information about the new application:
Name: Enter a name for the application, for example ATS Bus.
The name assigned to the application must be unique within ATS Security.
Description (optional): Enter a description for the application that can be seen in the applications grid card.
Access Rights URL: Enter a generic placeholder such as https://fake.url. This field is required to create the application but is otherwise unused.
This field is currently mandatory but will be removed in a future version of Security Manager.
Application logo and/or background image (optional): Upload a logo image and/or background image for the application.
Press Save.
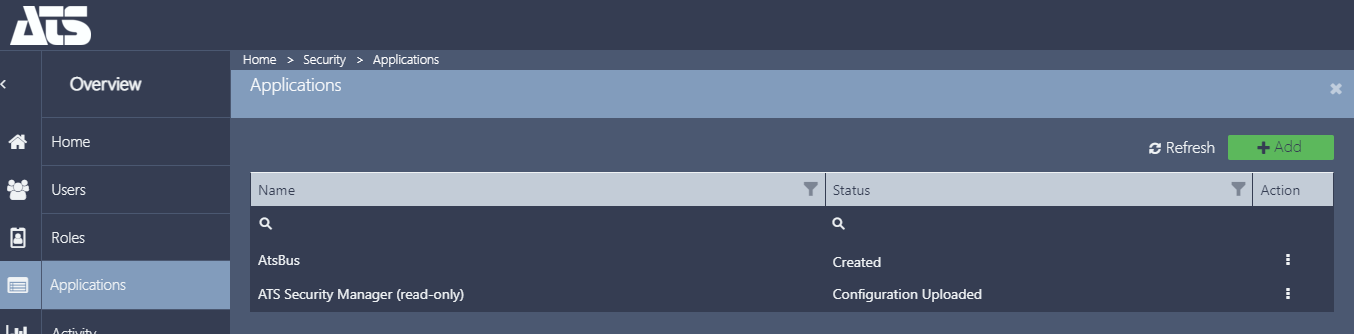
If the application was added successfully, the new row of the Applications grid should have the Status Created.
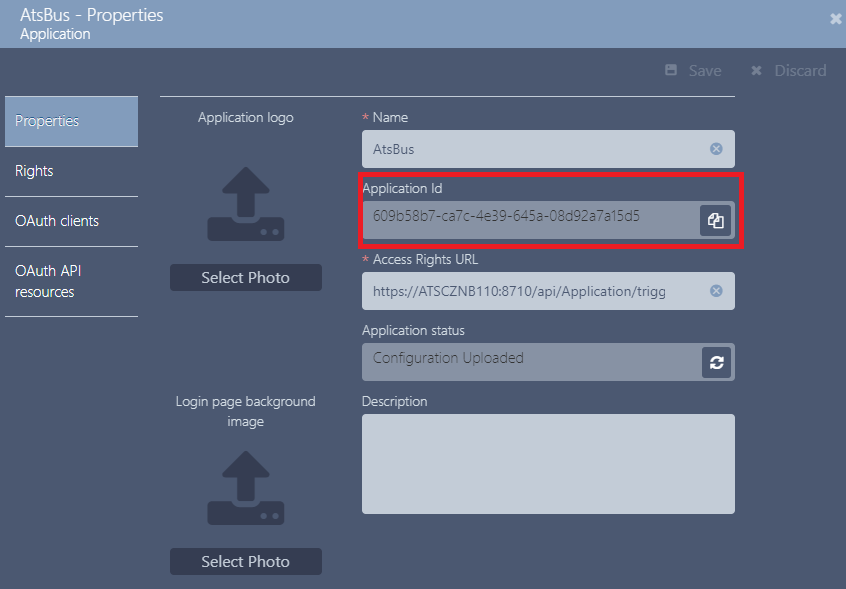
Acquire Application ID for ATS Bus application
During the installation of the ATS Licensing Server services, an Application ID is required. To obtain the Application ID, please follow the steps below:
Click on the grid row of the application created for ATS Licensing to open the applications properties.
In the Application Id field, copy the string by pressing  .
.
Install ATS Bus
This section describes the ATS Bus installation process.
Close any application that controls windows services like services.msc, computer management and the task manager before installing ATS Bus. They may interfere with the installation procedure.
Run the installer. The following screen will be displayed:

Click Next.
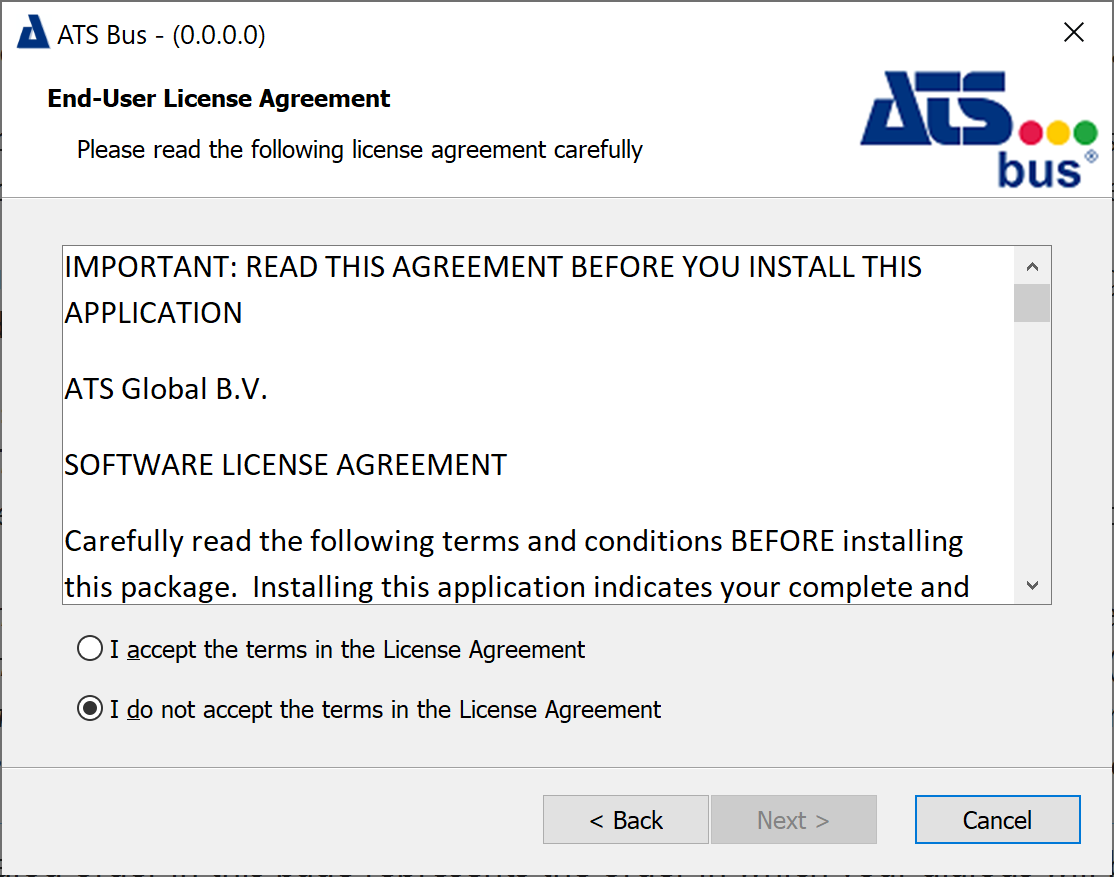
Select I accept the terms in the license agreement. Click Next.
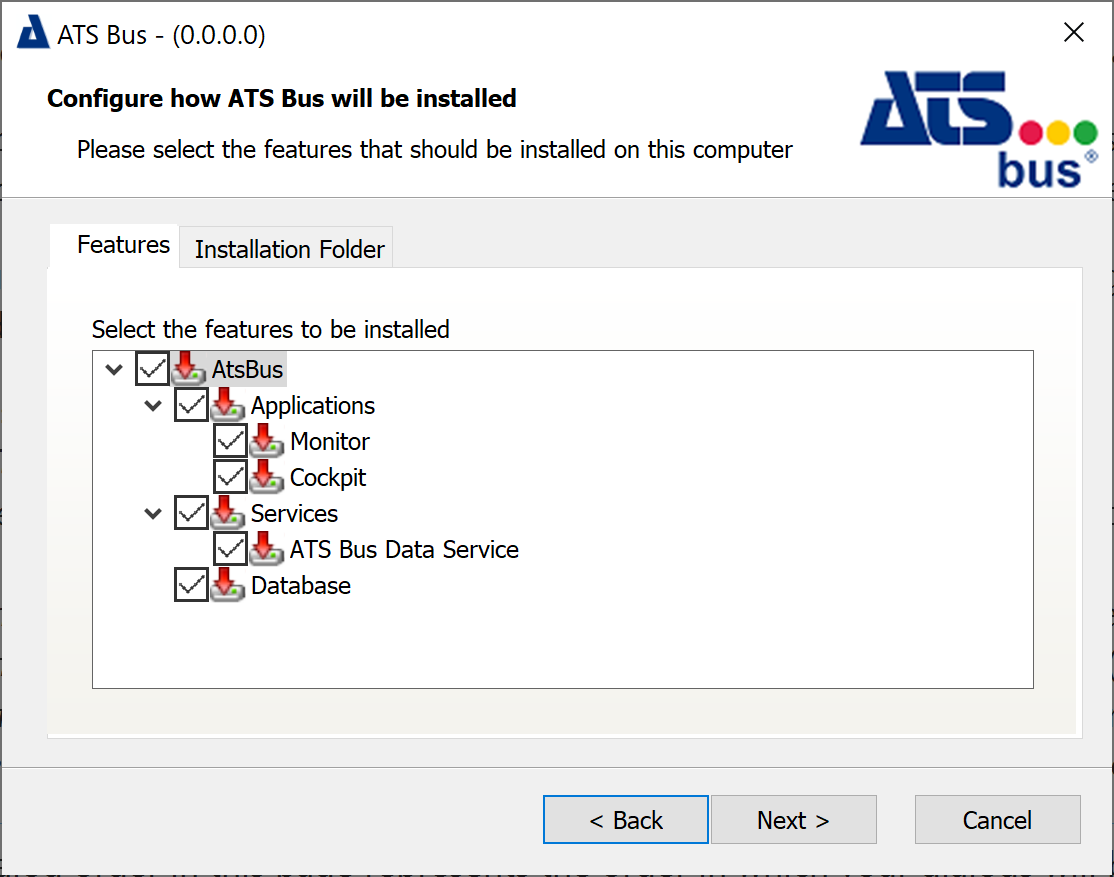
Select one or more features that should be installed. Items can be installed individually.
Applications: ATS Bus Monitor and ATS Bus Cockpit.
Monitor: ATS Bus Monitor.
Cockpit: ATS Bus Cockpit.
Services (ATS Bus Data Service): The data service that serves as a bridge between the ATS Bus configuration database and applications and bus stops.
Database: Installs or overwrites the ATS Bus configuration database to an SQL Server. Do not enable this feature when upgrading ATS Bus, it will overwrite the existing database.
Click Next. The next dialog will depend on whether or not you're creating a new database.
When the database feature is selected
The 3 dialogs below are shown when the Database feature is selected.
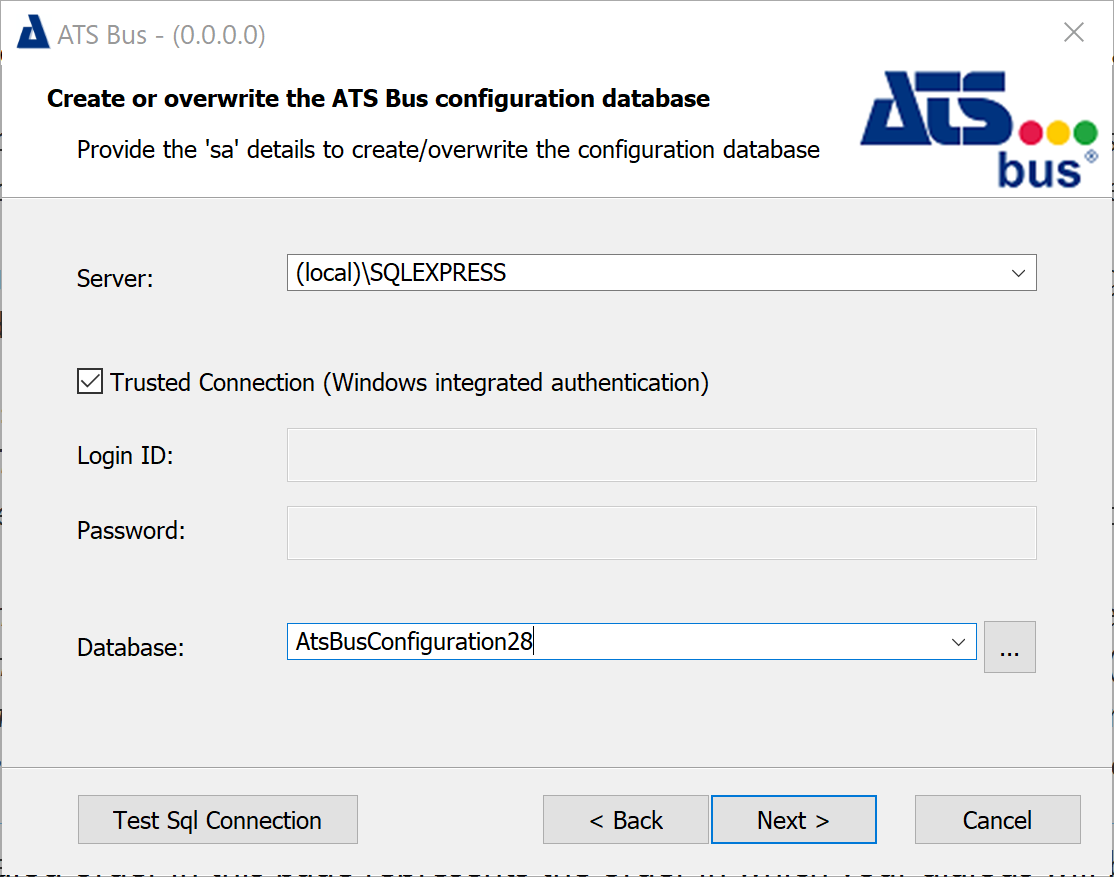
Fill in the required information to connect to the SQL Server to create the ATS Bus configuration database. The username and password must belong to an SQL Server user that has administrative privileges. These values can only be provided when the ‘Trusted Connection’ is not selected. The ‘Trusted Connection’ uses the Windows credentials of the user that executes the ATS Bus installer.
Clicking ![]() next to the ‘Database’ drop down list will show which databases are already present on the SQL Server.
next to the ‘Database’ drop down list will show which databases are already present on the SQL Server.
Click Next.
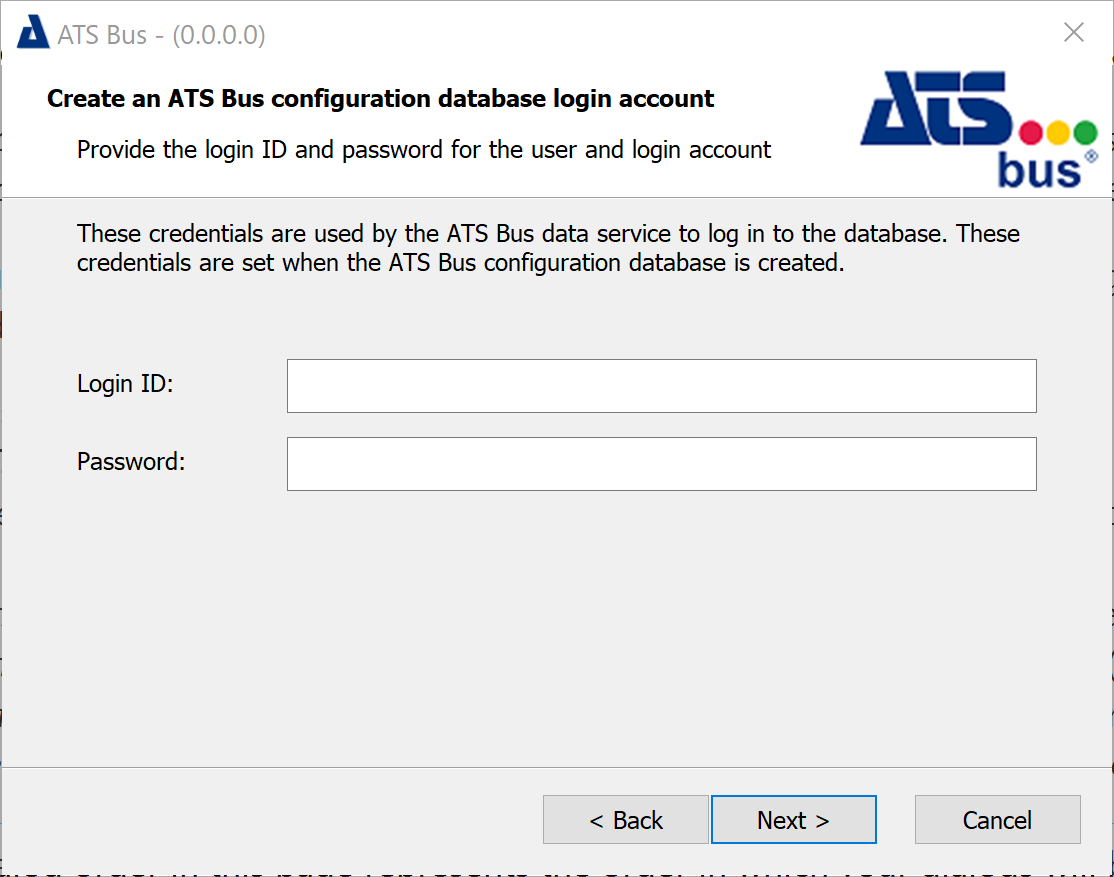
Enter a Login ID and Password for the ATS Bus data service to logon to the ATS Bus configuration database. The Login ID and Password are not the same as the one used to logon to ATS Bus Cockpit.
Click Next.
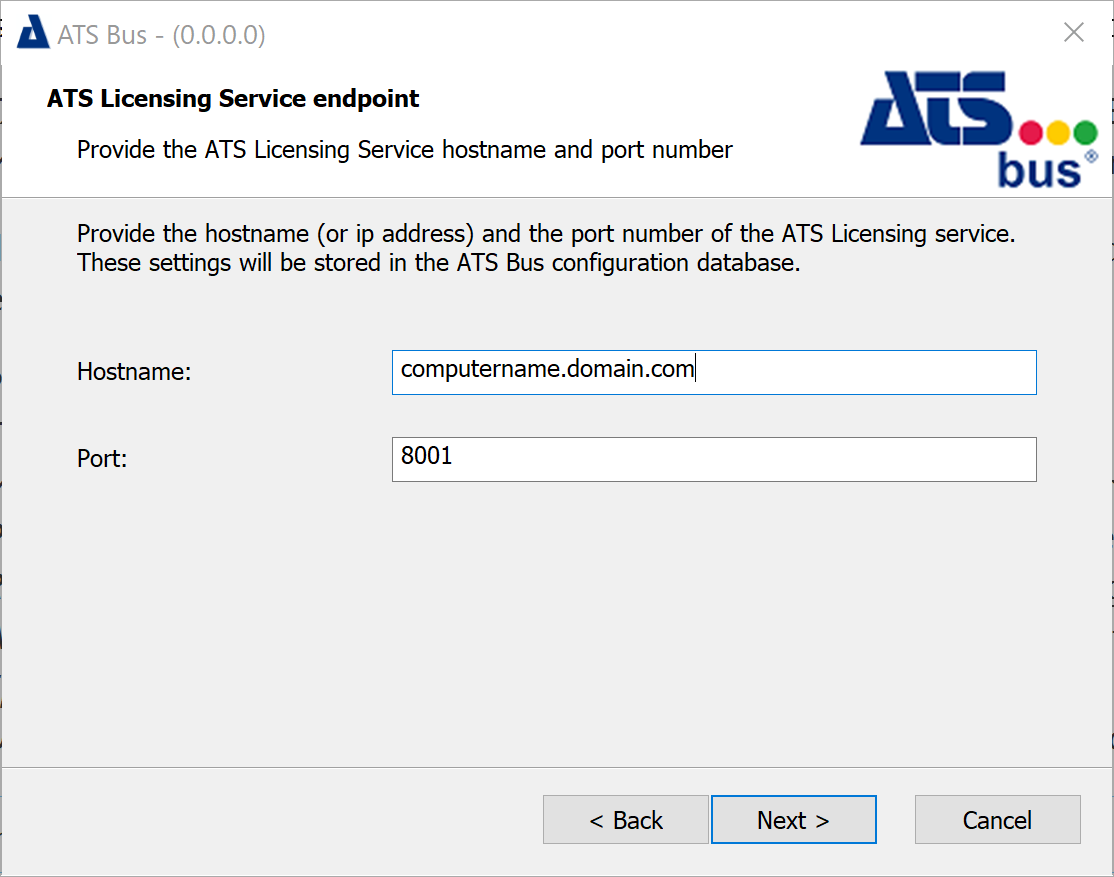
This dialog configures the endpoint details for the licensing server.
Provide the Hostname and Port Number of the licensing server and click Next.
When the database feature is not selected
The following screen is shown if the database is not selected but the Data Service is as the Data Service needs to know how to access the database.
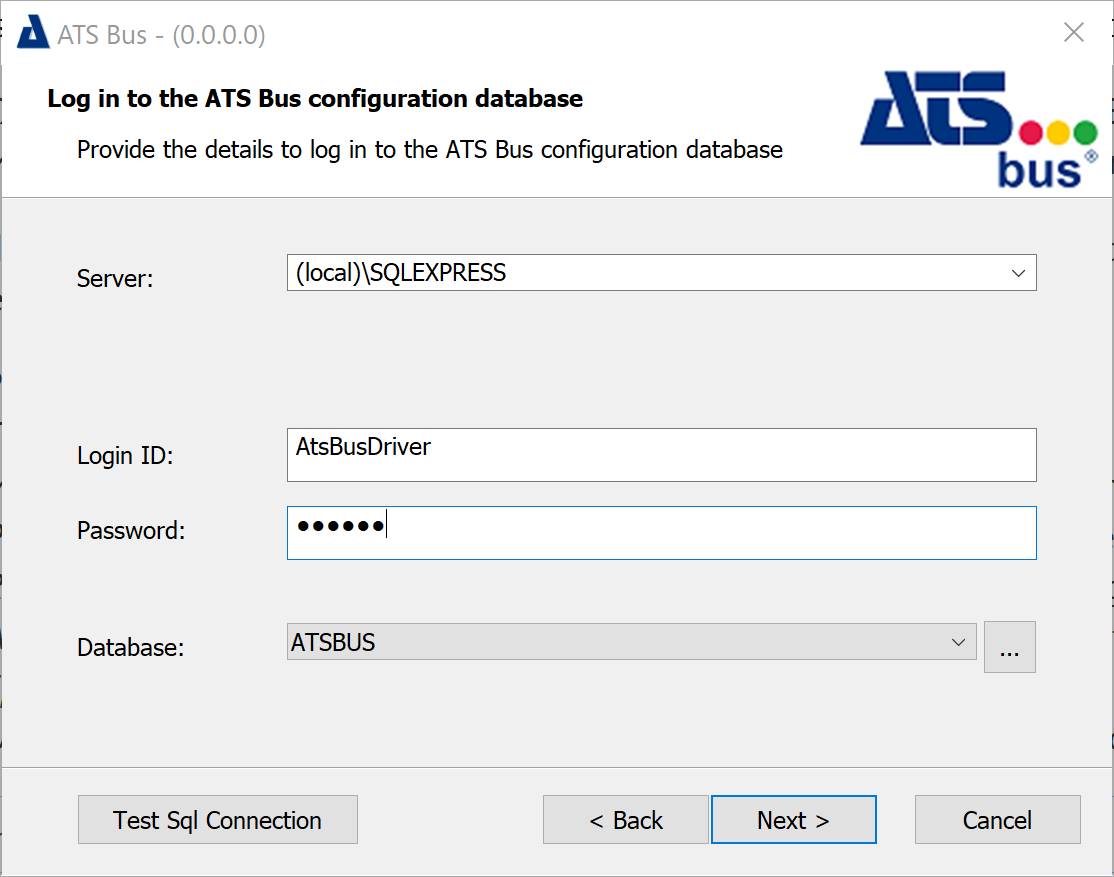
This dialog does not create a new ATS Bus configuration database but connects to an existing one using the SQL user Logon ID and Password.
Enter the required information and click Next.
For All Installations
Provide the port numbers and click Next.
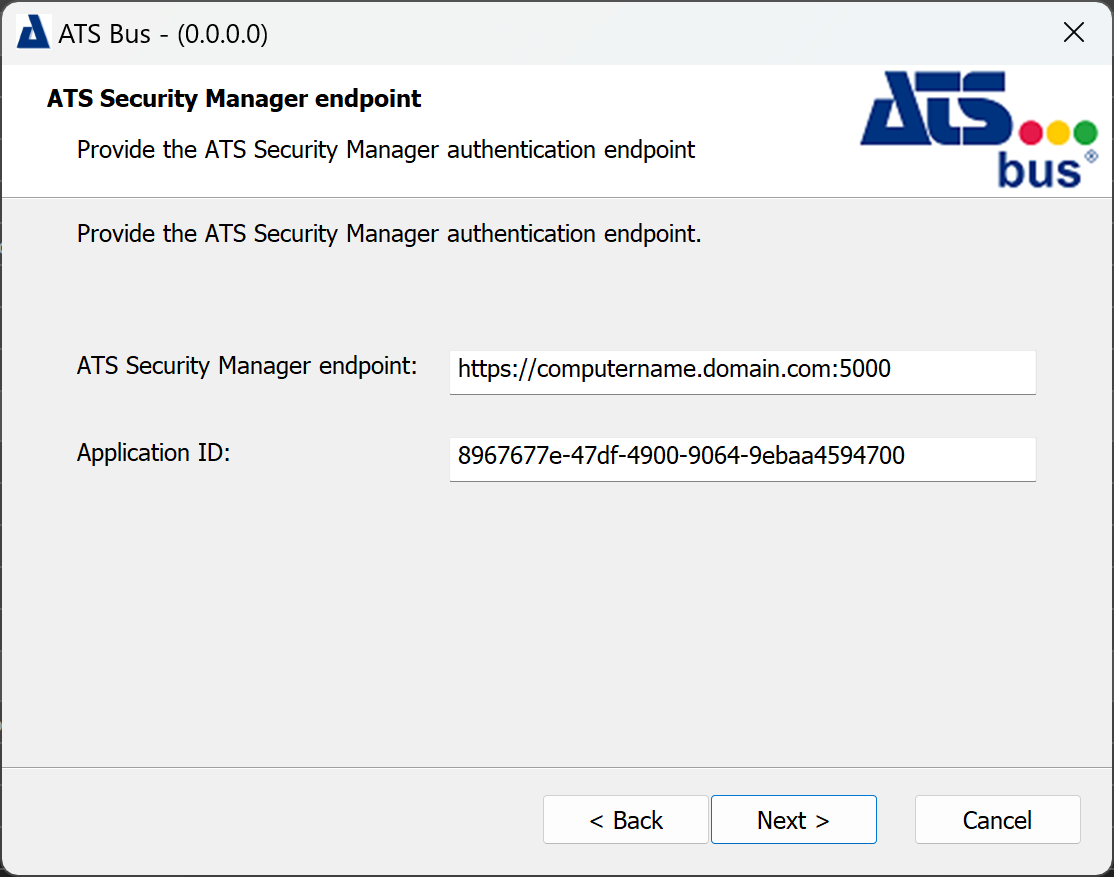
ATS Bus uses ATS Security to authenticate users. Authentication happens through an authentication endpoint and this dialog is used to provide that endpoint to the ATS Bus Data Service.
ATS Security Manager endpoint: Enter the endpoint for Security Manager.
The endpoint should include the FQDN and be in the following format: https://hostname.domain:5000
Application ID: Paste the application ID gathered in section Acquire Application ID for ATS Bus application. Click Next.
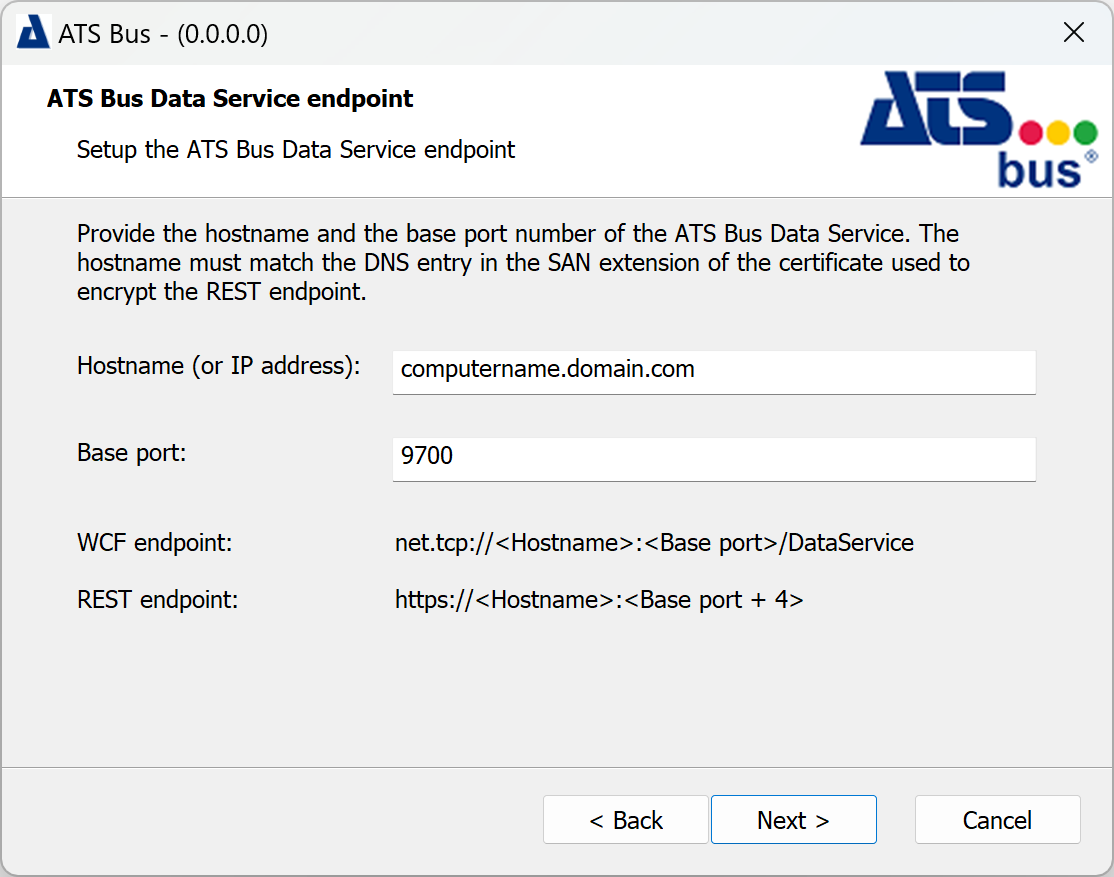
The ATS Bus Data Service endpoint dialog configures the hostname and base port of the ATS Bus Data Service. The data service binds to the following ports:
net.tcp://<fqdn>:<baseport> for the WCF configuration interface
https://<fqdn>:<baseport+4> for the HTTPS bus stop configuration interface
Examples:
net.tcp://server1:9700/DataService
https://server1:9704
https://server1:9710/api/application/trigger
Please note that ATS Bus only provides encrypted endpoints.
The FQDN (Fully Qualified Domain Name) must match a DNS entry in the SAN extension of the certificate encrypting the REST endpoint.
Please ensure that a certificate is registered with the port used by the REST endpoint which is base port +4. Clients will experience connection issues if a certificate is not assigned to the port. For further information please click here.
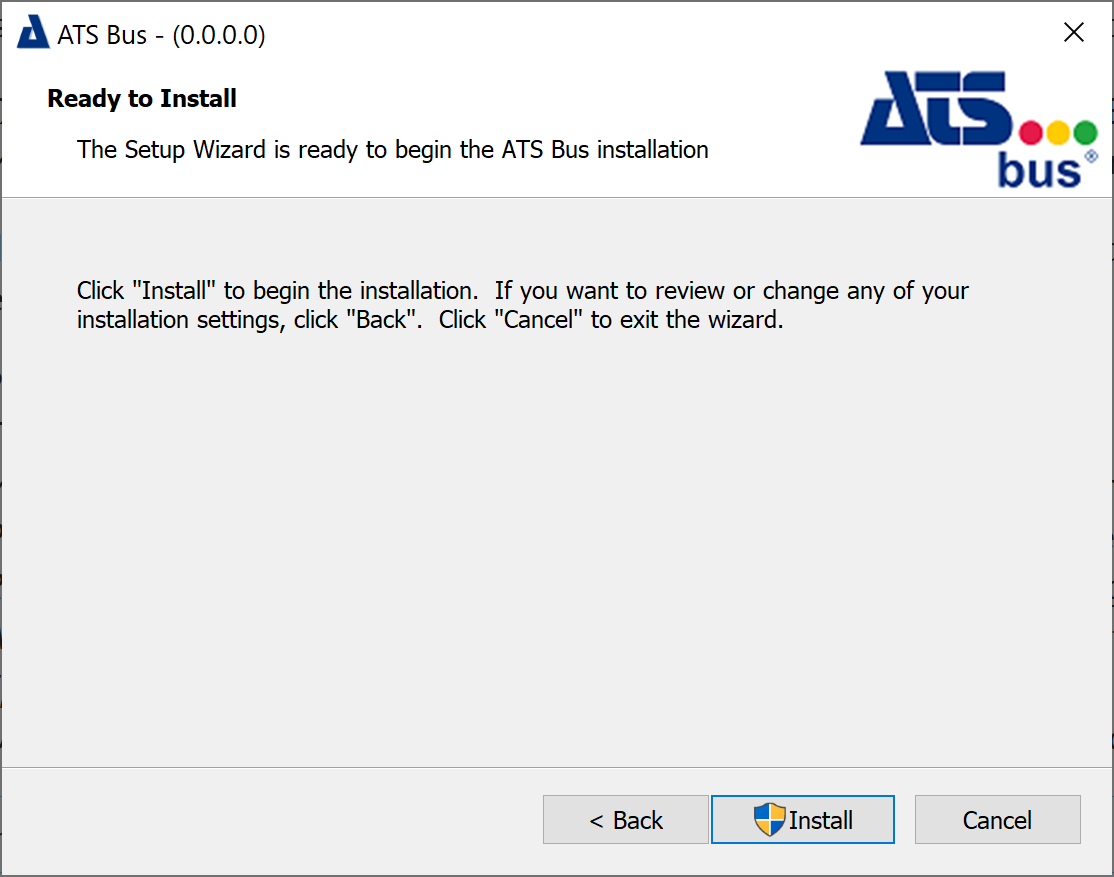
Click Install. This will create the database when the Database feature has been selected and create and start the ATS Bus Data Service when the Services feature has been selected. The installer also creates log sources, installs certificates and makes sure that the data service is started when Windows starts.
Click Finish to close the installer.
Configuration of roles for ATS Bus Configuration
After the successful installation of ATS Bus the status of the registered ATS Bus application in ATS Security should be set to Configuration Uploaded. This indicates that the ATS Bus application rights have been uploaded to ATS Security and can be assigned to ATS Security roles, which in turn can be assigned to users.
ATS Bus includes the following application permissions:
AtsBusConfigurationRead
AtsBusConfigurationWrite
AtsBusWorkOrderHandlingRead
AtsBusWorkOrderHandlingWrite
AtsBusMonitoringRead
AtsBusBusStopRestart
For more information on creating and managing user accounts, please visit the ATS Security online help here.
ATS Bus must be installed before ATS Security is configured.
Create an ATS Bus role
Create a new role in ATS Security i.e. ATSBusAdmin. For further information on creating user roles, click here.
Select the Rights tab and expand the ATSBus list.
Assign all permissions to the new role. For further information on editing roles, click here.
Assign the new role to a user that can authenticate through ATS Security such as an admin user. For further information on editing users, click here.
Alternatively, assign all permissions to an existing admin role.
Users assigned with the new permissions are required to log out and sign in again for the changes to take effect.
The user and role configurations are completed. The user can log into ATS Bus Cockpit using the Admin account.
Additional identity providers such as active directory can be configured to provide access e.g. via the current windows login
Install a Bus Stop
This section describes the installation process for every Bus Stop type.
If an earlier version is present it must be uninstalled before proceeding.
Run the installation executable and click Next.
Select I accept the terms in the license agreement and click Next.

Select an installation folder.
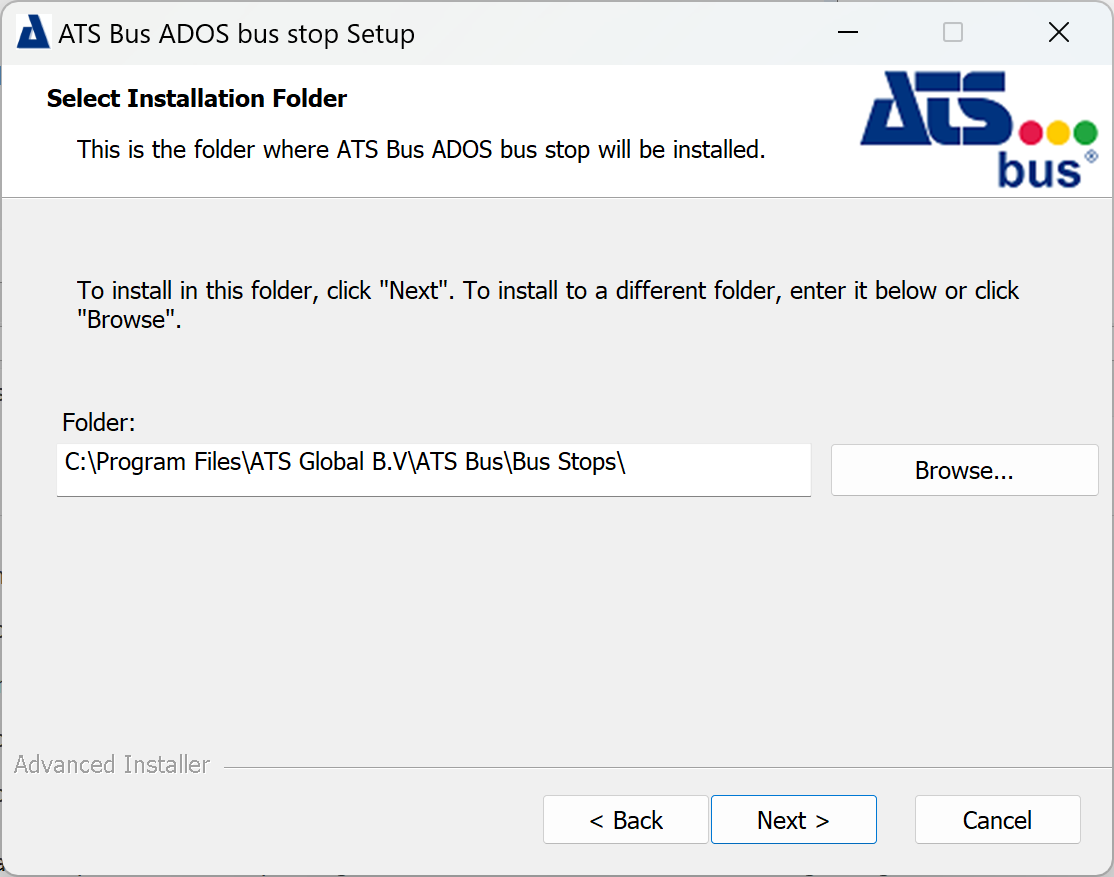
The OT, IT and ADOS bus stop install to C:\Program Files\.
The OT bus stop installer will also display a tab with a list of features under a Features tab. The installation directory can be configured in the Installation folder tab.
Click Next.
Enter the name of the bus stop. This is the name it will use during configuration.
Select Use TLS to specify that all endpoints will use TLS. This setting is configures the default certificate in the appsettings.json file.
Provide a base path if the bus stop is deployed behind a reverse proxy.
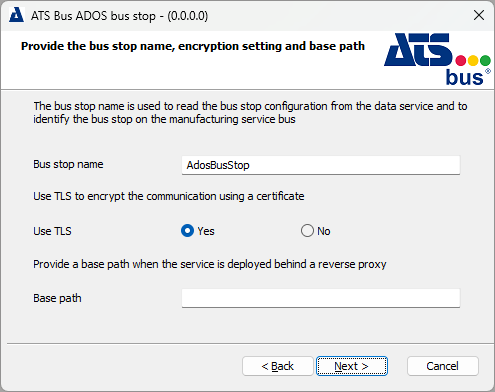
The bus stop may only contain the following characters: 'a'-'z', 'A'-'Z', '0'-'9' and '_'
This bus stop name will also be used as folder name in which the installer will copy the assemblies and configuration files of that bus stop.
Step 9 will be skipped if Use TLS is set to No.
Click Next.
This dialog allows users configure a default certificate that is used for all web API’s, which are hosted by the bus stop and have Use TLS set to Yes.
Set Allow invalid certificates to Yes if self-signed certificates are used. Also make sure to add a copy of the self-signed certificate to the Trusted Root Certification Authorities store.
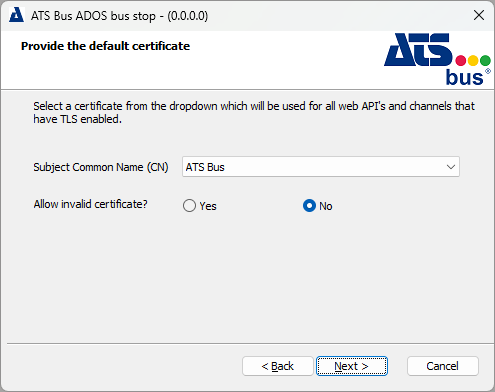
For further information on configuring certificates, please click here.
Click Next.
Provide the ATS Bus Data Service configuration endpoint.
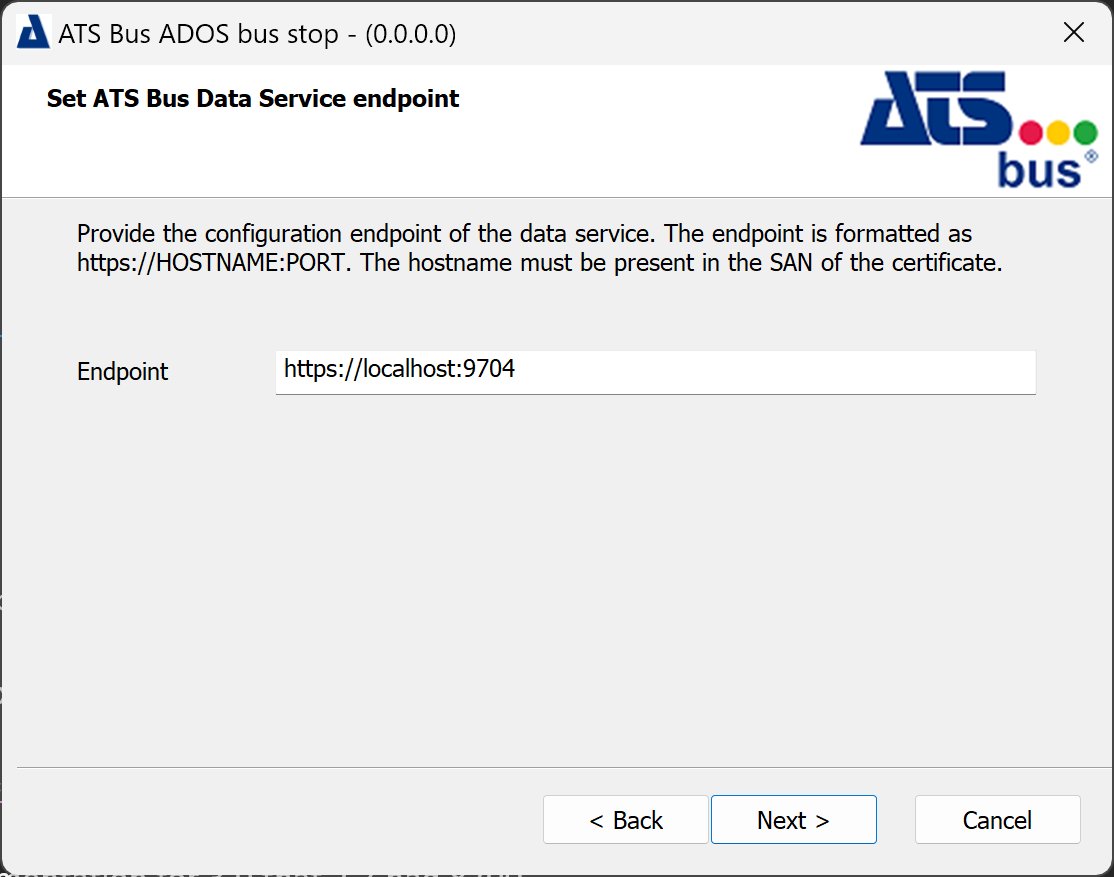
The default port of the ATS Bus 3.0 data service configuration endpoint is 9704. The hostname of the endpoint should match one of the hostnames provided in the Subject Alternative Name section of the certificate that secures the configuration endpoint.
Click Next.
Click Install.
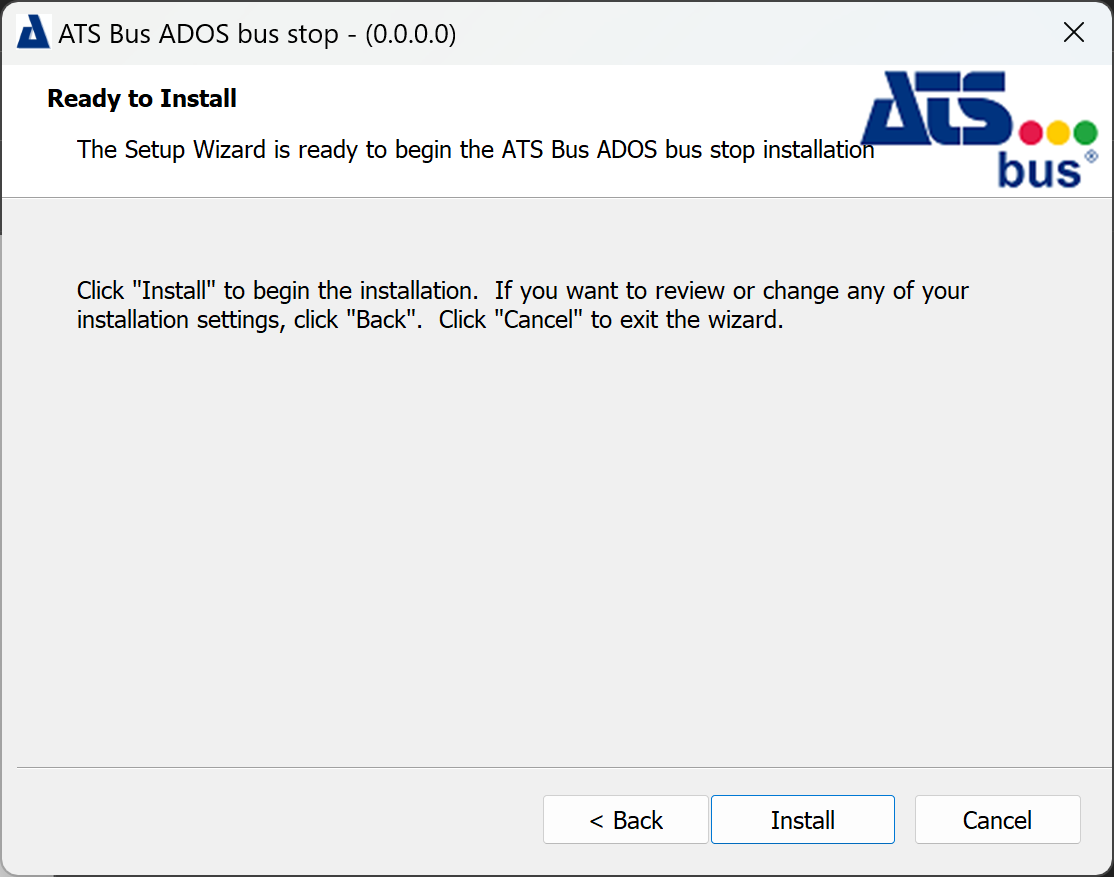
When the application has successfully installed the following screen will be shown. Click Finish to close the installer.

Update from ATS Bus 2.6 to 2.8
To upgrade ATS Bus the existing application must be completely uninstalled before installing the new version.
All ATS Bus and Particular services must be stopped before removing the existing application.
The ATS Bus 2.7 and 2.8 configuration databases are not backwards compatible with the ATS Bus 2.6 configuration database and therefore a new database is created by the ATS Bus 2.7 and 2.8 installers.
Changes to the configuration database
The upgrade process for migrating from ATS Bus 2.7 to 2.8 is handled using migration scripts that automatically update the database.
Updating from ATS Bus 2.6 to 2.8 is similar to the update from ATS Bus 2.6 to 2.7. The ATS Bus 2.6 database is first updated to contain the latest 2.6 fixes and then it’s content is converted into a new ATS Bus 2.7/2.8 database. The conversion is done automatically, the user should only provide the name of the new database. The old SQL credentials are also applied on the new database.
Updating from ATS Bus 2.6 to 2.8 goes via the following steps:
Uninstall ATS Bus 2.6.
Create a backup of the ATS Bus 2.6 configuration database.
Install ATS Bus 2.8 and unselect the ‘Database’ feature.
Provide the ATS Bus 2.6 configuration database connection details in the same way as performing a standard update. The installer will check the current database version and first migrate the ATS Bus 2.6 configuration database to the latest ATS Bus 2.6 version.
5. Provide a new database name for the ATS Bus 2.8 configuration database along with database administrator credentials to create the new database. The installer will migrate the configuration from the ATS Bus 2.6 configuration database to the ATS Bus 2.8 configuration database. This is an automated process. After the migration, the ATS Bus 2.8 configuration database is updated to the latest version.
Changes to the OperationsCapability handling
The OperationsCapability handling utilised topics in ATS Bus 2.6 and earlier versions. In ATS Bus 2.7 OperationsCapability uses operations. The ATS Bus 2.7 installer updates the configuration and the user is required to reconfigure the OperationsCapability handling. The update script applies the following changes:
Deletes the PublishAsOperationsCapability actions from the OT bus stop channel message configuration, these should be reconfigured.
Deletes all PublishWithTopic actions in the ADOS, Cloud and IT bus stop from channel messages that handle an OperationsCapability, these actions should be reconfigured using the PublishOnTheBus action.
Removes the subscriptions on the ProcessOperationsCapability messages for topics. The subscriptions must be reconfigured for operations.
Removes the export actions for the ProcessOperationsCapability bus messages, these actions must be reconfigured.
All items above must be addressed when migrating to ATS Bus 2.7.
Impinj Octane SDK update
The custom configuration for the RFID channel must be updated:
Copy the XML configuration from ATS Bus Cockpit to a text editor before updating to ATS Bus 2.7, do this for all RFID channels.
Update to version 2.7.
Go to the RFID channel configuration and press the ‘Use Default’ button in the ‘XML Reader Settings’ control. This will create a new configuration.
Copy the newly created configuration into a text editor.
Create a working copy of the original configuration.
Insert the following XML statement just above the ‘XArray’ node:
<ReducedPowerFrequenciesInMhz />
Rename ‘XArray’ to ‘SpatialConfig’
Set the SpatialConfig Mode to ‘Direction’, ‘Inventory’ or ‘Location’
Add the following nodes to the ‘Location’ nodeset (inside the ‘SpatialConfig’):
<MaxTxPower>true</MaxTxPower>
<TxPowerInDbm>30</TxPowerInDbm>
<DisabledAntennaList />
<LocationAlgorithmControl />
Remove the complete ‘Transition’ nodeset from ‘SpatialConfig’
Add the following to the ‘SpatialConfig’ nodeset:
<Direction>
<EnabledSectorIDs />
<TagAgeIntervalSeconds>20</TagAgeIntervalSeconds>
<UpdateIntervalSeconds>5</UpdateIntervalSeconds>
<UpdateReportEnabled>true</UpdateReportEnabled>
<EntryReportEnabled>true</EntryReportEnabled>
<ExitReportEnabled>true</ExitReportEnabled>
<FieldOfView>Wide</FieldOfView>
<Mode>HighPerformance</Mode>
<TagPopulationLimit>0</TagPopulationLimit>
<DiagnosticReportEnabled>false</DiagnosticReportEnabled>
<MaxTxPower>true</MaxTxPower>
<TxPowerInDbm>30</TxPowerInDbm>
</Direction>
Check if the working copy of the RFID editor has the same elements as the newly created configuration.
Copy the XML from the working copy in the XML Reader Settings section in the RFID channel configuration in ATS Bus Cockpit.
Configure to Run as Local or Domain User
By default, ATS Bus services (data service, browsing service or bus stop) run under the ‘Local System’ account but IT departments may need to run the services under a dedicated user account. This document provides information on how to achieve this. The following topics will be addressed:
Running the ATS Bus services as a dedicated local or domain user.
Setting up OPC DA (Workcenter bus stop OPC DA channel).
Build-in Accounts, Users, Groups and Permissions
Applications and services require a user or build-in account to execute and access resources (objects). The following build-in accounts are often used to run services:
Local System (NT AUTHORITY\System)
Has unrestricted access to all local resources.
More powerful that Administrator account.
The Local System account uses the PC account (hostname$) to login on the remote computer if both systems are in the same domain.
The Local System account uses the ANONYMOUS LOGON account to login on the remote computer if both systems are not in the same domain.
Network Service (NT AUTHORITY\Network Service)
Has restricted access to local resources.
The Network Service account uses the PC account (hostname$) to login on the remote computer if both systems are in the same domain.
The Network Service account uses the ANONYMOUS LOGON account to login on the remote computer if both systems are not in the same domain.
Local Service (NT AUTHORITY\Local Service)
Has restricted access to local resources.
The Local Service account always uses the ANONYMOUS LOGON account to login on the remote computer.
There are 2 types of user account, a local account and a domain account. A local account only has access to local computer resources and a domain account can be used to authenticate a domain user on multiple systems within a domain. In a workgroup configuration, machines cannot resolve each other’s local accounts because they do not share the same security database. Therefore, remote users are authenticated using the ANONYMOUS LOGON account.
A group is a collection of users and it simplifies the administration of user rights. Users inherit their rights from a group if they are a member of that group. The build-in group ‘Everyone’ represents local and domain accounts that the local computer knows.
Permissions apply to objects like files, services and so on and can be granted to domain (and trusted domain) users, groups and local users and groups (of the computer where the object is located). Permissions will indicate if a user or group can perform a specific operation on that object e.g. Execute permission can be assigned to a specific group, then only members of that group can execute that service. Other users that are not members of that specific group are denied the ability to execute the service. A user of that group can be denied permission by explicitly denying the permission for that user.
Follow the guidelines below when updating permissions:
Permissions on local objects (files, directories and queues) do not have to change when all ATS Bus services run as LOCAL SYSTEM on one single computer, this account has enough privileges to access all objects on the local computer.
Permissions for local objects should change when ATS Bus services run under a local or domain user account. Object permission must include this user account.
Remote object permissions (shares, queues, etc…) must include the:
computer account (hostname$) of the system that runs the ATS Bus services as LOCAL SYSTEM when working from within a domain.
the domain user account of the user that runs the ATS Bus services in a domain.
the ANONYMOUS LOGON account when the ATS Bus services use local computer accounts. Remote nodes cannot authenticate local users since they reside in other security databases.
How to Change File and Directory Permissions
Changing file and directory permissions are handled by the security tab in the file or directory property dialog.
Use the windows file explorer to navigate to the file or directory and use the context menu to bring up its properties.
Select the Security tab.
Click Edit to add/remove users or groups from the object permissions.
Click Add to add a computer, local, domain or ANONYMOUS LOGON account.
Make sure Computers is in the list of object types. If it isn't click Object Types to add it.
Click Locations… to select the location where the account may reside.
Click Check Names… to verify if the entered account exists.
Click OK to return to the previous dialog.
Set the permissions for the account that has been added.
Make sure that all groups and users listed in this dialog should be there and click OK to return to the properties dialog.
Click OK to confirm the changes and close the properties dialog.
Sub directories inherit permissions from parent directories. Files inherit permissions from the parent directories.
How to Change File Sharing Permissions
Directory sharing permissions are handled in the sharing tab in the directory property dialog.
Use Windows file explorer to navigate to the directory you want to share and use the context menu to bring up its properties.
Click Share in the Sharing tab and a dialog appears that allows accounts to be added.
Enter the following:
<AccountName>: Local or domain user account.
ANONYMOUS LOGON: The Anonymous logon account.
<COMPUTERNAME>$: Add a computer account.
Click Share. The directory sharing dialog opens.
This action modifies the share permissions and underlying file system permissions. The Advanced Sharing… button only modifies the sharing permission and not the underlying file system permissions. For more information visit the Technet website.
How to Run the ATS Bus Services Using a Dedicated Local or Domain Account
Make sure you have permissions allowing you to update service properties.
Go to the Services dialog (press WIN + R and enter services.msc)
Right click the ATS Bus service (bus stop, data service, browsing service) and select Properties from the context menu.
Select the Log On tab, select the This account radio button and click Browse to browse for the dedicated ATS Bus user account that has been created.
Enter the password for the user and click OK.
Stop the ATS Bus service. Do not restart the service because more changes are required:
File and directory permissions must be updated for the bus stops for the following files and directories:
C:\Program Files (x86)\Applied Tech Systems\ATS Bus Bus Stop\<XXX>\instance-mapping.xml’ where <xxx> resembles the bus stop name. This file may be moved to another location in the future.
All files and folders under C:\ProgramData\Applied Tech Systems\ATS Bus\<XXX>. <XXX> resembles the bus stop name.
Network sharing permission must be changed for:
The attachments directory which is located at: C:\ProgramData\Applied Tech Systems\ATS Bus\<XXX>\Attachments. The directory should be shared and access must be allowed to the ANONYMOUS LOGON account.
The Permissions of the NServiceBus DataBus file share must contain the proper permissions. The share name is configured in the ATS Bus configuration database.
The ATS Bus service can be started after the previous items have been addressed.