Results Configuration Options Results Configuration Options
The results of your search in the Navigation pane can be customized and filtered using the Result Options pane.

|
Active Effective Date |
Filter nominal data by Active Effective Date. This region will appear only after a Nominal Search has been executed. |
|
|
Enable Grouping |
Grouping refers to the organization of column headers in the report display region of DataUtility. Data will be sorted structurally, allowing you to find the data you need quickly and efficiently. For an in-depth discussion of DataUtility's grouping functionality, see the topic Enable Grouping. |
|
|
List Mode |
When the report display is using List Mode, data will be collected in vertical columns as with any standard Windows spreadsheet. As with grouping, you can drag and drop headers from the Columns region.
|
|
|
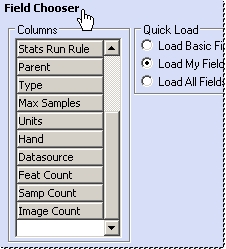
The Columns field contains a list of all the column headers available for use in the report display. Scroll up and down to find the desired column header, then drag and drop the header onto the column in the report display region. When headers are removed from the display region, they will return to the end of the column list automatically. Some headers may not disappear from the Columns field when they are used in group mode, since grouping allows for headers to be used twice.
|
||
|
The Quick Load region consists of three Column setting options: |
||
|
Load Basic Fields |
Selecting Load Basic Fields will activate a predefined, limited set of column headers in the report display region. Load Basic Fields is a fixed column setting that is automatically set to enable grouping. Any modification of the column header fields will consequently switch the Quick Load settings to Load My Fields. |
|
|
Load My Fields |
Load My Fields is a user-defined, customizable setting. Any changes made to the report display settings (e.g. modify header selection or enable grouping) will be saved to your user profile when DataUtility closes or whenever a search is performed. Each time DataUtility is opened, your customized settings will be loaded by default. |
|
|
Load All Fields |
Load All Fields will populate the report display region with every column header available. Load All Fields is a fixed column setting that is automatically set to enable grouping. Any modification of the column header fields will consequently switch the Quick Load settings to Load My Fields. |
|
|
Text Filter |
Filtering results in the report display region of DataUtility using text in a useful way of reducing your list of items to a precise point.
|
|
The Image Preview pane allows you to view the image which is associated to a selected Routine in the Database. Images added to a Routine may be previewed before committing changes to the Database. This pane may be disabled by selecting the Disable Image Loading in the Advanced Options of the Image Search Parameters pane.
Images may be rotated, zoomed, and translated within the defined preview area. The following hot keys may be used in conjunction with the mouse:
· Translate image: Hold down the Shift (or Ctrl) key and drag the image as desired.
· Spin image: Hold down the mouse button, drag the image in the desired direction, and then release the mouse button. Image will continue to spin on its own. To stop spin, click image again. To speed up or slow down the spin of an image, increase or decrease the speed at which you initially pull the image and release the mouse button.
· Rotate image: Hold down the mouse button and drag the image in the desired direction.
· Zoom image: Hold down the Shift and Ctrl keys together, click the mouse button in the preview pane, and drag the image as desired. Another option for zooming may be utilized if your mouse has the wheel feature. Moving the mouse wheel forwards or backwards while positioning the cursor over the preview pane will zoom the image in or out.
Examples of the three Background Color options are shown below. Colors may be switched at any time during viewing without disrupting the preview, and your settings will be saved when you exit DataUtility as with all other user-defined interface preferences.