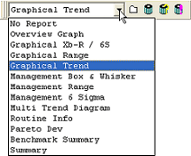

The Report Toolbar contains a list of the available report types. When a query is loaded, selecting a report type will propagate the report type in the document region.
The annotation you see around the 3D view are the first Report Type in the Report Type menu. The number of annotation and the number of markers will remain the same, but the type of annotation will change.
1. Click the Report Type menu to view the report types available to you.
2. To change the Report Type, select one from the menu.

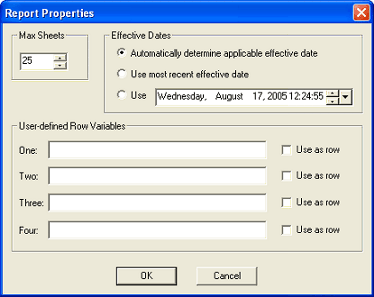
The Report Properties dialog is opened by clicking the Report Properties ( ) icon in the Report Toolbar.

Some report types will have multiple sheets. To limit the number of sheets CM4Di will display, enter the maximum number of sheets you would like CM4Di to generate. Unless a number greater than zero is entered, CM4Di will generate as many sheets as are necessary to display the contents of the selected query.
Customizing the effective dates options in the Report Properties dialog allows you to use the current effective dates with Sift Rules, rather than being restricted to only the default baselines. The Effective Date settings in CM4Di's Report Properties dialog will override those set in CM4D during template creation. However, the Effective Date settings are only applied during the current session of CM4Di and will not be saved to the document. By default, the Automatically determine applicable effective date radio button will be selected.
· Automatically determine applicable effective date: Allows CM4Di to use a sample's effective dates to determine how the sample will be applied to process baselines. The samples are organized into process baselines by comparing the effective date of each sample to the date of the process baselines. This is the only effective date option that uses a sample's effective date, and will result in sample data that is divided over more than one process baseline.
If two process baselines exist, one with a date of May 1 and one with a date of June 15, a sample with an effective date of May 14 would be associated with the May 1 baseline, and a sample with an effective date of June 16 would be associated with the June 15 process baseline. Also, a sample with an effective date of April 25 would be placed into the Default baseline.
· Use most recent effective date: Forces samples to associate to a single process baseline. The result will be that each sample's effective date will be ignored, and the newest process baseline will be used (including the newest engineering and control data).
· Use <specified date>: Forces samples to associate to a specific process baseline. The result will be that each sample's effective date will be ignored, and CM4Di will use the process baseline that has an effective date equal to or earlier than the user-specified date by searching backwards from the date entered in the field.
With User Defined Row Variables, the user can create their own variables. Selecting the check box next to Use as Row will use the variable as a row in the DataSet.

Clicking the Sift Rules button opens the Sift Rules dialog, which allows you to select which Feature Type, SMI Type, SMI Direction, SMI Hand, and Feature Filter types you want reported within the DataSet and what value type you are reporting. You can also apply Conditions to the Sift Rules to further filter the content of your data.
There may already be checked boxes in the Sift Rules dialog, as well as locked values. These defaults are due to the Sift Rules settings in the Document Defaults dialog and the settings in the CM4D.ini file. The Document Default Sift Rule settings chosen in CM4D during the creation of your CM4Di template will also determine your default Sift Rule. Each time a query is loaded in CM4Di, the default Sift Rule setting will be applied. If you load a query and then modify the sift rules, the next query loaded will use the modified version of the Sift Rules.
Please refer to the CM4D Classic Help Documentation for further information on activating Sift Rules and the cm4d.ini file.