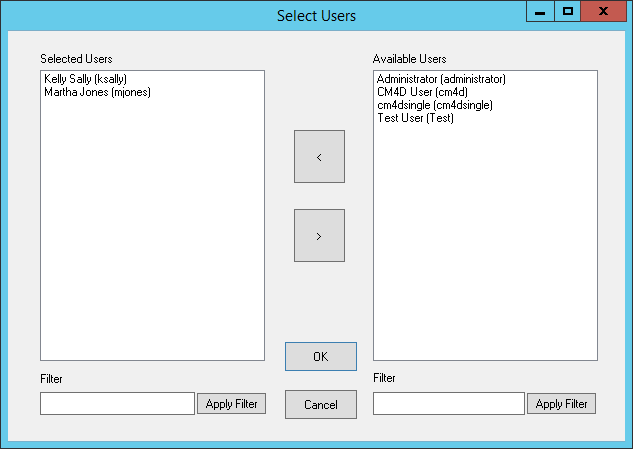
In the Groups tab of Site Manager, new groups can be created, existing groups can be modified or deleted, the privileges of a group can be defined, and users can be added to groups. A list of all of the existing groups are displayed under Group.

A new group can be created by following the instructions below.
1. Click New to create a new group
2. A default new group will appear called "New Group 1" along with a grid of Group Information on the right
3. In the Grid, enter the following information:
a. Group Name: Type a label for the group
b. Users: Select the Users field and click the browse button.
i. In the dialog, select the users you wish to add to the group from the Available Users list on the right and click the Left arrow to move the users to the Selected Users list.

ii. Click Ok to return to the Groups tab and continue setting privileges.
c. Access Privileges: To allow the users in the group to access specific Managed DataSources, select the check boxes next to the Database name(s).
You can further restrict access by using Routine Access Codes. If you are using Access Codes, your Cm4d.ini file will allow the codes to appear under the Access Privileges node. Check the boxes next to the Routine access codes that you want to allow the group to have access to. See the section Routine Access Codes below for more information.
d. Data Privileges: Select the privileges you want to allow the group to have for the site database.
4. Click Save to apply and save your settings.
5. To create additional groups, repeat steps 1-4.
If a group has been given access to a site, but has not been given access to a DataSource within it, that group will still be able to view the managed documents of that DataSource.
To modify an existing Group:
1. Select a group to open the corresponding Group Information grid on the right side of the interface.
2. After you have made your changes to the group, click Save.
To delete a group, select the group name from the left-hand list and click the Delete button on the bottom left of the interface.
Routine Access Codes are user defined strings added to the routines in the DataSource. The only reason to use Routine Access Codes is to restrict access to specific routines.
· Access codes are assigned to routines using DataUtility.
· Routines cannot have more than one access code.
Any Routine and Hide Routines without Access Codes are options within each DataSource. If Access Codes have been assigned to routines in the DataSource, the name of the Access code will appear under the DataSource after Hide Routines without Access Codes.
If you do not see the Routine Access Code fields in the Groups tab, check your Cm4d.ini file. The default setting LOADROUTINEACCESSCODES=0, which disables the loading and display of Routine Codes in SiteManager. If you want to load and display Routine Codes, you must set the parameter to LOADROUTINEACCESSCODES=1.
When Any Routine is selected, all the routines in the DataSource will be available to the group. Access to Any Routine is primarily for users who are routine creators and who set up routine access.
If Hide Routines without Access Codes is selected, only those routines with an access code will be available. When Hide Routines without Access Codes is not selected, and an access code is selected, the group will have access to any routines which do not have access codes, and routines which have the selected access code.
In the image below, the routines that would be available to this group for DataSource "v12 db" would be those routines with Access Code "BIW", "CAR", and routines without any access code. The group would not have access to routines with Access Code "DECK" or "DOOR".If both Hide Routines without Access Codes and Access Code "BIW" were selected, the group would only have access to those routines with Access code "BIW".
For more information about how to add access codes to your DataSources, see the DataUtility Help Documentation.