For the initial part of the Migration, double the number of Launcher Threads. This will get your Migration moving at a faster pace, and the system resources that are normally busy with CM4D processes will be idle until the migration has progressed anyway. After the crucial Managed Documents and/or Scheduler jobs have completed, you can lower the Thread Count to what you determine is a level that can be maintained once the migration is complete and the entire system is back online.
Threads are the CM4D Clients that are used to actually process the jobs, in this case, the Migration jobs. The more Clients that can be utilized, the faster the migration will go.
In previous versions, more than 2 or 3 Threads proved to be unstable. However, this instability has been solved in v21 so that there is now no limit to the number of Threads that can be set. The only limit is your system resources, so test out the Thread Count and find what the best performance is for your hardware for long-term use, but as far as the Migration is concerned, you can easily double the threads.
Bumping up the number of threads as long as you have the RAM/CPU to support them can dramatically increase the throughput of the system.
For example, if you currently run a system that has 6 servers running 3 threads (CM4D clients), you have 18 CM4Ds running reports. At the least, if you double your threads to 6, you then have 36 CM4Ds to run the Migration jobs. This will result in the migration being completed in a fraction of the time it would take if you left the threads as they are currently running, plus migration is faster to begin with, as the migration of documents is much quicker than it is when printing a normal Scheduler job.
To set the number of CM4D Threads you want to use, you need to modify the file CM4DLauncher.settings, located in the CM4D install folder for the system running the Launcher Service.
<?xml version="1.0" encoding="UTF-8"?>
<CM4DLauncherSettings serviceUser="cm4d" port="36057" schedulerHostname="localhost" threadCount="2" clientResetDays="30.0"/>
Depending on the performance of your system, you can choose to leave the threads bumped up, or reduce them as needed to suit your hardware performance.
One way to load balance for performance for this migration would be to distribute the jobs evenly between Scheduler users. And then use job priorities for each user to further define the order of the migration.
As general rule when it comes to Scheduler, do not use the same Scheduler User on different Servers, or you could end up with duplicate jobs.
If you have a Scheduler job that needs to be run asap, you need to be sure that all of the Managed Documents attached to the job are set with a high priority, as the job will not reactivate until all of the managed documents connected to it have been migrated. Also, if the original Scheduler job has a low priority, it will not be processed until all migration jobs (or other Scheduler jobs) with a higher priority have been processed.
· You cannot have duplicate Depositories. This applies both to duplicate Depository names, as well as duplicate paths assigned to different Depository names.
· If your Scheduler settings are changed after the map files are generated and you do not get those changes updated in the map files, your migration will have problems.
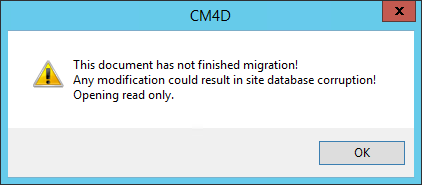
· While the Migration is in progress, Managed Documents cannot be opened. If a user attempts to open Managed Document while the migration is still running, they will get the following message in CM4D Classic, and the document will open as Read-only:
The migration process will change all existing Scheduler jobs. In this version, Report Paths, Report Names, and Managed Documents are no longer part of the Scheduler Job definition.
· A Scheduler Job will be defined by selecting one or more Managed Reports.
· A Managed Report is defined by a Depository and one or more SheetSets from one or more Managed Documents.
· The Depository is defined by the Depository Label and Depository Path.
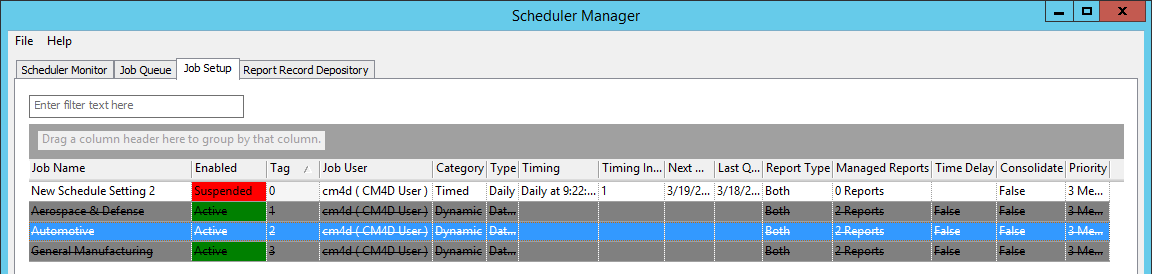
Once you have upgraded to v21, but before the Migration has been run, all existing Scheduler Jobs will be grayed out (disabled) in the Job Setup tab of CM4D Scheduler Manager, and cannot be modified until they come back online. As the Managed Documents associated to the jobs are completely migrated, the jobs will come back online for processing. If you have an existing Scheduler job that does not have any Managed Documents assigned to it, it will not appear grayed out or struck-through. Show/Hide
A new concept to some in v21 is CM4D Scheduler Report Depositories. Although Report Record was first introduced back in v14, the use of Depositories was not required. Beginning in v21, however, Depositories have become mandatory.
What are Depositories? Basically, a Depository is a defined network folder location for storing PDF reports generated by CM4D Scheduler and CM4D Web. See the topic Report Depository for more information.
If you are not currently using Depositories, the v21PreMigrator tool will make it easy to begin using them. If you choose, the tool will simply create all the Depositories needed in order to let your Scheduler system work exactly as it currently does, without any additional setup by you.
Regardless of whether you are already using Depositories or not, the pre-analysis phase of the v21 migration would be a good time for you to take a look at your system and organize or set up Depositories that will be the best use for your particular setup.
Some basic rules about setting up Depositories in the map file:
· The same Depository Name cannot be set for two different folder paths.
· The same folder path cannot be set for two Depository Names.
· The Depository Name field must have a value.
· The Depository Name must have a valid label.
· The Depository must have a valid definition:
§ Unique Name & Path (combination)
§ Valid folder characters
§ Writable location (for both Scheduler Manager and Scheduler Job users)
While the migration is running, what will happen to new DataSmithBatch jobs?
Once Migration Mode is Activated, any new data that comes into the system from DataSmithBatch that needs to trigger a Scheduler Data Processed job will not be lost.
While Migration Mode is active (and if the DataSmithBatch service is running), any new data that is added to the system for a Routine with the Data Processed flag set will be cached in a temporary queue. As Scheduler jobs have been migrated and come back online, the temporary job queue will be checked for any processed data that triggered a Scheduler Data Processed job. If so, that job will be sent to the Scheduler Job Queue for regular processing. If the data does not need to trigger a job, then it will be discarded before the Post Migrate Cleanup.
Normal DataSmithBatch processing of data is not affected by the Migration and will be processed into the Database as usual. Only data that could potentially trigger a Scheduler Data Processed job must be cached so that a job can be queued as needed once the migration is done.
Managed Documents of the Workcell type will be migrated, but do not require any user mapping with the v21PreMigration Analysis tool. As a result, Workcell documents will not appear in the v21MigrationMapManDocs.txt map file, and when the migration is Initialized in the S21A dialog, those documents will be put directly into the new Managed Document database table.
Will my Report Record documents be changed after the migration?
Yes, if you are already using Report Record Managed Documents that are set up according Report Record specifications, all of the settings will automatically be migrated to the new locations inside the SheetSet Properties of the Managed Document when it is opened in v21.
So in v20, you had to have a Report Record SheetSet with a Sheet for the Thumbnail and a Sheet for the Search Filters. All of this information will be moved inside the SheetSet Properties dialog after Migration. In v21, the Thumbnail sheet will be set as your original Thumbnail sheet. Your Search Filters will be copied into the SheetSet Management dialog as individual rows.
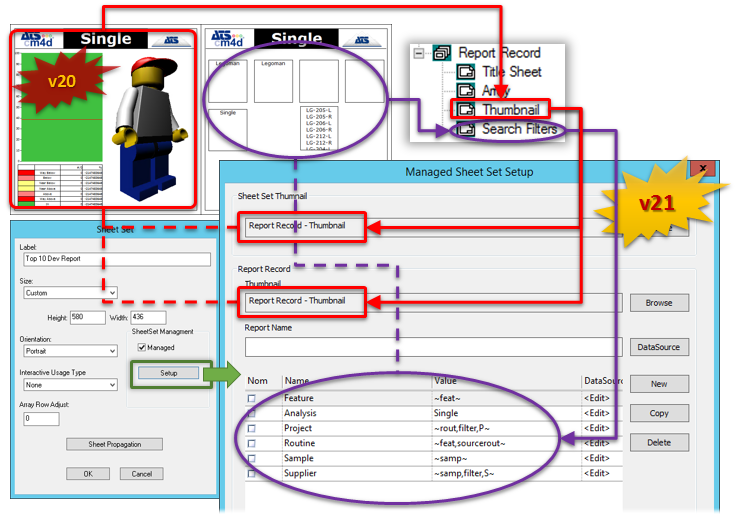
You may choose to remove the Report Record SheetSet entirely from your document once the migration is complete. However, if you do so, either move the Thumbnail Sheet to the SheetSet that is using it, or make sure to select a new Thumbnail in the Managed SheetSet Setup.