Before you upgrade to v21, there are some mandatory steps that must be completed before running a full system upgrade from v20 to v21.
Steps to Complete
A. Get database up to Schema 21b/21a (CM4D v20.3 or v20.4), if not already current
B. Request new CM4D Licenses
C. Back up system
D. Complete the Pre-Migration Analysis
i. Unzip the v21PreMigrator folder
ii. Copy your Cm4d.4ds file to the v21PreMigrator folder
iii. Run the v21PreMigrator Analysis Tool
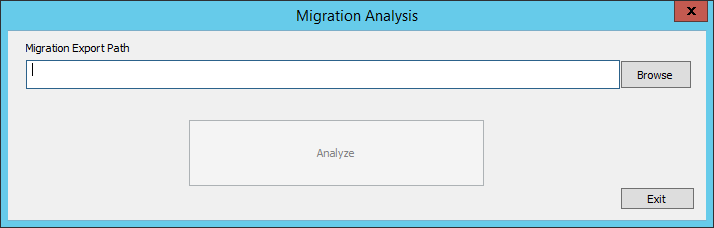
(1) Set the Migration Export Path
(2) Click Analyze
(3) Edit the Managed Documents map file
(a) Set the Migration User
(b) Set the Job Priority
(c) Set the Report Tag Source
(4) Edit the Report Paths map file
(a) Set the Depository Path
(b) Set the Depository Name
(5) Click Re-Analyze in the v21PreMigrator
iv. If no errors, exit v21PreMigrator Analysis tool
Your database must be Schema 20b-20b to run the v21PreMigration Analysis tool. For instructions on migrating up from several versions back, you may want to refer to the following guides:
CM4D v21 uses a new version of the ATS Licensing Server and requires a new version of all CM4D license files. Contact [email protected] for help with license requests.
You should request new license files to be used before upgrading to v21 to allow time for ATS to process your license request and deliver the files to you before you upgrade to v21.
In addition to normal upgrade backup procedures, specifically make sure to back up all of your v20 Managed Documents and your Site/CM4D Databases before you upgrade to v21, as the migration of the Managed Documents is irreversible.
Since all Managed Documents and Scheduler Jobs must be migrated before they can be used in v21, a special application has been provided to make the migration process as easy as possible. The v21PreMigrator Analysis tool will analyze your current v20 system to see what will need to be migrated, show you exactly what will happen with your Managed Documents and Jobs, and then allow you to make decisions on what you want the end result of the migration will be - all before shutting down the CM4D system and starting the upgrade and migration process.
There are several required changes, including:
· Creating and/or Assigning Report Depositories for Scheduler Jobs
· Assigning Scheduler Users to each Managed Document for the Migration Jobs
· Assigning Scheduler Priorities to each Managed Document for the Migration Jobs
· Selecting a Report Tag Source
Some optional changes may include:
· Re-organizing the structure of existing Report Depositories
§ Adding Report Sub-folders
§ Changing the folder location(s)
If you are changing the Depository to a new folder, and you will have Scheduler create the new folder for you during the migration process, be sure that the user running SiteManager has WRITE privileges in that location. Alternatively, you can manually create the new folders before running the migration.
§ Assigning a completely different Depository to a Scheduler Job
· Changing Report Names (by default, the current Managed Document label will be used as the Managed Report label)
All of these changes can be assessed before performing the actual upgrade to v21, thereby keeping the amount of system downtime to a minimum. Take your time to analyze the output map files that the v21PreMIgration Analysis tool generates, as the settings in these files will be used during the Migration.
The analysis process is non-destructive and does not require a full CM4D installation on the computer that runs the v21PreMigration Analysis tool. It can also be run from a Network location.
The v21PreMigration Analysis tool must be run on a 20b database schema, but it will not alter or interrupt your current CM4D system.
The v21PreMigration Analysis tool is provided only to help you prepare your system for the migration and upgrade, it will not change or interrupt your current CM4D system or functionality. This analysis must be run if you are upgrading to v21, and it requires some input, but you will also be given the opportunity to make some changes before the migration that may improve your systems' organization, if you choose to do so.
The v21PreMigrator Analysis tool can be run on any system that can connect to the Site Database; it does not need to have a full CM4D installed.
The pre-migration analysis tool will create two "map" files that will look at your system, write out what you have to a file, and then you can edit those files to control how the migration will work. This process does not alter your current system and it can be run as many times as you want prior to migration, allowing you to make changes to the map files, re-run the analysis, make additional changes, re-run analysis, and so on.
The v21PreMigrator tool is a stand-alone tool that can be run on any computer in your network, as long as the following specifications are fulfilled:
| Required: | Not Required (but OK if present): |
| Schema 20b Site and CM4D Database(s)* | ATS Licensing |
| Connection/Access to Site and Database(s) | Specific Site Manager Privileges |
| A local CM4D installation |
If you are running a version earlier than v20, you must first follow the applicable upgrade paths to reach at least v20.3 (Database Schema 20b) before you can upgrade to v21. See the v20 Migration Guide topic for more information.
Set the folder in which the two output Migration Map Files will be saved once the Analysis is complete.
The folder selected as the Migration Export Path folder does not need to be a Shared folder, but it may be more useful. If the folder is shared, the Map files generated by the analysis tool can be opened for editing by other users within the network.
Viewing and Editing these output map files in a program such as Excel is highly recommended.
Running the v21PreMigrator Analysis for the first time will always result in errors. This is because you have to make decisions and modify both files before the Analysis can return a Valid status.
The two map files that result from this analysis will be imported into the Migrate S21 dialog after the system has been upgraded to v21. The two files must be completely validated before you update to v21 and run the Migration tool, because the v21PreMigration Analysis tool cannot be run on a v21 database schema.
The Analyze button becomes Re-Analyze once the analysis has been run once and the two map files have been created in the Migration Export folder. Repeat as many times as you like. If you receive no errors and are satisfied with the migration maps, you are ready to continue on with the migration.
Clicking Re-Analyze will not overwrite any manual edits you may have made to the two map files, it will only add any missing information from your system that is not already in the file.
Since the map files are an exact mapping of how your current system will turn in to the upgraded system, if you update your system and do not get those changes updated in the map files, your migration will have problems.
So if you do make changes to your system after running the v21PreMigration Analysis tool, you can get those changes to be included in the migration maps in one of two ways:
· If you are certain that no manual edits have been made to the map files, or at least not extensive changes that you need to keep, you can simply delete the two map files and start over if you make changes to your current v20 system. Then in the v21PreMigrator tool, use the Analyze button to create new map files with the latest system settings.
· If you have already manually edited a map file but have made some changes to your system that you want to be included in the map file, delete only the rows for the changed information and leave the edited rows that you want to keep as modified. Then in the v21PreMigration Analysis tool, click Re-Analyze.
While running the Analysis or Re-Analysis, the progress will be written out to a v21PreMigrator.log file in a Logs folder inside the PreMigrator folder. Check this log file periodically if you want to see if the analysis is still running. Once it is complete, the message "Finished Analyzing for Migration" will be written at the end of the log file (and the v21PreMigrator tool will pop up a message dialog).
The migration map files created by the v21PreMigrator contain specific information that will tell you how your migration will proceed. The file names for the text (tab-delimited) files are hard-coded and must not be renamed or saved in any other format. You can edit these files using any text file editor, but using a program such as Excel is recommended if you want to take advantage of the handy tools Excel provides for searching, sorting, and mass editing.
Sorting the rows using Excel functionality (even Formatting as a Table while working with the file in Excel) is acceptable, but do not reorder the columns.
The two files contain Column Headers, some of which have codes following the field label:
· (I) - Input. These fields display your current systems settings and configuration. Input values must not be modified, or the analysis will be unable to recognize the item correctly, and you will end up with validation errors or a failed migration.
· (O) - Output. These fields display the content of what will be the result of the migration. Suggestions may be provided to you if a reasonable guess can be made, or if a reasonable suggestion cannot be ascertained, the field is left empty.
Be sure to save and close the map files before Re-Analyzing or Initiating the Migration.
Keep the original file format. Do not save these files with *.xls, *.csv, or any other extension than the one provided.

This file includes information about every Static and/or Dynamic Managed Document in your Site database. Workcell documents will not be listed in this file, as that type of Managed Document does not require mapping for the migration. If you have Workcell documents, they will be automatically migrated during Stage 1 of the Migrate S21 Tool.
|
Headers |
Use |
Action |
|||||
|
Doc Type(I) |
Indicates the type of document - Static, Dynamic, or Workcell. |
System Input - do not modify |
|||||
|
Path(I) |
The location in which the document is currently saved. |
System Input - do not modify |
|||||
|
Site(I) |
The Site Database that the document is saved in. |
System Input - do not modify |
|||||
|
Managed Document Name(I) |
The current label of the document. |
System Input - do not modify |
|||||
|
Managed Report Label(O) |
Will be the new label of the Managed Report. By default, this will be the same as the current label of the Managed Document. You may choose to change the label.
|
Pre-populated, but can be modified |
|||||
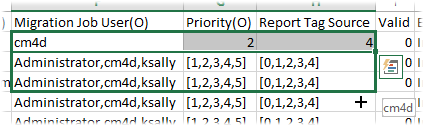
|
Change this to a single user name. The Scheduler User that will be used to process the assigned migration priority job. The map file will be pre-populated with job users currently running Scheduler jobs will appear in the field.
Your Site may have additional users with the Scheduler User privilege, but any user can run the Migration Jobs as long as the following conditions are met:
|
Requires User Decision |
||||||
|
The order in which the Managed Document will be migrated. The file will be generated with all available priority levels, and you must change the field to a single value of 1, 2, 3, 4, or 5.
|
Requires User Decision |
||||||
|
1=Very High |
2=High |
3=Medium |
4=Low |
5= Very Low |
|||
|
Designates the Report Tag Source property for the Managed Report that will be created using the Managed Document during the migration. The file will be generated with all available options, and you must change the field to a single value of 1, 2, 3, 4, or 5. |
Requires User Decision |
||||||
|
0 |
Document Only - only tags that are set in the Managed SheetSet(s) within the Managed Report will be used by CM4D Web. | ||||||
|
1 |
None - no tags will be used by CM4D Web, even if tags are available for the Managed Report. | ||||||
|
2 |
Global Only - only Report Tag Defaults set in SiteManager will be used by CM4D Web. | ||||||
|
3 |
Global if No Document - tags assigned at the Global level will be used ONLY if no tags are set for any SheetSet(s) in the Managed Report. | ||||||
|
4 |
Both - tags from both the Managed SheetSet(s) and Report Tag Defaults set in SiteManager will be used whenever available. | ||||||
|
Report Tags are properties of a Managed Report that can be assigned in two locations:
These tags are used by CM4D Web for grouping, searching, or filtering. The Report Tag Source setting determines where the Managed Report will look for tags. This property can be modified for individual Managed Reports once CM4D Web is installed. |
|||||||
|
Valid |
Indicates the status of the analysis. Until this field shows analysis was valid for the document row,you cannot continue with the Migration.
|
Message only - do not modify |
|||||
|
0=Invalid |
1=Valid |
||||||
|
Error Message |
Message will indicate why the row did not pass validation. This could be because the Migration Job User and Priority has not been set. Once a valid status is returned for all rows, this field will be empty. |
Message only - do not modify |
|||||
Running the analysis for the first time will result in something like this:

Both the Job User and Priority columns are pre-defined with all options, and in all cases you must change all document rows to a single job user and a single priority. If you open this file in a program like Excel, you can change one row and then use the drag-replace tools for quick replacement of multiple rows.

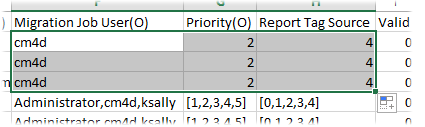
Save and close the files, then click Re-Analyze in the v21PreMigrator tool.

Repeat these steps until all rows have a 1 in the Valid column after the v21PreMigrator has analyzed the files with all of your edits.
This file includes information about all of the Scheduler jobs in your Site database. If you do not use CM4D Scheduler, this file will be empty and does not need to be modified, but do not delete it from the Migration export folder.
The output Depository folders do not have to be the same as your current report paths and folders. This may be a good opportunity for you to check the existing structure of where your reports are stored, and if you are already using Depositories, how these might be re-organized using new folders and sub-folders.
However, if you leave the New Paths field values as they are pre-populated, your reports will be generated as they were before the upgrade. The only thing you would need to do then is add a Depository Name. This will create a new Depository that points to the report path you are already using. Just make sure that your Depository and Path combinations are unique. See the section v21 Migration Notes for more information on Depositories.
|
Headers |
Purpose |
Action |
|
|
Job Name(I) |
Label of the job as it appears in Scheduler Manager. |
System Input - do not modify |
|
|
Job User(I) |
Username of the Scheduler user assigned to run the job. |
System Input - do not modify |
|
|
Job Document Count(I) |
Indicates the number of Managed documents associated to the job. |
System Input - do not modify |
|
|
Path(I) |
The current path of the Report, where the generated PDF is saved. |
System Input - do not modify |
|
|
The path of the designated Depository, where reports will be generated after the migration. This path should be a UNC path to ensure access throughout your network.
|
Pre-populated, but can be modified |
||
|
The label of the Depository that the report will use. This may be empty if you have not set up any Depositories. May be empty at first, but must be defined to pass validation. If you enter a Depository that does not already exist, it will be created during the migration process.
|
Requires User Decision May be empty or pre-populated; pre-populated value can be modified |
||
|
Report Name Prefix(O) |
This indicates a sub-folder of the “New Path”. This prefix is added to the Report Name, and any sub-folders that do not exist will be created when the Job is run for the first time. This field can be empty. |
May be empty or pre-populated; pre-populated value can be modified |
|
|
Valid |
Indicates the status of the analysis.
|
Message only; do not modify. |
|
|
0=Invalid |
1=Valid |
||
|
Error Message |
Message will indicate why the row did not pass validation. Once a valid status is returned for all rows, this field will be empty. |
Message only; do not modify. |
|
If you do not have any Depositories, running the v21PreMigration Analysis tool would result in the Depositories or Report Name Prefix fields being empty, because the analyzer had nothing to compare to. So you would need to edit the New Path and Depository Name fields, entering information for labels of new Depositories you want created during the Migration and the folder path that the Depositories are pointing to.
If a defined Depository doesn't already exist, it will be created in the specified location when the migration is initialized, so you need to be sure those folder locations are writable and use valid folder characters.
Example 1 of Depositories and Prefixes
If no Depositories have been previously defined, running the analysis would result in something like this:

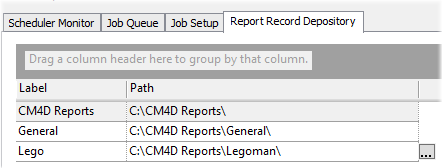
A convenient way to do this would be to go back and modify the Report Record Depositories in your v20 CM4D Scheduler Manager. If you were to create a new Depository called "Reports" that pointed to the folder "C:\CM4D Reports", running the re-analysis would look like this:

The analyzer is able to intuit certain information and configure some of the mappings for you. It recognizes that in the example above, the Depository path was a subset of the Report Path. So it mapped the Path as the root folder of the Reports Depository, then added the sub-folders as Report Name prefixes. This will not actually change where the reports are going to be saved after the migration is complete.
Example 2 of Depositories and Prefixes
If are already using Report Depositories for some of your jobs, and Report Paths that point to another folder within one of those Depositories, you may see Prefixes being added automatically for you.
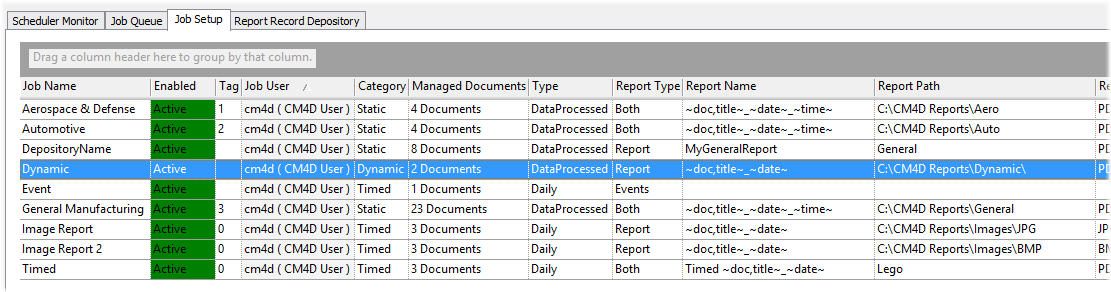
In this example, the Jobs in Scheduler look like the following image:
The existing Depositories were:
Running the v21PreMigrator Analysis tool resulted in the following Report Paths Map file:

The v21PreMigrator Analysis tool was able to intuit that the subfolders included in the original Report Paths are not Depositories, so it will move the subfolder to the Prefix column. This will result in the subfolder becoming a property of the Report Name, and the report will end up being generated in the same folder as before the migration. The main difference, however, is that the subfolder becomes part of the Report Name definition, and the Report (including the subfolder) will be defined in the database as belonging to the set Depository.
1. Copy the v21PreMigrator folder/zip file to the machine that will be running the analysis.
2. Connect to the CM4D database to be upgraded with one of the two following methods:
· Copy a current Cm4d.4ds file from your current setup into the v21PreMigrator folder, or
· Run DbConnect and manually enter the connection information.
3. Run v21PreMigrator.exe.
a. In the Migration Export Path field, either type in or browse to the folder path where the migration export files will be created and saved.
b. Click Analyze.
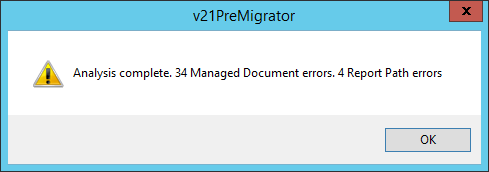
i. The first time you run the analysis, every Managed Document will have an error. This is because there are decisions that you have to make for every Managed Document in the map file.
ii. Report Path errors may not always appear, but if they do you must set up and/or assign Depositories before the analysis can be validated.
4. Browse to the Export folder and open the two map files. See the section Migration Map Files for more detail on the fields that need to be edited and what the settings are.
· v21MigrationMapManDocs.txt - always requires decisions and editing.
· v21MigrationMapReportPaths.txt - only requires editing if you use Scheduler and want to make adjustments to your current Depositories, or if you get path resolve errors.
5. Once you have made changes to the two map files, save and close the files. Do not change the format or extension of these files, and do not leave them open in Excel or any other editor or you will get an error from the read-only flags.
6. In the v21PreMigrator tool, click Re-analyze.
7. If you receive additional errors, or would like to make some changes to see what the outcome will look like, change the map files as you like and then click Re-Analyze.
8. Repeat as many times as you like. If you receive no errors and are satisfied with the migration maps, you are ready to continue on with the migration.
Continue to Step 2: System Upgrade.