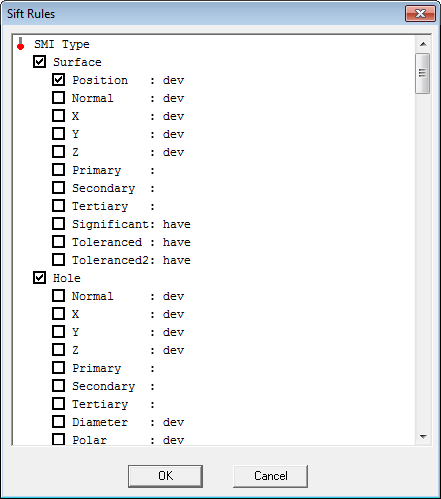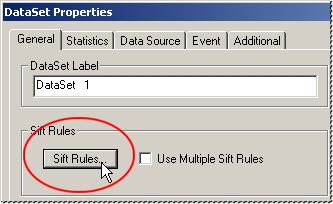
Clicking the Sift Rules button in the DataSet Properties dialog opens the Sift Rules dialog, which allows you to select which SMI Type, SMI Direction, SMI Hand, and Feature Filters you want reported within the DataSet and what value type you are reporting. You can also apply Conditions, Sorting, or Elimination/Augmentation options to the Sift Rules to further filter the content of your data.

To select a Feature Type (Surface, Hole, etc.), select the check box to the left of the Type name. Select or clear the check boxes next to the SMI Characteristic Type (X, Y, Z, etc.) you wish to include. The SMI Characteristic Value (act or dev) can be selected from the list next to the SMI Characteristic Type. If 'dev' is used, the deviation type must be set in the Document Defaults Deviation Types dialog.
 Tip
Tip
There
may already be check boxes selected in the Sift Rules dialog, as well
as locked
characteristic values shown in parenthesis, such as (dev). These defaults
are due to the Sift Rules settings in the Document
Defaults dialog and the AllowTypeSet section of the CM4D.ini
file.
 Reference
Refer
to the topic Feature, under the subheading SMI
Types to see what the characteristic criteria must be met to fall
into one of the SMI Types categories.
CM4D looks at the characteristics of a feature, and if it meets certain criteria, CM4D will assume that the feature is one of the feature types listed in the table found in the topic Feature.
When you set a SMI Characteristic Value for a SMI Characteristic Type, the SMI Characteristic Type of the other Feature Types will change to match your selection.
 Example
If
you changed the SMI Characteristic Value of the X to "act" in
the Surface Feature Type section of the Sift Rules, the X in all of the
other Feature Types (Holes, Slots, Reference, etc.) will change to "act".
When Significant or Toleranced is selected in combination with other rules, CM4D will only load those features which have all of the selections. For example, if both Significant and Primary are selected, only those features which are both Significant and Primary will be loaded.

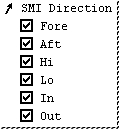
Filter out data based on the direction of the feature. Check the box(es) you want to include.

Filter out data based on the Handedness of the feature. Check the box(es) you want to include.

Select the check boxes next to the pre-defined filter labels you wish to use. Under Must Match you can choose whether the data must match "at least one filter specified", or "all filters specified".
The filter value <unassigned> can be used in order to select all of the feature values that have not been assigned for Key, Restricted, or Unrestricted feature filters.
Tip
Feature
Filters are defined during the creation of the database. See your system
administrator for a description of the Feature Filters available to you.

Select a check box next to a condition and then enter the condition in the field. The Must Match section allows you to choose whether the data has to match at least one of the conditions selected, or all of the filters selected. A condition could be a variable or an expression, or a combination thereof.

Conditions can use the following arguments:
Symbol |
Description |
< |
Less Than |
> |
Greater Than |
[ |
Less Than or Equal To |
] |
Greater Than or Equal To |
& |
And |
| |
Or |
^ |
Direction |
Example
If
you entered ~nom, x~ >
1500 as a condition, you would get all of the points in a specific
area of the car, those greater than 1500.

The sorting available in the Sift Rules is one of two ways to sort the contents of a DataSet (the other sort method is available in the Additional Processing section of the DataSet Properties General Tab). Sorting will only work on numerical data, and will be applied consecutively (i.e. sorting rule 1, sorting rule 2, etc). Variables and expressions can be used to sort a DataSet. The sorted data will be rounded to the precision (number of decimal places) set in the Document Defaults.
To create a sort rule, click on the first field in the Sorting section of the Sift Rules dialog and enter the expression {(-1)*(~mean)}. Enable the sort rule by selecting the check box next to number 1 to use the sorting parameter entered in the field. Click OK twice to activate the Sift Rule sorting in your DataSet. This same process can be used for Multi Sift Rules, as well as the Sift Rules accessed through the Defaults tab of the Document Properties dialog.
The main advantage of using Sift Rule sorting versus sorting on the DataSet level is that Sift Rules accommodate three sorting options at a time (or more when combining Single Sift Rules within a Multi Sift Rule). Using Multiple Sift Rules affords more control over DataSet sorting, as each Sift Rule within the Multi Sift has more options than the DataSet level sort. Also, Sift Rules have the Keep only Top Values options.
Tip
When
setting up Sift Rule sorting, multiplying a variable by (-1)
will sort the data in descending order. Using a variable without multiplying
by (-1) will keep the results in the default
ascending order.
After the other sift rules are applied for the sift, you can then sort the list and filter out (remove) from the list those rows whose value of the sorting criteria is not in the top so many or top percentage of the list of rows. For instance, after entering a variable such as ~mean~ or ~stddev~ into the first sort field, you can then choose to show the Top number (e.g. 10 values) or the Top percent (e.g. 5% of all the values).
Example
The
Sift Rule conditions identify 50 rows in the DataSet. The variable ~mean~ is entered in the first Sort field, the
Top number radio button is selected,
and the Top number value is set to 10. In such a case, the 10 rows out
of 50 that have the highest ~mean~ value will
be listed in descending order in the grid, while the
remaining 40 rows will be sifted out.

The Hide/Show section of the Sift Rules allow you to display rows from a DataSet according to the following rules:
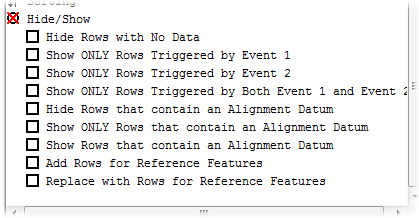
When the Hide Rows with No Data check box is selected, rows in the DataSet grid that are empty (i.e. rows that do not have values for any of the samples) will be removed. When the check box is cleared, empty rows will not be removed from the DataSet grid.
When the Show ONLY Rows Triggered by Event 1 check box is selected, all rows from the DataSet that are not triggered by Event 1 will be removed from the DataSet. When the check box is cleared, all rows will remain in the DataSet, regardless of whether they have been triggered by Event 1 or not.
Example
The
maroon cells are triggered by Event 1. Since the first and third rows
do not contain any cells triggered by the specified event, they have been
removed from the DataSet.


When the Show ONLY Rows Triggered by Event 2 check box is selected, all rows from the DataSet that are not triggered by Event 2 will be removed from the DataSet. When the check box is cleared, all rows will remain in the DataSet, regardless of whether they have been triggered by Event 2 or not.
Tip
To
show only rows triggered by Either Event
1 or Event 2, select "Show ONLY Rows Triggered by Event 1"
and "Show ONLY Rows Triggered by Event 2".
Example
The
purple cells are triggered by Event 2. Since the first two rows do not
contain any cells triggered by the specified event, they have been removed
from the DataSet.

When the Show ONLY Rows Triggered by Both Event 1 and Event 2 check box is selected, all rows from the DataSet that are not triggered by Event 1 and Event 2 will be removed from the DataSet. When the check box is cleared, all rows will remain in the DataSet, regardless of whether they have been triggered by Event 1 and Event 2 or not.
Example
The
red cell was triggered by both Event 1 and Event 2. Since the first three
rows do not contain any cells triggered by the specified events, they
have been removed from the DataSet.

When the Hide Rows that contain an Alignment Datum check box is selected, any rows used in an Alignment will be removed from the DataSet.
When the Show ONLY Rows that contain an Alignment Datum check box is selected, any rows not used in the Alignment will be removed from the DataSet.
When the Show Rows that contain an Alignment Datum check box is selected, the align datums will be added to the DataSet, regardless of any other Sift Rules.
 Notice
If
the align datums are not toleranced or significant, and Tolerance and
Significant are selected in the sift rules, the align datums will still
be added to the DataSet when Show Rows that contain an Alignment Datum
check box is enabled.
Add Rows for Reference Features, used with DataSets containing Constructed Features, adds all Reference Features to the DataSet, regardless of which feature types are selected in the DataSet Sift Rules for SMI Type. Add Rows works the same as Replace with Rows, except that Add includes the Constructed feature in the DataSet.
Notice
Add
Rows for Reference Features must
be enabled in the DataSet Sift Rules if you want to use the Expand
Reference Features function on a Group annot. If you choose not to
use the Add Rows for Reference Features
in the Sift Rules, you must manually put all of the reference features
into the DataSet that you want to use with Expand Reference Features.
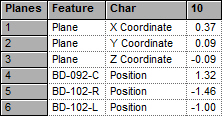
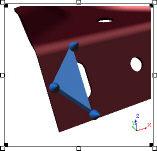
DataSet without Augment
DataSet with Augment
When the Reference Features used to augment the DataSet are added to the defined DataSet, they are added according to the characteristics selected in the Sift Rules. However, even if the main check box of an SMI Type is off, any characteristics selected within the SMI Type will be used to determine which characteristics of the Reference Features will be added to the DataSet.
To change which characteristics are used for augmenting the DataSet:
1. Turn on the SMI Type
2. Select which characteristics within that type you want to show
3. Then turn the main type check box off again
Tip
If
you choose to Add Rows for Reference Features and those features already
exist in the DataSet, then those Reference Features will not be added
to the DataSet a second time.
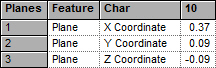
When Add Rows for Reference Features is turned on, the feature markers for those added Reference features will appear in any Views using that DataSet, along with the feature markers for Constructed Features.
Plane Feature Marker without Augment Reference Features
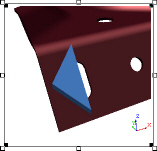
Plane Feature Marker with Augment Reference Features
When the Replace with Rows for Reference Features check box is selected, all of the Reference Features used to create the Constructed Feature are added to the DataSet, but not the Constructed Feature itself. Replace with Rows works the same as Add Rows, except that Replace does not include the Constructed feature in the DataSet.
When the Use Multiple Sift Rules check box is selected on the DataSet Properties General tab, you can create and apply more than one set of sift rules to a DataSet. Multiple sift rules are used to separate the points of DataSets into groups so that when Auto Report is run, the sheets will be grouped and ordered according to their sift rules.
For example, if you were to use multiple sift rules to separate the front, middle and rear of a car, you could create three sift rules with the following conditions:
· Sift Rule 1: Condition ~nom,x~<1500 for the front of the car
· Sift Rule 2: Condition ~nom,x~<2700 for the middle of the car
· Sift Rule 3: Condition unnecessary, as the third sift rule would include all points not used by the first two sift rules

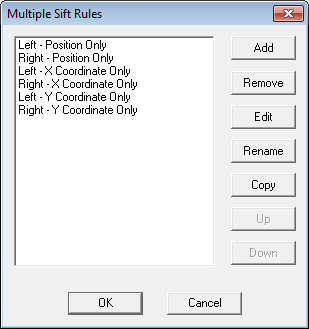
To create new Multiple Sift Rules, select the Use Multiple Sift Rules check box in the DataSet properties dialog, then click Sift Rules to open the Multiple Sift Rules dialog.
|
· Add - creates a new Sift Rule. |
· Remove - deletes the selected Sift Rule(s) from the list. |
|
· Edit - opens the Sift Rule dialog, in which you can edit the properties of the Sift Rule. |
|
· Rename - modify the Sift Rule label. |
|
· Copy - duplicates the selected Sift Rule. |
|
· Up - moves the selected Sift Rule higher in the list. |
|
· Down - moves the selected Sift Rule down the list. |
Multiple Sift Rules can be selected individually, or using the multiple select function (Ctrl or Shift). Sift Rules can also be duplicated using the Copy button, which will create an identical Sift Rule which can then be renamed in the Copy Sift Rules dialog in order to differentiate the new Sift Rule with a unique name. Using the Copy function allows you to create similar Sift Rules without having to recreate each one individually. The entire list of Multiple Sift Rules can be deleted by selecting all of the labels and clicking the Remove button. Multiple sift rules are applied according to the order listed in the Multiple Sift Rules dialog.