Managed Documents are CM4D documents which have been created using a managed SIte Database and are saved with special settings. Managed documents are used by CM4D Classic, CM4D Interactive, CM4D Workcell, CM4D Scheduler, and CM4D Web.
When a Managed Document is opened, CM4D will attempt to load the data for all of the Queries in the document immediately.
Types
There are three types of Managed Documents
- Static - configured to load data from one specific Routine.
- Dynamic - configured to allow data to be loaded from any Routine.
- Workcell - a specific type of Dynamic Managed Document only used for CM4D Workcell templates.
Open a Managed Document
If you have just opened CM4D, select Open Managed Document from the Startup dialog.
If CM4D is already open:
Select File > Open Advanced > Open Managed Document,
click Open Managed Document (![]() ) on the toolbar, or
) on the toolbar, or
select Ctrl+M on the keyboard.
Select a managed document from the Managed Document Selector.
If the managed document you are trying to open is already being edited by someone else, you will not be able to open it. The following message will appear: "Unable to open [document path] for editing! This document is already opend and locked by another user. Would you like to try to open this document for reading only?"
You will be able to open the managed document, but will not be able to save any changes made.
Copy a Managed Document
The Save As menu option is the recommended method of making copies of a managed document:
From the File menu, select Save As, give the file a unique name, and save it to a shared network location.
The file will be saved as a normal CM4D document, not a Managed Document.
Refer to the topic Saving Your Document as a Managed Document and follow steps 3 through 6 to learn how to create a managed document.
Alternatively, you may use the Managed Document Administration dialog to create a copy of a Managed Document.
Save a Managed Document
When you have created your CM4D document, save it to a shared folder on the network.
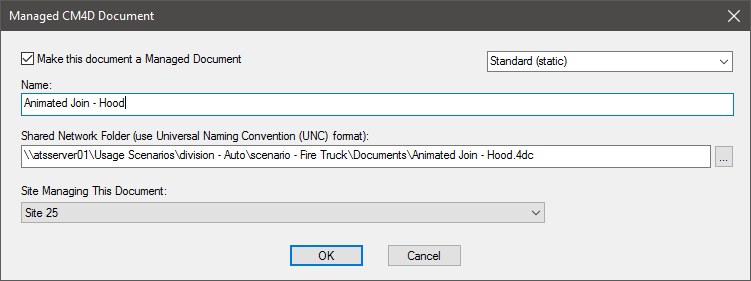
Go to the Document menu and select Management Settings.

Within the Managed CM4D Document window, check the box next to Make this document a Managed Document.
If the routine of this managed document needs to be dynamic, select Dynamic from the menu. Otherwise, leave this set to the default Standard (Static) setting. See here for more information about Static and Dynamic Routine Managed Documents. If your managed document needs to be a CM4D Workcell document, select Workcell from the menu and refer to the CM4D Workcell Help Documentation for more information.
Enter the name of the document. This can be the same of different from the actual document file name.
Enter the path to location of the CM4D document (in UNC format), or click the browse button and select the location of the document on the network.
Click OK.
Notice that the appearance of the CM4D title bar has changed so that the word Managed appears before the filename.
Save your document.
When a document is saved as a Managed Document, CM4D will load all of the Queries at the time of the save. Each subsequent time that Managed Document is opened, then, all of the queries will be loaded on open.
Delete a Managed Document
When you delete a CM4D Managed Document from Windows Explorer, for example, you delete the file, but not the reference to the document in the Site database that makes it a managed document.
If you delete the reference to a Managed Document from your Site database, the filename will remain in CM4D's Managed Documents list and the actual file will still exist at the same shared network location it was before. The file will no longer be a Managed Document, however.
Deleting a Managed Document requires specific steps, or you will end up with conflicts when attempting to use the document or re-managing it later on.
Open the document from the Managed Document Selector.
Go to the Document>Management Settings... menu.
Un-check the box Make this document a Managed Document.
Click OK.
Save the document (not Save As...).
Alternatively, you may use the Managed Document Administration dialog to delete a Managed Document.