DataSet Properties - Datasource Tab
The DataSource tab is used to link specific Feature and Sample data to a DataSet. The DataSet will use data from a specified routine, features, and samples, or from another DataSet.
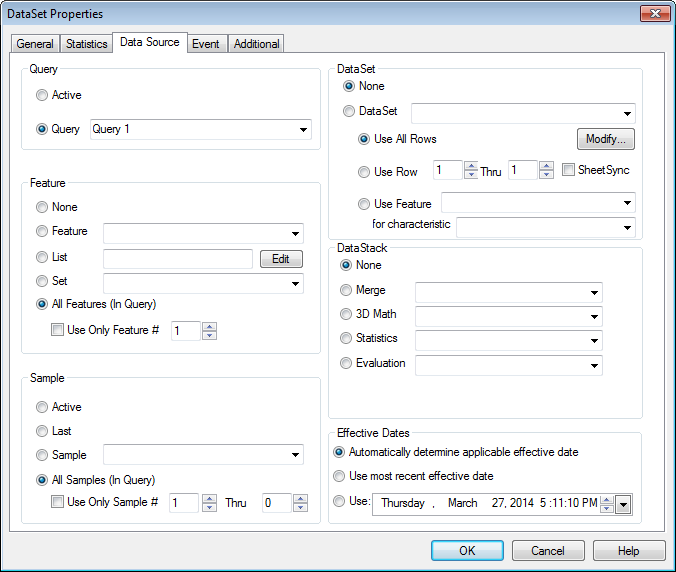
Query
The Query section allows you to select which query you want to pull data from to use in the DataSet.
Active - The currently active query will be used.
Query - Select the Query you want to use from the menu. Queries will appear in the menu in the order they were loaded.
Feature
Select the feature or features you want to use in your DataSet from the Feature section of the dialog.
Features within a routine are normally ordered by ascending label value unless the Feature Sequence number characteristic is used. Then, the Feature Sequence number will be used to determine feature order within a routine. Altering feature sequences may cause changes to existing sheet annotation that have data sources based on Feature Sequence. The Sequence number of a Feature may be modified using DataUtility.
None - No features will be loaded into the DataSet.
Feature - Select a single feature from a menu containing all of the features in a selected query.
List - Allows you to create a custom a list of features to use. Click Edit to open the Feature List dialog, then add the features you want to use in the DataSet. To select multiple features, hold down the shift key while selecting a range of features, or hold down the ctrl key and click on individual features.
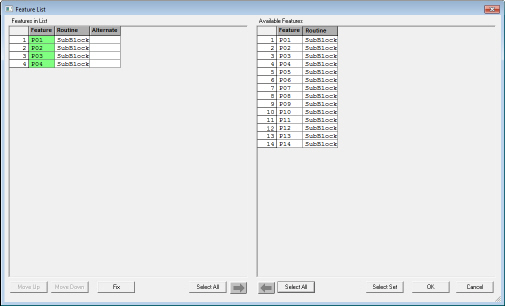
 - Moves the selected features from the Available Features section to the Features in List section on the left hand side. You must select at least one row for the button to be active.
 - Moves the selected features from the Features in List section to the Available Features section on the right hand side. You must select at least one row for the button to be active.
Select All - Selects all of the features in the section on the side corresponding to the button used.
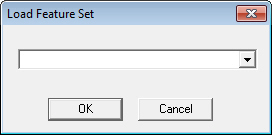
Select Set - If you have any Feature Sets, choose one from the dropdown menu and click Ok. All features included in the selected feature set will be loaded into the Available Features section of the Feature List dialog.
Move Up - Moves the selected feature up one row in the Features in List section.
Move Down - Moves the selected feature down one row in the Features in List section.
Fix - If a feature does not resolve, an alternate feature (in a different Routine) may be suggested, based on the feature label. To accept the suggested Alternate feature(s), click Fix.
Set - Choose a previously created Feature Set from the menu.
All Features (In Query) - Uses all of the features available within the routine selected when you assigned features to a query.
Use Only Feature # - Selecting Use Only Feature # will load only the feature selected.
Sample
Select a specific sample or group of samples.
Active - Uses the active sample.
Last - Uses the last sample loaded into the query.
Sample - Select which sample to use from a list of all samples available within the selected query.
All Samples (In Query) - Uses all of the samples in the selected query.
Use Only Sample # - A single sample can be selected by position number within the routine load by selecting the Use Only Sample # check box and entering the sample position in the number fields. Entering a range of numbers in these fields allows for the samples within the position interval to be loaded.
To specify how many columns you want the table to display, see the topic Set Table Columns.
DataSet
When a DataSet is created or edited, a DataSource is defined for it in the DataSet Properties DataSource tab. If a different DataSet is selected from the dropdown, then all other DataSource properties (i.e. Query, Feature, and Sample) are ignored.
None - If you wish to specify the DataSource using the routine, feature, and sample properties on this page then select the None radio button here.
DataSet - To select another DataSet to use as a DataSource, pick a DataSet label from the dropdown list.
Use All Rows - To select All Rows from the selected Database, click the radio button next to Use All Rows. The DataSet properties may be accessed by clicking Modify to the right. Any changes made here will have the same effect as if it were modified through the DataSet tree.
Use Row # - To select a specific row or a range of rows, select the radio button next to Use Only Row # and enter the row number(s) in the field(s) (e.g. 2 Thru 12).
Use Feature - The rows from the DataSet to be used may be selected using the feature label and characteristic association in combinations such as x dev, y dev, etc. The Use Feature for Characteristic option is populated at the time the DataSet is selected from the menu.
In the past, only row number was available to determine which data was used for an annotation. This caused problems when the database was changed and features were moved to a different row, thus shifting the data in your document. Now by using the feature label to find the data for the annotation, your data will no longer be shifted by any changes to the database as long as the feature information remains the same.
DataStack
The DataStacks section of the DataSource tab is used to set up which calculations you would like to perform on a specified set of data.
None - If None is selected, DataStacks will not be used.
Merge - Merge allows you to combine all the DataSets of your DataStack in one of three ways: Append, Collate, or Subset.
3D Math - The selected 3D Math calculation is performed on the DataStack.
Statistics - The selected Statistics are applied to the entire DataStack.
Evaluation - The selected Evaluation method is applied to the DataStack.
DataSets... - Once you have selected method you want use to synchronize your DataSets (Merge, 3D Math, Statistics, or Evaluation), select DataSets... to select which DataSets you want to include in the DataStack.
Setup... - Setup may be accessed when some combinations of settings are selected in the DataStack section.
Effective Dates
Under Effective Dates on the DataSource tab of the DataSet Properties dialog, there are three available effective date settings:
Automatically determine applicable effective date - Allows CM4D to use a sample's effective dates to determine how the sample will be applied to process baselines. The samples are organized into process baselines by comparing the effective date of each sample to the date of the process baselines. This is the only effective date option that uses a sample's effective date, and will result in sample data that is divided over more than one process baseline.
If two user-defined process baselines exist, one with a date of May 1 and one with a date of June 15, a sample with an effective date of May 14 would be associated with the May 1 baseline, and a sample with an effective date of June 16 would be associated with the June 15 process baseline. Also, a sample with an effective date of April 25 would be placed into the Default baseline.
Use most recent effective date - Forces samples to associate to a single process baseline. The result will be that each sample's effective date will be ignored, and the newest process baseline will be used (including the newest engineering and control data).
Use - Enter a specific date. to forces samples to associate to a specific process baseline. The result will be that each sample's effective date will be ignored, and CM4D will use the process baseline that has an effective date equal to or earlier than the user-specified date by searching backwards from the date entered in the field.
Can we improve this topic?