Job Setup
The Job Setup tab displays all of the settings for a selected job, and allows you to create, edit, or remove Scheduled jobs.
|
|
|
|
To create a new job, click the Add button. |
|
|
To copy a job and all associated property settings, select the job row in the grid and click Copy. The copied job will be duplicated and assigned a default name (Copy1 of..., Copy2 of..., etc.). The job name can then be modified in the Job Name column. |
|
|
The Exit button will close the Scheduler Manager without saving any changes. |
|
|
To delete a job, select the job row in the Job Setup grid and click Remove. Click OK to confirm deletion of the job. |
|
|
The Revert button will refresh all job settings to the last-saved state as retrieved from the Database. The Revert button can also be used to refresh Next and Last Run times after changing job settings. |
|
|
If you wish to make changes to an existing job, select the job row in the grid, make your changes, then click the Save button. |
|
|
Selecting a job row in the grid and clicking Test will immediately send the job to the Job Queue for a one-time run. When you test a job with a Dynamic Routine document, or data processed, the results may differ from what you may expect from a real job. |
|
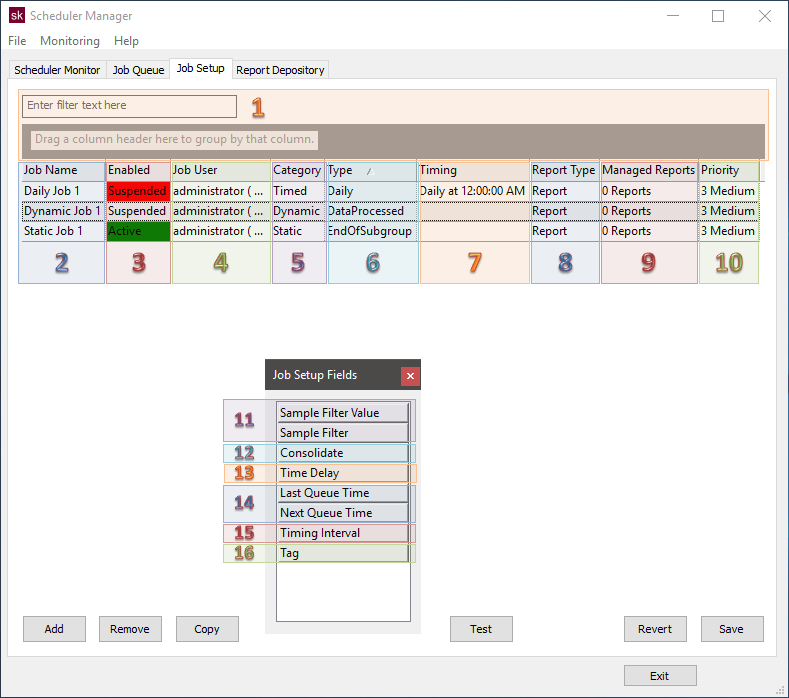
1. Search and Group
The interface allows you to search by string or group jobs by column.
- Enter filter text here - Enter a string to filter down the entire grid to only rows containing text matching the string entered. This filtering is dynamic and will update the grid as you type.
- Drag a column header here to group by that column - See the topic Grid Controls for information on how to use the grouping and sorting options available in the Grid area.
- Columns - The available columns can be used to sort and group the results of a search.
- Field Chooser - To access any additional or removed columns, right click in the column header area and select Field Chooser. Drag the column names into position in the column header area and close the Field Chooser dialog.
2. Job Name
Define a name for your job using the Job Name field. Job names must always be unique.
3. Enabled
A defined job can be set to Active or Suspended using the Enabled column. Only Active jobs will be processed by Scheduler. Any jobs that are Suspended will not be included in the error check job settings when the Save button is clicked.
4. Job User
Assign a Job User to run the job. Any available Job Users will appear in the drop down.
5. Category
The Category defines what the job can be used for. The category selected dynamically determines what options are available in some of the other columns, as well as which Reports appear in the Managed Reports dialog. Categorize the job as one of the following three:
Timed
A Timed job will run at a specific time; daily, monthly, weekly, or yearly. Timed jobs can be run at intervals, such as every three weeks. Additional Timing options are set in the Type, Timing, and Timing Interval columns.
Dynamic
Dynamic Routine Managed Documents initiate jobs when DataSmith processes data, or completes processing a subgroup. Additional Dynamic options are set in the Type column.
If a job is triggered for a Routine that is used by both a Static and a Dynamic managed document, then only the Static job will be sent to the Job Queue. To allow the Dynamic job to be sent to the Job Queue even with the Static job being queued for the same routine, you need to set the Force Dynamic Processing monitor flag both on the Routine via DataUtility as well as the job permission via DataSmith Batch.
Static
Static Routine Managed Documents initiate jobs when DataSmith processes data, or completes processing a subgroup. Additional Static options are set in the Type column.
If a job is triggered for a Routine that is used by both a Static and a Dynamic managed document, then only the Static job will be sent to the Job Queue. To allow the Dynamic job t o be sent to the Job Queue even with the Static job being queued for the same routine, you need to set the Force Dynamic Processing monitor flag both on the Routine via DataUtility as well as the job permission via DataSmith Batch.
6. Type
The options available in the Type column are dynamically dependent on which Category is selected.
Timed Types
If Timed is selected in the Category field, choose the interval at which you would like the job to be executed:
- Daily - processed every day
- Every Sunday - processed once a week, on Sunday
- Every Monday - processed once a week, on Monday
- Every Tuesday - processed once a week, on Tuesday
- Every Wednesday - processed once a week, on Wednesday
- Every Thursday - processed once a week, on Thursday
- Every Friday - processed once a week, on Friday
- Every Saturday - processed once a week, on Saturday
- Hourly - processed every hour, on the minute set in the Timing field
- Monthly - processed once a month, on the day and time selected in the Timing field
- Yearly - processed once a year, on the date and time selected in the Timing field
Dynamic or Static Types
If Dynamic or Static is selected in the Category field, choose whether or not the job will run when Data is Processed or at the End of a Subgroup.
DataSmith Batch Manager, after completing tasks for Data Processed Monitored Routines, will check for Data Processed jobs and make entries in the Schedule Queue as needed. Entries in the Schedule Queue contain the information about the data (routines) that caused the entry. That same routine which caused DataSmith to place an entry in the Schedule Queue will be used as the routine for the query in the managed document. These settings are only available for Static or Dynamic jobs.
The following settings are required when using either the Data Processed or End of Subgroup job types:
- DataSmith Batch Manager - Event Data Processed or Event End of Subgroup check box in the Job Permissions field.
- DataUtility - Data Processed Monitored or End of Subgroup Monitored check box must be set on each routine that you want to use.
- DataProcessed - Whenever DataSmith Batch processes a file that uses a Routine with a monitor flag, monitor permissions in Batch, and a job defined in Scheduler, an entry will be placed in the Job Queue.
- EndOfSubgroup - Whenever DataSmith Batch finishes processing a subgroup from a Routine which has a monitor flag, monitor permissions in Batch, and a job defined in Scheduler, an entry will be placed in the Job Queue. In order for CM4D Scheduler to work with the End of Subgroup job setting, the subgroup size of the routine needs to be set and samples need to have a subgroup sequence number. When the subgroup sequence number equals the subgroup size, an entry will be placed in the Job Queue.
7. Timing
When a job is timed, the options in the Timing column can be used to determine when and how often a job is to be run. Depending on the type of Timed Job, when you double-click the Timing field a different popup will appear (either a Time selection dialog or a Calendar and Time selection dialog).
- Hourly Jobs - Enter the minute of the hour the job will be run. For example, if this is set to 15, the job will run at a quarter past every hour.
- Monthly Jobs - Select the date of the month the job will be run. It is highly recommended that you do not to schedule the report for the 29th, 30th or 31st day of the month, since not every month may contain these days. If the month does not contain the day the report was scheduled for, your scheduled report will not run until the next month that has the selected day.
8. Report Type
Report Type determines the output of a processed job.
- Report - Generates a PDF report, and if the Managed Report selected has a Thumbnail image, a PNG or GIF file will be created. GIFs will be only be created if the Thumbnail sheet includes an Animated Alignment.
- Event - Generates an Event Notification email based on the Event settings configured for the Managed Report at the DataSet level of Managed Documents. In addition to selecting from the same list of Managed Reports as the Report type, Event only allows you to also select Managed Reports that do not have a Depository assigned. See here for more information on Events.
- Both - Generates both an Event and a Report.
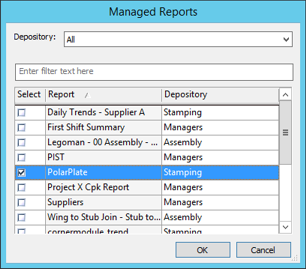
9. Managed Reports
All jobs require at least one Managed Report to run the job and generate the printed report. When scheduled jobs are executed, the Managed Documents for each Managed Report are opened in CM4D Classic and generate either a Report, an Event, or both. The list of Managed Reports in the dialog depend on what is selected in the Job Type column. Multiple Managed Reports only share job settings; all of the Managed Reports in a single Job will still be processed as individual printed reports. See also, Managed Report Administration.
 |
|
| Depository (column) | Displays the label of the Depository assigned to the Managed Report. This Depository is where the report generated by the job will be sent on completion. |
| Depository (dropdown) |
Choose a Depository to filter the list of Reports to show only Managed Reports from the selected Depository. If your Report Type is "Event", select All from the dropdown to see Managed Reports without Depositories assigned. |
| Enter filter text here |
Enter alpha or numeric strings to find specific Manage Reports. Wildcards are not supported. |
| Select |
Enable the check box to assign a Managed Report to the job. |
| Report |
Displays the name of the Managed Report. |
- To add one or more Managed Reports to a job, you must first select a Job Type (Timed, Dynamic or Static).
- Then choose the Managed Report(s) that you want to use by double-clicking the Managed Reports field.
- In the Managed Reports dialog:
- Select a Depository from the dropdown to narrow down the list to a single Report Depository.
- Select All to show all available Managed Reports.
- If your Report Type is set to Event, selecting All from the dropdown will also include Managed Reports without a Depository assigned.
- Select the check box(es) next to the Managed Report Name(s) to be added to the job.
- Select a Depository from the dropdown to narrow down the list to a single Report Depository.
- Click OK.
10. Priority
A Priority can be set to Very Low, Low, Medium, High, or Very High. This priority will only be used when more than one job is waiting to be processed at the same time by the same process thread. The job with the highest priority will be processed first, but if all the Priority settings are the same (default is Medium), then jobs will be processed in the order they are entered into the Job Queue.
Once a job has begun processing, it will complete processing even if a higher priority job is placed the Job Queue.
11. Sample - Filter/Value
Sample Filter
The Sample Filter menu contains filters A through Z, along with an option for "No Filters". Only one filter and one value can be selected per job. Sample Filters are available for either Static or Dynamic jobs.
All of the subroutines that match the filter will be the ones processed and the routine will be added to the query. The subroutines will then be loaded and an exact match to the specified filter will be needed. Scheduler then checks to see if there is a job defined for that routine. If there is, DataSmith will create a job and pass all the information on to CM4D. If CM4D comes across a filter set, it will use that filter. If not, CM4D will ignore the filters.
Sample Filter Value
The text field that corresponds with the Sample Filter allows you to key in the specific Sample Filter Value. You can also leave this field empty; blank or ~unassigned~ are valid values. Only one filter and one value can be selected per job.
In order for Filter Options to work correctly, you must know what you are looking for. The exact filter value must be entered into the edit field so that the value stored in the database will be an exact match.
12. Consolidate
When Static or Dynamic jobs are Consolidated, data files are sent to the Queue in groups specified by the number of Maximum Files set in DataSmith Batch Manager. When the Scheduler processes the jobs waiting in the queue, all entries that meet the following three requirements will be consolidated into one final job to be processed:
- All the samples in the data file must belong to the same Routine.
- All the samples in the data file must have identical Schedule ID's.
- All the samples in the data file must have the same Managed Document ID.
If a routine has 12 sample files, and the number of Maximum Files is set to 5, then for every 5 data files processed, one entry would be placed in the Job Queue. This would result in three total [Waiting] entries in the queue with one final [Processing] entry that will be processed by CM4D Scheduler.
13. Time Delay
The Time Delay option applies only to jobs that are in the Category Dynamic or Static. When the Time Delay is set to True, the job will be delayed by the number of minutes set in the Timing Interval field of the grid, starting from the time it is placed in the Job Queue.
If a job is put in the queue at 11:45:36 AM but has a 30 minute delay, Scheduler will not actually process the job until 12:15:36 PM.
14. Queue Time - Next/Last
- Last Queue Time - Indicates when a job was previously placed in the Job Queue. This field is automatically updated each time Scheduler runs the job.
- Next Queue Time field - Indicates when a job is scheduled to run next. This field is automatically updated periodically by Scheduler as needed.
15. Timing Interval
The Timing Interval is designates the recurrence of a Timed job or the delay, in the case of Data Processed jobs. The Interval is dependent on the Type that is selected. Double-click the field and enter the number in the field according to the following rules:
- Daily - Number of Days. For example, if this is set to 2, the job will run every 2 days.
- Hourly - Number of Hours. For example, if this is set to 2, the job will run every 2 hours on the minute specified in the Timing field.
- Monthly - Number of months. For example, if this is set to 6, the job will run every 6 months, beginning with the first month after date set. For example, if on May 22nd a job was created to run every 3 months, the Next Run would be set to June 22nd. Once the job runs for the first time on June 22nd, the job will then only run every 3 months thereafter.
- Weekly - Number of Weeks. For example, if this is set to 3, the job will run every 3 weeks on the day of week selected.
- Yearly - Number of years. For example, if this is set to 1, the job will run once a year on the date set in the Date calendar.
- DataProcessed - When a job is Dynamic or Static and the Time Delay is set to True, the number entered in this field will determine the length of delay (in minutes) from the time data is processed or an end of a subgroup is reached before the job is run. For example, if this is set to 30, the job will not begin processing until 30 minutes after the job was triggered.
16. Tag
A Tag is a user-defined string that may be used for sorting or grouping jobs within the Scheduler Manager user interface. This is only used for managing jobs in Scheduler Manager, this is not the same as the Report Tags used by CM4D Web.
Can we improve this topic?