The CM4D Upload Portal installer includes two feature modules that can be installed together or separately:
- ATS Upload Portal and API Services - Installs the CM4D Upload Portal applications and its supporting services. This machine must be able to connect to ATS Security and Configuration Manager.
- ATS CM4D Configuration - Installs the CM4D Configuration plugin for ATS Security and Configuration Manager. Must be installed on the same machine as ATS Security and Configuration Manager. See here for a brief installation guide for ATS Security and Configuration Manager or visit ATS-HELP for the full documentation.

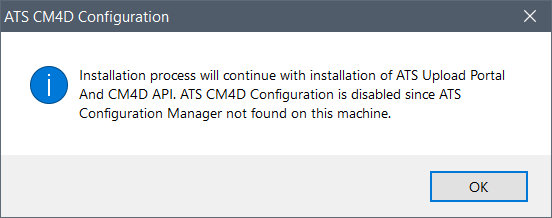
You may choose one or the other, or both based on your server and application deployment scenario. If the installer is run on a machine without , a warning ![]()
![]() will appear and you will only have the option to install the Upload Portal and CM4D API. See here for more information on deployments.
will appear and you will only have the option to install the Upload Portal and CM4D API. See here for more information on deployments.
In addition to the CM4D Upload Portal, the supporting services DataSmith Batch Proxy and DataSmith Translator must also be installed. These two supporting services have their own installers and requirements.
Run the CM4D Upload Portal Installer
- The CM4D Upload Portal installation process requires a user with administrative access to ATS Security and Configuration Manager.
- Run the CM4D Upload Portal install executable (as Administrator).
- Click Next.
- Agree to the terms and conditions, then click Next.
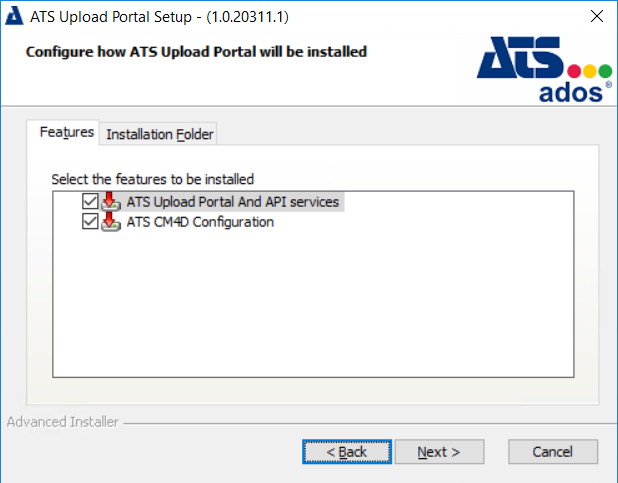
- The default options provided install both the services and CM4D configuration, and to install the Upload Portal to C:\Program Files (x86)\Applied Tech Systems\ATS Upload Portal\. Most installations will use the defaults provided, but you can modify how it is installed.
- By default, both features are installed. To change which features to install, uncheck the unwanted options:
- ATS Upload Portal and API Services - Installs the CM4D Upload Portal applications and its supporting services. This machine must be able to connect to ATS Security and Configuration Manager.
- ATS CM4D Configuration - Installs the CM4D Configuration plugin for ATS Security and Configuration Manager. Must be installed on the same machine as ATS Security and Configuration Manager.
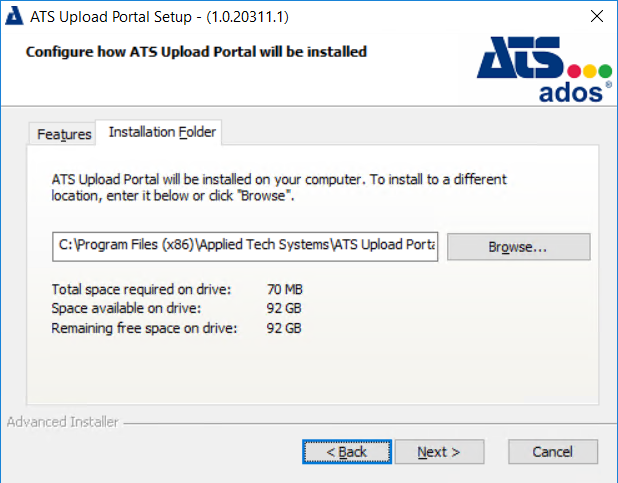
- To change the installation folder, go to the tab and either enter a folder path or browse to a folder.
- By default, both features are installed. To change which features to install, uncheck the unwanted options:
- Enter the database information. This database is created entirely by the installer, including the database object, tables and procedures.
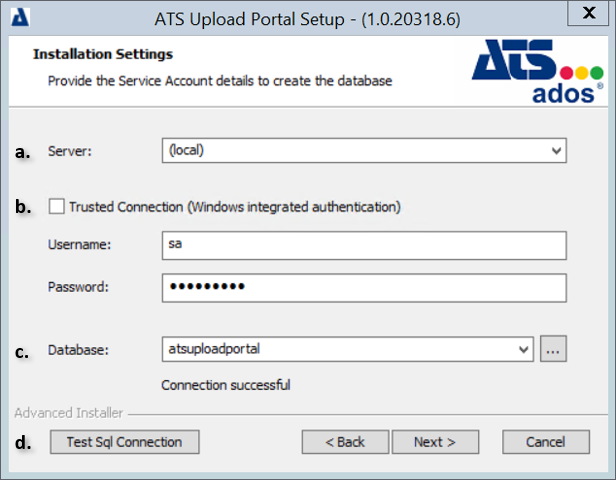
- Server - Enter the database server name, or leave the default (local) if installing on the local machine. The default (local) is automatically resolved to the computer name in the installed configuration files.
- Trusted Connection - Enter the user credentials to access the database management system. This user must have a sufficient privilege level to create and modify databases.
- To use the current Windows user account, leave the Trusted Connection box checked.
- To use a SQL login, uncheck the Trusted Connection box.
- Database - Set the database for the CM4D Upload Portal, DataSmith Translator and DataSmith Batch Proxy services.
- To allow a new database to be created by the installer, enter a unique name.
- To choose an existing database, click the ellipses button and select a database from the dropdown menu.
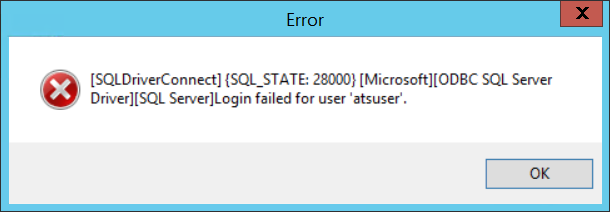
- Test SQL Connection - Click to confirm that the selected user can connect to the database server.
- If the connection is successful, continue.
- If the connect fails, correct the user login and retest.
- Click Next.
- Enter the database connection information. This user must have a sufficient privilege level to create and modify databases.
- Username - Enter a username for the SQL login account.
- Password - Enter a password for the SQL login account.
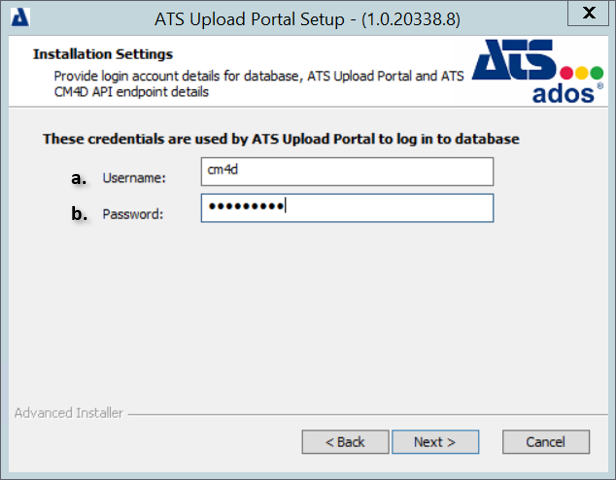
- Click Next.
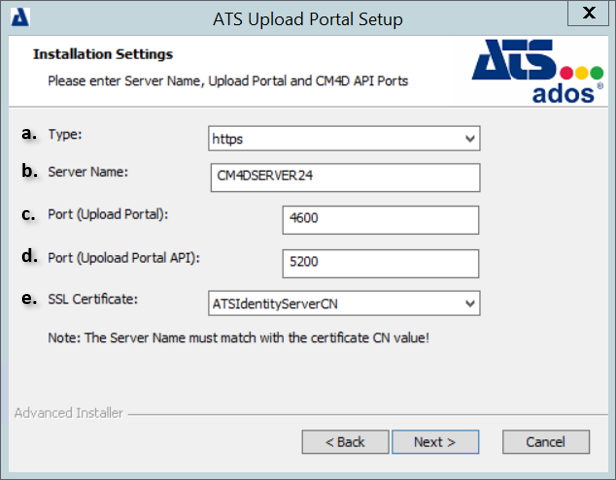
- Provide the service endpoint details.
- Type - Select the security type, either http or https.
- Server Name - Enter the Server Name of the machine hosting the CM4D Upload Portal.
- Port (Upload Portal) - The default port for the CM4D Upload Portal is 4600. To change the port, enter a new port number.
- Port (Upload Portal API) - The default port for the CM4D Upload Portal API is 5200. To change the port, enter a new port number.
- SSL Certificate (https only) - Select a certificate.
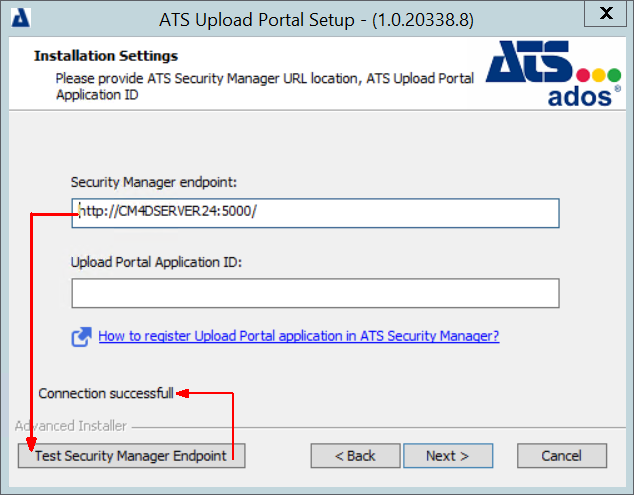
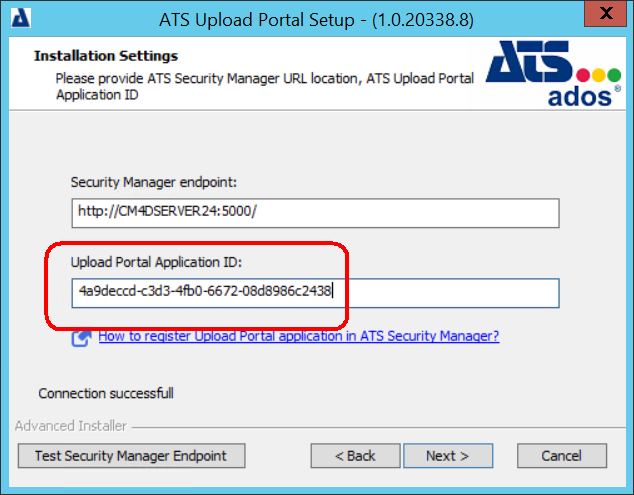
- Provide the Security Manager endpoint and Application ID for the Upload Portal.
- Security Manager Endpoint - Enter the endpoint URL for the ATS Security Manager, including the port (http://servername:port/).
- Upload Portal Application ID - The Upload Portal Application ID must be generated by adding the CM4D Upload Portal as a new Application in the ATS Security and Configuration Manager.
- Test Security Manager Endpoint - Click to confirm you can connect to the endpoint. If the server name or port are incorrect, the test will show the connection failed.
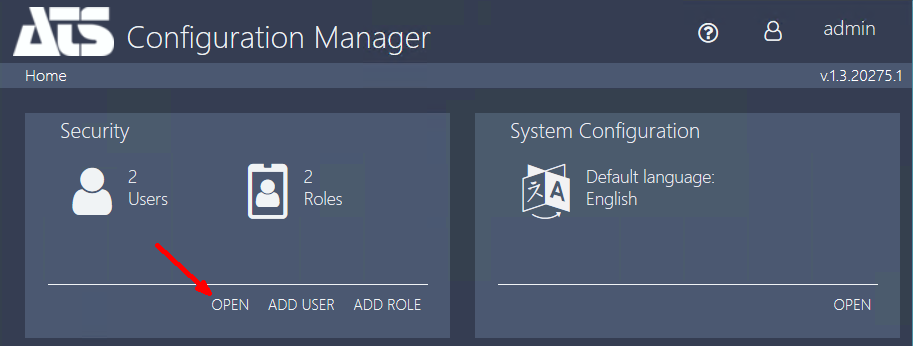
- Browse to the ATS Security Manager URL (http://servername:port/) and log in with a user with Admin access.
- On the Security card, click Open.
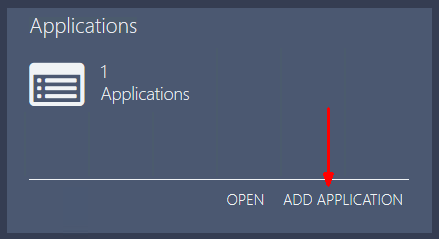
- On the Applications card, click Add Application.
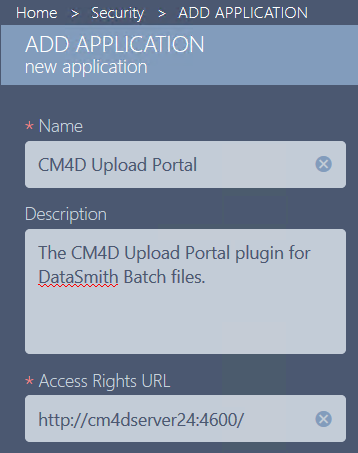
- Enter the information about the new application.
- Name - Enter a name for the application, such as 'CM4D' or 'Upload Portal'.
- Description (optional) - Enter a description for the application that can be seen in the Applications grid card.
- Access Rights URL - Enter the address endpoint for the CM4D Upload Portal, including the server name and port (http://servername:port/) entered in the previous install window.
- Click Save.
- If the application was added successfully, the new row of the Applications grid should have the Status 'Created'.
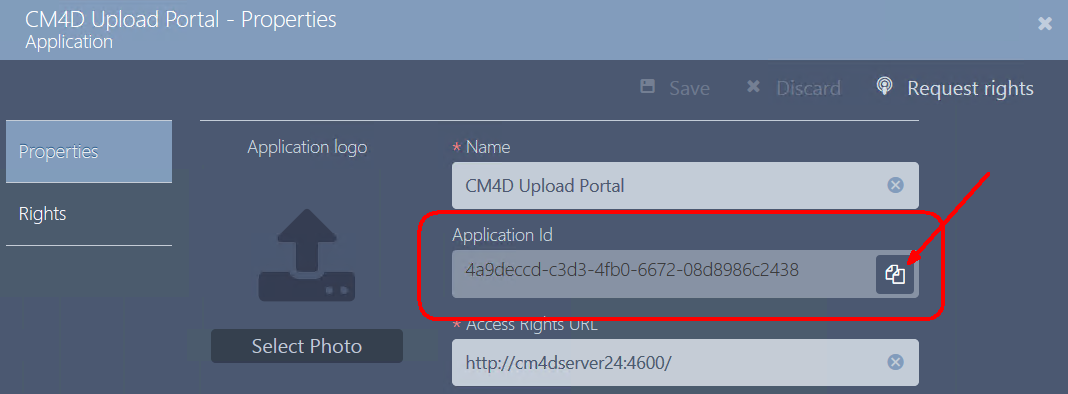
- Click on the grid row of the new application to open the Application properties.
- In the Access ID field, copy the string (
 ).
).
- On the Security card, click Open.
- Go back to the Upload Portal installation window.
- Paste the Application ID from the Application properties in the Upload Portal Application ID field of the installer window.
- Click Next.
- The default endpoints are provided based information provided in previous installation steps.
- Security Manager Endpoint - Enter the endpoint URL for the ATS Security Manager, including the port (http://servername:port/).
- CM4D API Endpoint - Enter the endpoint URL for the CM4D Upload Portal API, including the port (http://servername:port/).
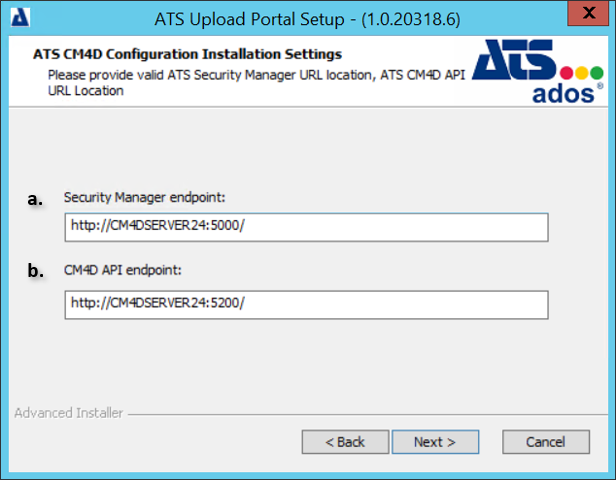
- Click Next.
- Enter the ATS Licensing Server URL.
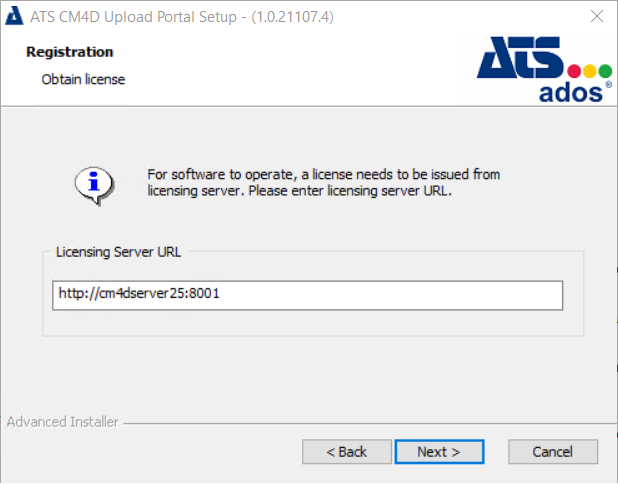
- Click Next.
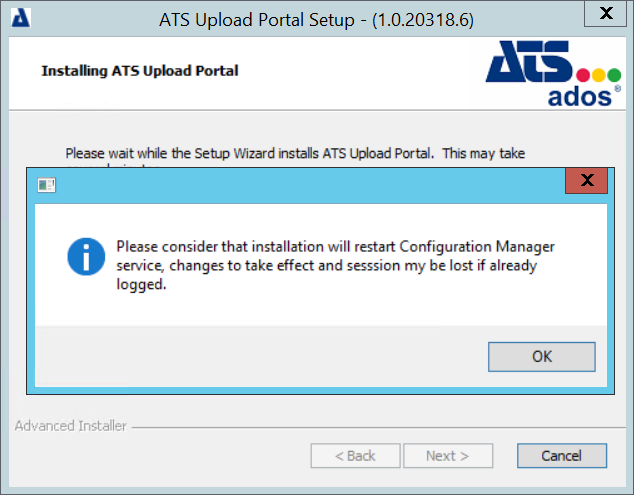
- Click Install.
- If prompted about restarting the Configuration Manager service, click OK.
- Click Finish.
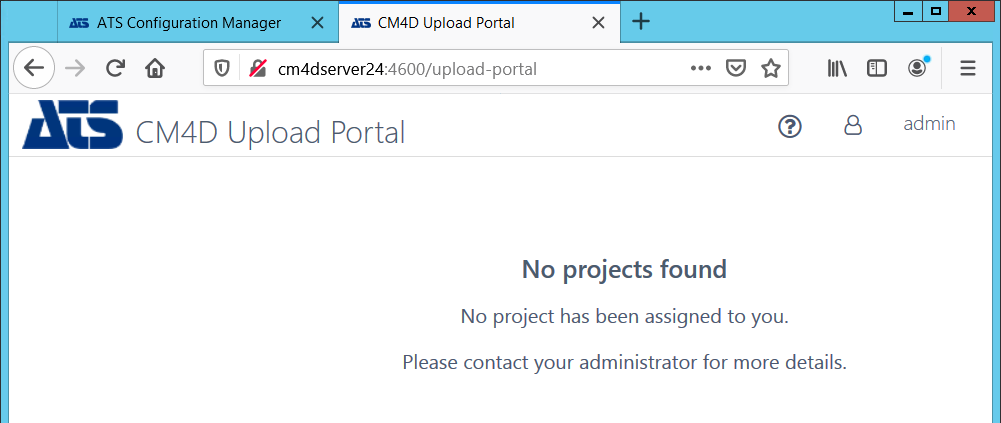
The Upload Portal web page is launched automatically in the default browser. You must complete the configuration in the ATS Security and Configuration Manager before the Upload Portal can be used.
Once the CM4D Upload Portal installation is finished, continue with the DataSmith Batch Proxy and DataSmith Translator installations.