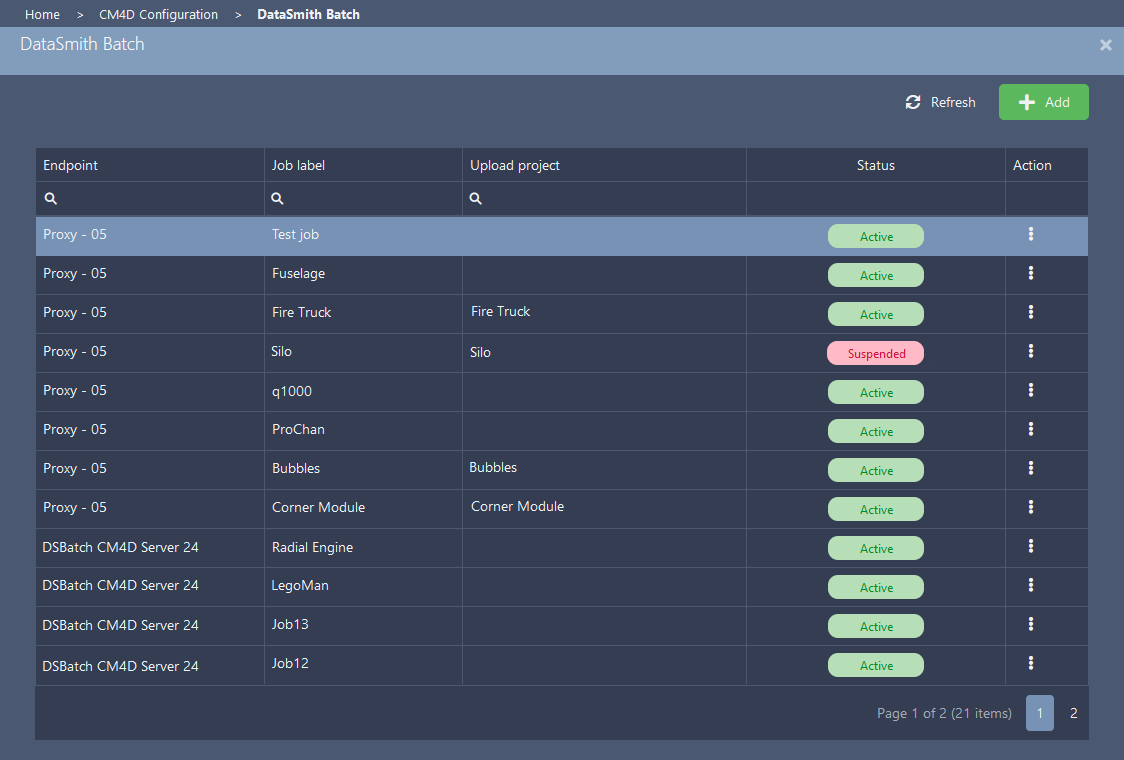
The DataSmith Batch tab contains all available DataSmith Batch processing jobs from the servers connected via endpoints defined in Configuration>Service Endpoints. Create new Batch jobs, activate or suspend a job, view or modify properties and set the job as a Project for CM4D Upload Portal.
The CM4D plugin detects jobs based on the Job Label in DataSmith Batch Manager, so if a job label is changed in Batch Manager then the job in Configuration Manager must be reconfigured for the Upload Portal as if it were a completely new job.
Batch jobs appear in a grid blade with one row per job for each connected server endpoint. Each job listed has two corresponding security Rights that must be assigned to a user Role to be able to see the project in their Upload Portal.
- Add - Create a new Batch job.
- Refresh - Reloads the grid to show any updates to the current status of the contents.
- Properties - Click on a grid row to modify the properties, or use the Action menu ( Open).
 |
|
|
Action |
Click the three dots to open the menu of available actions for the selected row.
|
|
Endpoint |
The label of the DataSmith Batch Proxy service endpoint that runs the DataSmith Batch service and stores the Batch folders and files. |
|
Job Label |
The label of the Batch job, as it is defined in DataSmith Batch Manager. If a Job Label is changed in DataSmith Batch Manager, any upload portal settings and permissions for the job in Configuration Manager will no longer be associated to that batch job. |
|
Status |
The current state of the job - Active or Suspended. Suspended jobs that are enabled on the Upload Portal can still receive submitted data files, but the files are not processed (marked as 'Submitted') until the job is set to Active in DataSmith Batch Manager. Suspended project files are marked with the 'Suspended' flag to alert users to the current status of the job. |
|
Upload Project |
The label of the Upload Portal project. This is what the users see on the project card. |
Add New Batch Job
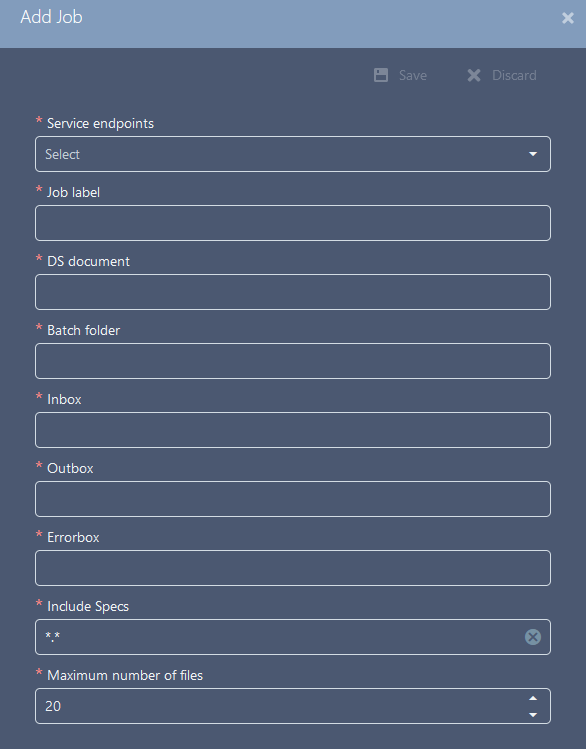 New Batch jobs can be created by clicking the green Add button in the top right of the DataSmith Batch card. The Add Job blade contains the minimum required fields. Additional properties may be edited once the job is created by selecting Open from the Batch Jobs grid row Actions menu.
- Click Add to create a new Batch job.
- In the New Job blade, enter the initial information:
- Service Endpoint: Select DataSmith Batch service to which you want to add the job.
- Job Label: Enter the name of the job. This must be unique.
- DS Document: Enter the path to the DataSmith translator used for processing data.
- Batch Folder: Enter the path for Batch folder. This is the root folder for this job which will contain the working folders (Processing, Retry). It must be local to the system on which the DataSmith Batch service is running (Service Endpoint).
- Inbox: Enter the path for the folder where data files are gathered before processing. If this folder is within the Batch Folder, enter just the Inbox name to use a relative path.
- Outbox: Enter the path for the folder where data files are sent when files are finished processing successfully. If this folder is within the Batch Folder, enter just the Inbox name to use a relative path.
- Errorbox: Enter the path for the folder where data files are sent when an error condition occurs. If this folder is within the Batch Folder, enter just the Inbox name to use a relative path.
- Include Specs: Specify any restrictions on file types if you only want to process specific file extensions but there may be other types in the Inbox folder.
- To include all file types, use *.* as wildcard expression.
- Multiple types can be added using a semicolon delimited list, is not case sensitive and is an OR operation.
- Maximum number of files: Enter the upper limit on how many data files can be picked up from the Inbox at one time for processing.
- Click Save.
Batch Job Properties
The DataSmith Batch Job Properties tabbed blade contains information about the DataSmith Batch job. Some fields can be modified if you have the required user role.
|
|
|
| Batch Folder |
The folder that is the central hub of the Batch Processor, and must be on a local drive on the system where the DS Batch service is running. This is the main folder where the Batch service creates the Inbox, Out Box, and Error Box when those respective folder paths are set to relative paths. |
| Batch User |
The user that will be used to run the Batch job. The user names available in the Batch User column is dependent on a user having the Batch User permission in the Site database. In order for the Batch processor to run, there must be a user selected from the Batch User menu. If a user is not chosen (this field is blank by default when a new batch settings file is used), Batch will log the error "File Status: File Has Errors! DataSource "[DataSource Name]" has lost connection!". A disabled menu (grayed out) may indicate that either you are not connected to a Site Database or there are not any users available with the Batch User privileges. |
| Cause for Unreasonable |
An existing cause can be assigned to unreasonable data by entering a valid cause label in the Cause for Unreasonable field. If you enter a valid label, causes will be assigned where values exceed reasonable limits. If you leave this field empty, or enter a bad cause label, no causes will be assigned. Cause Labels can also be assigned using the Output Setup dialog in DataSmith.
If there are reasonable limits for a Position characteristic, but the data file only contains X, Y, and Z characteristic values, a check for reasonable limits cannot be performed. For this case, the X, Y, and Z characteristics in the data file should have reasonable limits. |
| Configs |
Configs, or configurations, are a set of instructions which are used by DataSmith to process a data file. DataSmith Batch will only processes the Configs listed in the Configs section of the Batch Properties if set to Process. The Configs list is populated automatically based on the DataSmith Document selected for the current job. If your DataSmith file contains multiple Configs, and you do not want to use all of them, select only the desired Config(s) and leave the unwanted Configs check boxes unselected. If a new DataSmith document is selected, but has the same Config name as the previous translator, the Configs with matching labels are registered as the same Config, and the new Config will remain active (set to "Process"). If the new Config label does not match the previous label, the Config will then be reset to the default "Inactive". There must be at least one Config enabled in order to validate the Batch process, so if you only have one Config in your translator file than make sure that it is selected (made Active). If there are no Active Configs in this section, DataSmith Batch will not be able to process data. |
| Default Datasource |
The default datasource is the CM4D Managed Datasource that is used for processing data by DataSmith Batch. Any Managed Datasources available in the Site database will appear in the DataSources list. |
| DS Document |
DataSmith Document, a.k.a, DataSmith Translator. Enter the local (or UNC) path in the field or browse to the DataSmith file (*.4datasmith) used to process your data files. The Configs list is provided automatically from the Config labels that exist in the selected DataSmith file. All Configs are unchecked by default. At least one Config must be selected in order for DataSmith Batch to be able to process any data. |
| Endpoint |
The service endpoint that runs the DataSmith Batch service and stores the Batch folder. |
| Errorbox |
The folder that stores any files that the translator could not process for one reason or another. When a file is moved to the error folder, a .ERR log file is generated to correspond each data file, listing the reason for the error. The Batch Error Box is defined as a relative folder by default, but can be assigned any user-defined directory (local or UNC path). |
| Exclude Specs |
Batch retrieves the entire contents of the Inbox (as specified by the *.* wildcard parameters unless you specify which file types you want to retrieve. To retrieve all files except those with a specific file extension, type the file extension between the two wildcard symbols (*.*). The Exclude field is a semicolon delimited list and is not case sensitive. Exclude is also defined as an OR operation (not AND), meaning that a file only has to match one of the specs to be excluded. |
| Inbox |
The folder that is the first destination for all data files that will be processed by DataSmith Batch. The Batch Processor will retrieve data from the folder designated as the Inbox and transfer it to the Processing folder to be processed. The Batch Inbox is defined as a relative folder by default, but can be assigned any user-defined directory (local or UNC path). |
| Include Specs |
Batch retrieves the entire contents of the Inbox (as specified by the *.* wildcard parameters) unless you specify which file types you want to retrieve. To retrieve only files with a specific file extension, type the file extension between the two wildcard symbols (*.*). The Include field is a semicolon delimited list and is not case sensitive. Include is also defined as an OR operation (not AND), meaning that a file only has to match one of the specs to be included. |
| Job Label |
The name of the Batch job. This is read-only once the job is created and saved. |
| Job Permissions |
Job Permissions may be set for each job. If none are selected for any of the Job Permissions, DataSmith Batch will not process any data. At least one permission must be selected (Update Samples is the most commonly used). |
| Maximum Number of Files |
The maximum number of data files you wish to process at one time from one Inbox. This number is per DataSmith process, as set in the Concurrent DataSmith Processes section of Batch Manager. |
| Outbox |
The folder that contains a copy of all the files that DataSmith Batch successfully processed and marked with a date/time stamp. The Batch Out Box is defined as a relative folder by default, but can be assigned any user-defined directory (local or UNC path). |
| Status |
The Job Status is the traffic signal, so to speak, for the DataSmith Batch processor.
|
| Subfolder |
Processed files can be organized in subfolders by day or month in the Out Box and Error Box. Options include: None, Day or Month. For example, if Day is selected from the Subfolder menu, a subfolder labeled with the current day's date will be created to hold processed files in the Out Box. If any errors occur during processing, then a parallel subfolder labeled the same way will be created in the Error Box. Folders are only created on days when files are processed. The same would apply if Month is selected, with the exception that folders would be created only once a month as files are processed. |
| Tag |
A user-defined text string that can be used for sorting or identifying jobs in the grid. |
| Timestamp Format |
When a file is passed from the Inbox to the Processing folder, DataSmith Batch will apply the date/time stamp and a new file extension to the data file as specified in the Timestamp Format section of the Batch Manager.
If you use one timestamp format, then decide you wish to use another, the old time stamp will not be deleted from the filename of data files that have already been processed. DataSmith Batch will simply begin using the updated Timestamp Format for all subsequent files. If a file is being reprocessed, and already has a timestamp assigned to it, as long as the current Batch timestamp format is set to the same format as the reprocessed file (i.e. the filename formats match exactly), the timestamp will be updated to the new date and time. If the file Body-In-White ^ LH_DMIS000115_06-02-21_11-40-14.dmo is reprocessed one month later, the file name would then be labeled Body-In-White ^ LH_DMIS000115_06-03-21_08-23-55.dmo. The only part of the filename that would be modified would be date/timestamp. |

Folder File Counts
The number of files currently in each of the Batch folders is displayed in parenthesis next to the field label. These numbers can be useful when troubleshooting a slow or stopped system to indicate where the problem might be, especially when the inbox, outbox and/or errorbox are located on different machines. When the DataSmith Batch folders are counted, only the main batch folders (Inbox, Outbox and Errbox) are counted, along with the most recent first-level sub-folders (day or month). If you are not using subfolders, all files in the main folders will be counted.
If you have subfolders created by Month, only files in the main folders and any subfolders for the last month will be counted. Any files that exist in a previous month's subfolder will not be included in the count.
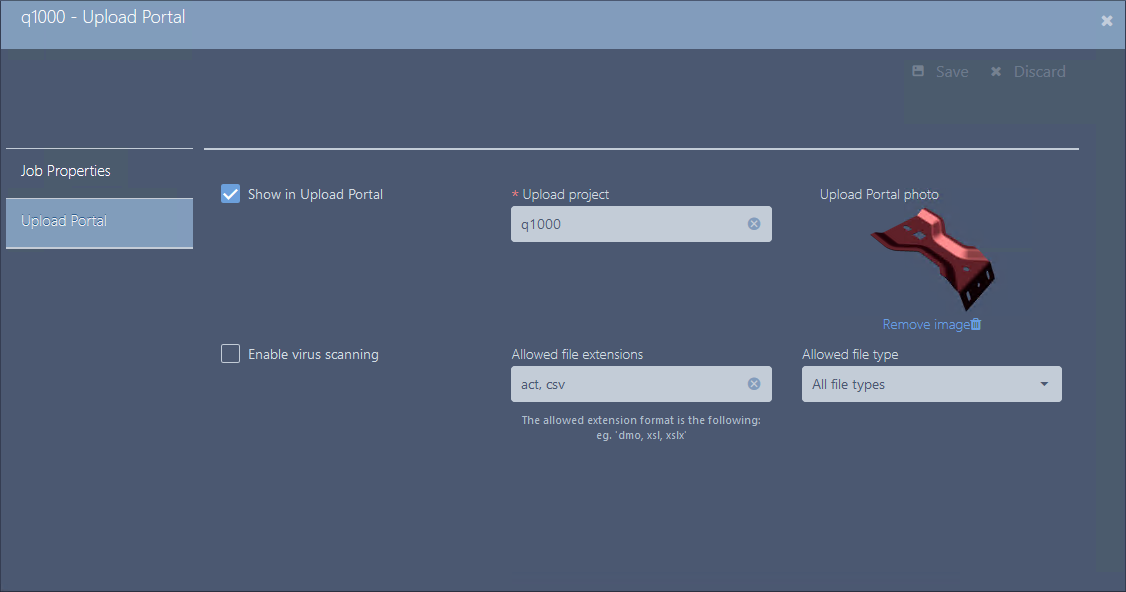
Upload Portal Project Properties
|
|
|
|
Enable Virus Scanning |
If enabled, all files uploaded to the project will be scanned by the specified virus scanner before the files are sent to the batch proxy server for processing. If a virus is detected, the file will fail to upload. Requires a Virus Scanning endpoint defined in Configuration > Service Endpoints. |
|
File Extensions |
Specify the extension(s) of files allowed for upload to this project. Uploaded files that do not match the file extension(s) will be rejected and will not be submitted to DataSmith Batch for processing.
|
|
Specify the types of files allowed for upload to this project (Text, Excel, Text and Excel, All Types). Uploaded files that do not match the MIME type will be rejected (marked as invalid) and will not be submitted to DataSmith Batch for processing.
|
|
|
Select Image |
Add an image to display on the project card. Images are not resized to fill/fit the card.
|
|
Show in Upload Portal |
Enable to show the project card in the Upload Portal. Uncheck to remove a project from the system. When a project is disabled, the rights to that project are removed from the system. Re-enabling a project requires user rights to be reassigned. |
|
Upload Project |
Enter a name for the project for which the job is assigned; must be unique. This name is used to label the Rights when for the project when adding it to a user Role and is what the users see on the project card in the Upload Portal. Project names are limited to a maximum of 20 characters. |