
Topic Contents: Hide
Toolbar buttons allows easy access to the most commonly used menu options, as well as perform functions that are not accessible by any other means. The toolbars in the Reporter interface looks like the following image:
Toolbars (as well as specific buttons) can be enabled or disabled as required using the View menu.
|
|
Routine Selection Tree |
Hides or restores the Routine Selection tree to the interface |
|
Toggle Reporter Auto Mode |
Enables or disables Auto Mode. When Auto Mode is on, Reporter will automatically load any new data from the database into the report. |
|
|
|
New Data Notification |
New Data is available in the database for loading. When enabled, clicking this button will load any new data from the database into the report. |
|
|
Data Error Notification |
If a data file is not processed into the database successfully, the Data Error Notification will be enabled. Click the toolbar button to acknowledge the current notification. Check your Error folder to find the erroneous file and check the log file for more information on the error. |
|
|
Prints your current report to the default printer, using the current Output settings. |
|
|
|
Prints your current report to a PDF, using the current Output settings. |
|
|
|
Email Sheet |
Sends your report, using the current Output settings, to an E-mail as a PDF attachment. This option only works if you have an E-mail program installed on your computer. |
|
|
DataUtility |
Opens the DataUtility application for viewing or editing data in the CM4D Reporter database. |
|
|
Report Type |
Allows you to select a Report Type to view in the Sheet Display Region. |
|
|
Sift Rules |
Opens the Sift Rules dialog. |
|
|
Change Sift Rules |
Opens the Multiple Sift Rules dialog. |
|
|
First Sample |
Loads the first sample from the sample list into the report |
|
|
Previous Sample |
Loads the previous sample from the sample list into the report |
|
|
Sample Selection |
Allows you to select the individual sample that you want to view from a dropdown menu |
|
|
Next Sample |
Loads the next sample from the sample list into the report |
|
|
Last Sample |
Loads the last sample from the sample list into the report |
|
|
First Sheet |
Opens the first sheet of the report in the display region |
|
|
Previous Sheet |
Opens the previous sheet of the report in the display region |
|
|
Sheet Selection |
Allows you to select a specific sheet or the sheet Array from a dropdown menu |
|
|
Next Sheet |
Opens the next sheet of the report in the display region |
|
|
Last Sheet |
Opens the last sheet of the report in the display region |
|
|
Display Frame |
Hides or restores the frame surrounding the sheet in the display region |
|
|
Rotates the report aspect between Landscape to Portrait. |
|
|
|
Switches the report size between standard and extended. |
|
|
|
Zoom Tool |
Zooms the viewing area of your sheet by clicking the zoom tool icon and drawing a box around the area you want to zoom |
|
|
Zoom Fit |
Zooms the report to fit within the report window area. |
|
|
Zoom Fit 3D |
Zooms the image to fit within the borders of the view area. |
|
|
Edit View |
Puts the View into Edit Mode. |
|
|
Allows you to add or move a leader line to a View image. |
Although all buttons required by CM4D Reporter are available on the interface by default, you may enable additional buttons by selecting View > Customize menu option.
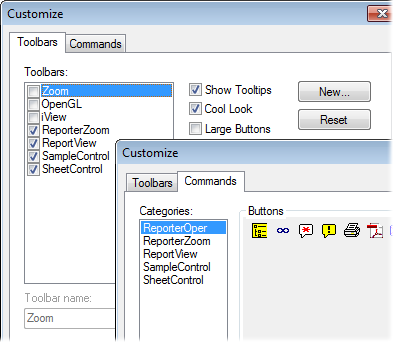
On the Toolbars tab, the CM4D Reporter toolbars can be toggled on or off by selecting the check box next to its name. Selecting or clearing the check box next to Show Tooltips will toggle the messages which appear as the mouse pointer hovers over toolbars. Selecting or clearing the check box next to Cool Look will change the appearance of the toolbars. Selecting or clearing the check box next to Large Buttons will change the size of the buttons in the toolbars.
A new toolbar can be created by clicking New, typing a name for your toolbar, and clicking OK. The new toolbar will appear in the User Interface and buttons can be added to the new toolbar using the Commands tab. Select the Commands tab, then select a name of a toolbar from the list. The buttons will appear to the right. To add them to your new toolbar, click and drag the buttons from the Customize dialog onto the new toolbar in the user interface.


