Layout Manager can execute SQL statements to display data on controls. This allows dynamic values to be used. The example below shows how it is possible to limit the results from a statement depending on the value selected on a different control.
SQL controls can be populated with an SQL statement preceded by the characters ‘>>’. For example:
>>select code from products order by code
The variable name of other controls in the layout can be used in brackets to limit the output of the SQL statement depending on the values selected on a different control. For example:
>>select code from products where product_id = [ProductGroup]
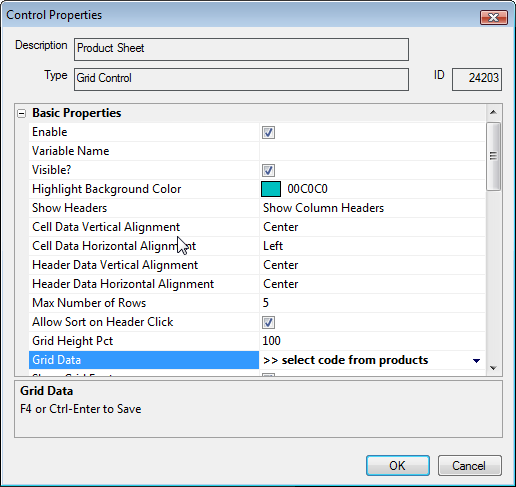
1. Enter the required data in Grid Data.
You cannot add values directly into Grid Data. They must be called from the database.
2. Scroll down to the bottom of the properties list.
3. Click Click here to change Column info.
4. Click Reset to Defaults.
5. Click OK.
6. Click OK in Control Properties.
The grid will now update to display the entered values.
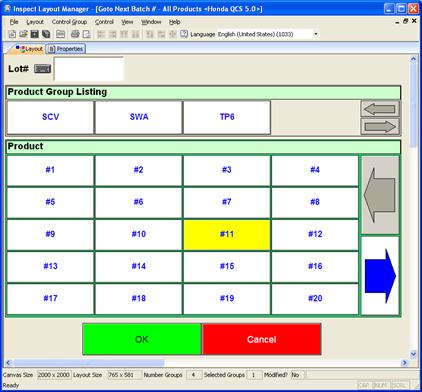
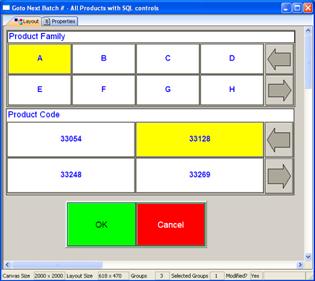
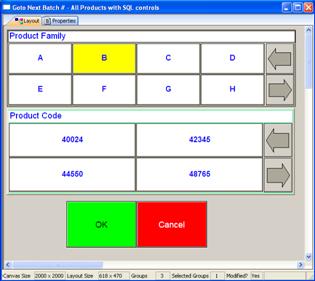
In the example below, the layout shows two controls: Product Group and Product. The goal is to limit the products displayed, depending on the button selected in the Product Group.
1. Open Inspect Layout Manager.
2. Create a new layout using screen type Goto Next Batch Unit.
3. Right click in the empty space in the new layout and select Manage User-Defined Controls.
4. Click Add.
5. In Control Description type Product Group Auto Control.
6. In Control Type select Auto Control.
7. Click OK then Close to return to the layout.
8. Add a new control group to the layout named Product Group Listing.
9. Right click on the control group and select Manage > Controls.
10. Add the Product Group Auto Control to the control group.
11. Click OK.
12. Double click on the control to display the properties.
13. Make the following changes:
o Variable Name: ProductGroup
o Auto-Control Data:
>>select pgt.description
from product_groups_text pgt, product_groups pg
where pg.is_active = 1
and pgt.language_id = (select default_language_id from global_settings)
and pgt.product_group_id = pg.product_group_id
order by 1
This should all be copied as one line.
14. Click OK.
15. Add a new control group to the layout named Product Listing.
16. Right click on the control group and select Manage > Controls.
17. Add the Product Sheet to the control group.
18. Click OK.
19. Double click on the control to display the properties.
20. Make the following changes:
o Variable Name: Product
o Grid Data:
>>select pt.description
from products p, products_text pt
where p.is_active = 1
and p.product_id in
(select pgd.product_id
from product_group_detail pgd, product_groups_text pgt
where pgt.description = '[ProductGroup]' and pgd.product_group_id = pgt.product_group_id) and
pt.language_id = 1033
and p.product_id = pt.product_id
This should all be copied as one line.
21. Scroll down to the bottom of the properties list.
22. Click Click here to change Column info.
23. Click Reset to Defaults.
24. Click OK.
25. Click OK in Control Properties.
The grid will now update to display the entered values.
26. Add a new control group to the layout.
27. Right click on the control group and select Manage > Controls.
28. Add OK and Cancel to the control group.
29. Click OK.
30. Right click in the empty space in the layout and select Layout Properties.
31. Modify the Stored Procedure parameters as required.
For information on how to use Stored Procedures contact ATS Support Services.
32. Save the layout and assign it to the required template (see here).
33. Assign the template to a station (see here).
The layout can now be used as required in Data Collect and will work as follows.
The first example shows the Products associated to Product Group ‘A.’ When the selection changes to Product Group ‘B,’ the products are updated accordingly.
In this example we will add custom information to the Unit List control in the Main screen.
1. Add a column for the custom data in the custom_unit_info table in the database.
2. Populate the field as required. This can be done directly in the database or during run-time.
3. Modify the custom_create_new_unit stored procedure to include the information added to the custom_unit_info table. This can be done using this code - SQL or Oracle.
4. In Layout Manager, add the Custom Unit Info Control to the layout to the Main screen.
5. In the control properties, modify the Grid Data property as follows:
>>custom_get_unit_list [current_tracking_point_id], -1, 1033, 1033, 100
6. At the bottom of the control properties, change the column info.
You will notice that the custom info from the custom_unit_info table is now listed.
7. Enable and disable the columns as required.
The table will now display the selected information.
