To create a Defect Trigger carry out the following steps:
1. From the Event Types list select Defect Triggers.
A list of the existing triggers will be displayed.
2. Click New...
The General form will be displayed.
3. Complete all the items in the form according to the following table.
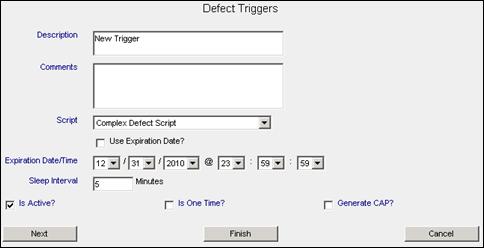
| Name | Value | Description |
| Description | Frame Defect | A description of this new trigger. This description will appear in the Event Description column of the Defect Triggers table. |
| Comments | All defects on ATS Bike frame | Comments about the Defect Trigger. |
| Script | Frame Defect Email | Select the script that you wish to use for the trigger. For more on scripts see Creating Scripts. |
| Use Expiration Date? | Disable | When this box is checked, the expiration date and time will become active and once the specified expiration date/time has passed, the trigger will be marked inactive. |
| Expiration Date/Time | Not required | The date/time when the defect trigger will expire and become inactive. |
| Sleep Interval | 1 | After a trigger is active, the number of minutes that go by before the trigger is reactivated and another notification is sent. |
| Is Active? | Enable | If this box is checked, the trigger is active. If it is unchecked, the trigger is inactive. |
| Is One Time? | Disable | If this box is checked, the trigger will become inactive after it fires one time. If this box is not checked, the trigger will continue to fire continually, or until it is marked inactive. |
| Generate CAP | Disable | If this box is checked, the trigger will activate a CAP event. |
4. Click the Next button at the bottom left of the General form.
After you have completed the General form for creating trigger types, you must complete the Conditions forms. Most of the condition forms are identical except for the items they list.
| Condition | |
| Product | ATSBike |
| Part | Cross Bar Down Tube |
| Location | Include All |
| Concern | Include All |
| Detail | Include All |
| Rank | Include All |
| Safety Factor | Include All |
| Defect Shift | Include All |
| Defect Station | Include All |
| Responsible Area/Cell | Include All |
| Defect Status | Include All |
| Recipient | Cell Leaders |
1. If required, disable Include All in the bottom-left corner.
2. Select the desired items from the Available list. The Available list contains the all the items for that type (i.e. Parts contains parts) that the Inspect administrator set up in the Inspect Admin program.
3. If applicable, use the Folder selection to limit the items that appear in the Available list.
4. Select the required items in the Available list. To assign all the items in the Available list, check the Include All checkbox.
5. Click the <<< button. The selected items are added to the Assigned list.
6. After finishing the form click the Next button at the bottom left of the form to go to the next form.
You can also select the desired form in the navigation bar at the right.
7. On the Recipient page click the Finish button in the left-hand corner of the form to save the completed trigger.