What are Defect Indicators?
At least one default configuration and group should be setup immediately. Without a configuration and group setup, you will be unable to use some Inspect reports.
Some reports allow users to filter by user-defined Defect Indicator Configurations and Groups. This is a powerful tool that can allow comparisons between external warranty, internal indicators and other reporting types. If setup properly, it can allow a facility to predict external data based upon internal data collection.
Specific part/concern combinations are assigned to Groups. These groups could relate to a particular type of part (e.g. gauges or seats) but a part/concern combination can be included in more than one group. The groups are then assigned to Configurations. Each group can only be assigned to one configuration although groups with the same name can be included in different configurations.
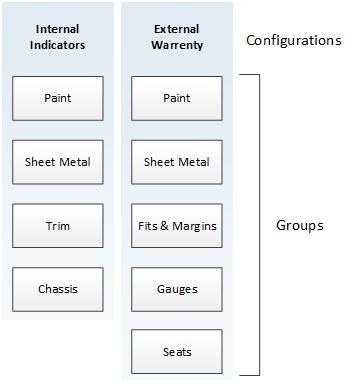
The graphic below shows that External Warranty is one of two reporting Configurations. External Warranty has five groups: Paint, Sheet Metal, Fits & Margins, Gauges and Seats. Parts and concerns can then be assigned to each group within a configuration.

For example, for the configuration External Warranty and group Paint, all paint concerns on specific parts could be assigned to Paint.
Defining Defect Configurations
Configurations allow you to compare data across reporting categories. For example, you can combine the information for paint and sheet metal into one report.
Select the Reports tab.
Click Configurations/Groups.
A new window opens displaying configurations in the left-hand pane and groups in the right-hand pane.
Click the add button (![]() ) below the left-hand pane.
) below the left-hand pane.
The Defect Indicator Configuration creation window opens.
Enter a description for the configuration.
Click OK.
The configuration is added to the list.
Defining Defect Groups
Items in the same Indicator Group have something in common. For example, a group could be Gauges. This group would contain all of the gauge parts and concerns.
Select the Reports tab.
Click Configurations/Groups.
A new window opens displaying configurations in the left-hand pane and groups in the right-hand pane.
Click the add button (![]() ) below the right-hand pane.
) below the right-hand pane.
The Defect Indicator Group creation window opens.
Enter a description for the group.
Select the configuration to assign it to using the drop-down list.
Click OK.
The group is added to the list.
Assigning Parts/Concerns to Configurations/Groups
Now that groups have been assigned to configurations 'part + concerns' can be assigned to groups.
Select the Reports tab.
Click Groups/Part + Concerns.
A new window opens displaying groups in the left-hand pane and parts/concerns in the right-hand pane.
Select a configuration from the drop-down list above the left-hand pane.
The groups that it contains are shown in the left-hand pane.
If required, filter the parts and concerns using the drop-down lists above the right-hand pane.
If required, enable Hide Assigned below the right-hand pane to only list part/concerns that have not been assigned to a group.
Drag parts/concerns in the right-hand pane onto groups in the left-hand pane.
The parts/concerns are now assigned to the groups.