The Travel Service controls the routing of the station information for travel tickets.
In order for Travel Service to work correctly it must be configured to a domain user account. For further information see here.
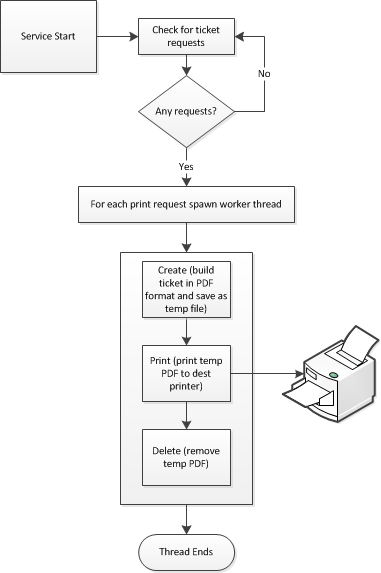
How Does the Travel Service Work?
The following graphic shows how the Travel Service creates a PDF from a ticket request.
View Print Queue
Select the Services tab.
Click Travel.
Select the required Travel Service.
Click Connect.
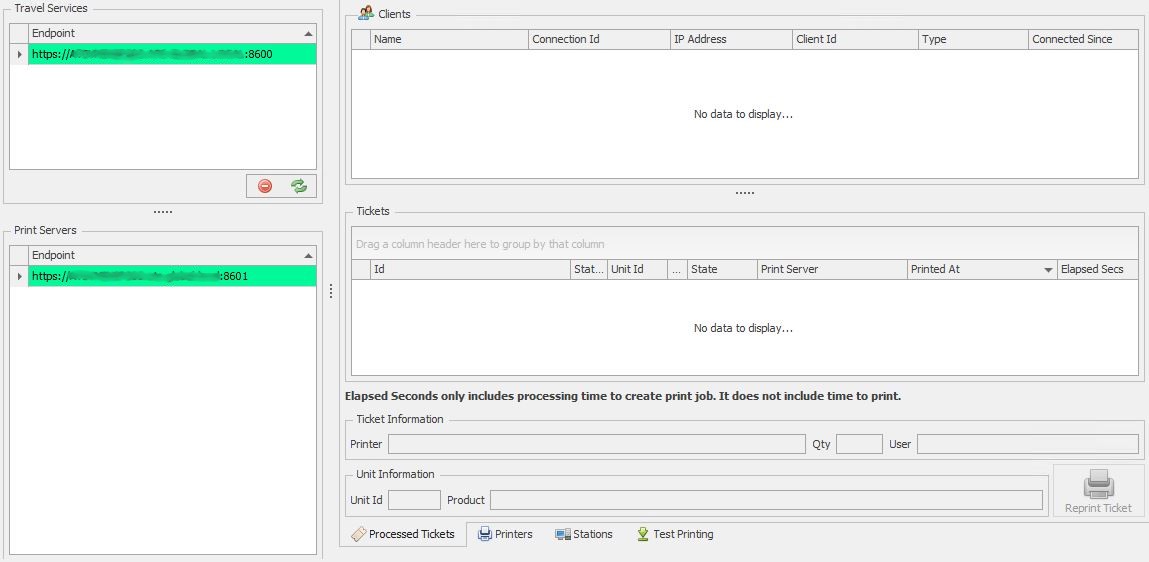
Select the Processed Tickets tab.
The tickets that have been printed on the selected travel service are displayed.
It's possible to reprint a ticket in the queue by clicking the Reprint Ticket button.
The server will disconnect automatically when you close it or select a different server.
View Printers
Select the Services tab.
Click Travel.
Select the required Travel Service.
Click Connect.
Select the Printers tab.
This will display the printers available on the Travel Service machine.
View Stations Travel Service is Assigned To
Select the Services tab.
Click Travel.
Select the required Travel Service.
Click Connect.
Select the Stations tab.
This will display the stations that the travel service has been assigned to together with details on print jobs.
Assign a Station to the Travel Service
A station can be assigned the Travel Service in the station properties. See here for further information.
Ticket Types
Select the Services tab.
Click Ticket Types
This will display the built in ticket types, listed below.
Defect (portrait)
Checklist (portrait)
Defect (landscape, defect barcode)
Defect + Checklist (2 column, max 20 questions)
Defect + Checklist (portrait, large page, with signoff)
Tickets can be created, edited, activated, deactivated and deleted in this screen. For examples of Travel Tickets, click here.
Test Printing
Select the Services tab.
Click Travel.
Select the required Travel Service.
Click Connect.
Select the Test Printing tab.
Search for a unit in one of the following ways:
By Identifier: Select the By identifier tab then select which identifier to search for and enter a value.
By Tracking Point: Select the By Tracking tab then select a tracking point and enter and beginning and end date/time.
Click Search.
A list of the units matching the criteria is shown.
Select the required unit.
Select a station in the Station drop down box.
In the Print Server section, specify the following:
Server: Select a print server in the Server drop down menu.
Printer: Select a printer in the Printer drop down menu.
In the Print Options section, specify the following:
Ticket Type: Select the type of ticket to print from the Ticket Type drop down menu.
Print Mode: Select the print modes to include in the travel ticket by ticking the required options in the Print Mode drop down menu.
Language: Select the language to use for the Travel Tickets.
Press the Print button.
Barcode Symbology
The barcode type used in Travel tickets can be configured in the appsettings.json file in the Travel Service folder.
Default location: C:\Program Files\Applied Tech Systems\Inspect\7.1.11.25\Services\Travel Service
To change the barcode type in the appsettings.json file, locate BarcodeSymbology under the Settings section.
The following barcode types are supported:
Code128
Code39
Interleaved2of5
Example
"Settings": {
"BasePath": "",
"AlternativeEndpoint": "",
"PrintedTicketQueueSize": 1000,
"BarcodeSymbology": "Code128",
"QueueFetchSize": 5,