Topic Contents: Hide
ReportTweak is a reporting tool which may be used to create and manage reports based on the premise that "similar" annotation connected to the same DataSet will make up a single report.
ReportTweak considers annot to be "similar" if all of the annot in the SheetSet share the same:
· Annotation type (text, chart, graph, etc.)
· DataSet (DataSource)
· Size (width & height)
· Amount of sub-annot (i.e. number of Components)
When in RepotTweak mode, capturing annotation with the mouse does not select Views with the other annotation on the Sheet.
Existing AutoReports or Annotation Chains may be converted into ReportTweak reports.
Although Report Tweak does not create the layout for the annotation, Auto Report can be used as a "Startup Wizard" to create the basic layout before converting the AutoReport to Report Tweak.
· Only Multiple-sheet AutoReports may be converted to ReportTweak
· Once an AutoReport or a Chain is converted into a ReportTweak report, it cannot be reverted back to an AutoReport or Chain.
When Report Tweak is toggled, or active, the annotation which make up the report are highlighted with one of five colors to indicate what state the annotation are in.
Green = Valid Annot
Blue = New Valid Annot
Red = Invalid Annot
If an annotation is not connected to a valid DataSet or DataSet row...
Fuchsia = Duplicate Annot
If two or more annotation are connected to the same DataSet row...
Yellow = Unresolved Annot
Gray = Inactive Annot
If an annotation is part of a ReportTweak that is connected to a different DataSet than the one currently active...
The right-click menu ReportTweak is enabled as soon as you toggle ReportTweak mode on. The menu content will appear differently according to the following situations:
Single Annotation (Excluding Views)
Multiple Annotation (Including Views)
If you do not have any highlighted annot (including gray), you do not have any ReportTweak reports for the current SheetSet, so the ReportTweak menu options will not work.
When a single annotation is selected, a right-click menu will appear containing the following options:
Transfers the selected annot from the current Sheet to the Sheet marked as the Active Sheet. If there is no Sheet marked as the Active Sheet, this option will not be enabled.
Used in conjunction with one of the six available select options:
· ...of this Feature - selects all annot in the SheetSet that share the same Feature
· ...of this Routine - selects all annot in the SheetSet that share the same Routine
· ...of this SMI type - selects all annot in the SheetSet that share the same SMI Type (e.g., Surface, Hole, Slot, etc.)
· ...of this SMI hand - selects all annot in the SheetSet that share the same SMI Hand (e.g., Right, Left, Centerline)
· ...of this SMI axis - selects all annot in the SheetSet that share the same SMI Axis (e.g., Primary, Secondary, Tertiary)
· ...of this SMI dir - selects all annot in the SheetSet that share the same SMI Direction (e.g., Fore, Aft, Hi, etc.)
Regardless of what Sheet you are currently viewing, the "Select...from Active Sheet" option will only select annot matching the descriptor from the sheet marked as the Active Sheet. If there is no Sheet marked as the Active Sheet, these options will not work.
· ...of this Feature - selects all annot from the Active Sheet that share the same Feature
· ...of this Routine - selects all annot from the Active Sheet that share the same Routine
· ...of this SMI type - selects all annot from the Active Sheet that share the same SMI Type (e.g., Surface, Hole, Slot, etc.)
· ...of this SMI hand - selects all annot from the Active Sheet that share the same SMI Hand (e.g., Right, Left, Centerline)
· ...of this SMI axis - selects all annot from the Active Sheet that share the same SMI Axis (e.g., Primary, Secondary, Tertiary)
· ...of this SMI dir - selects all annot from the Active Sheet that share the same SMI Direction (e.g., Fore, Aft, Hi, etc.)
When a single View annotation is selected, a right-click menu will appear containing the following options:

· Auto-Orient - select one option in each of the three sections to determine how your View will be oriented
· Select all Views - Selects all Views in the SheetSet
· Force and Replace this view to all Sheets - replaces all Views in the SheetSet with the View currently selected
· Copy this View to all Viewless Sheets - pastes a copy of the currently selected View onto any sheet in the SheetSet that does not have a View
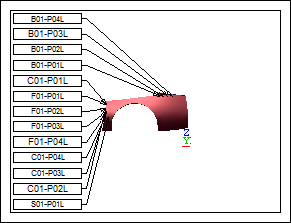
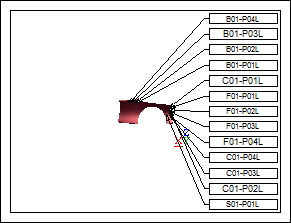
· Mirror Annot - mirrors the selected view and all annotation that are connected to that view by a leader line
§ Views will be mirrored across the center line (through the Y axis) of the View, but will not be moved within the sheet
§ Annotation will be mirrored across the vertical center of the View
 |
|
 |
The symmetry of Left and Right Handed data often results in a symmetrical report. An easy way to create this type of report is to build the report for one hand, and then use the Mirror Annot functionality to automate the building of the opposite hand.
Any annotation on the sheet that are not connected to the view by a leader line will not be affected.
When multiple annotation are selected, a right-click menu will appear containing the following options:
· Send to Active Sheet - Moves any selected annotation from their current sheet to the sheet marked as the Active Sheet. If there is no Sheet marked as the Active Sheet, this option will not be enabled.
· Uncross - The selected annotation will be reorganized on the sheet (within the selection) so that the leader lines will not be crossed.
|
· Balance - Once you have your annot approximately where you want them, use the Balance function to push the selected annot out to the four corners of the selection and space them vertically within the selected area.
|
· Lock Position - Once you have your annot where you want them on the sheet, the Lock Position allows you to lock the annotation into place on the sheet. This option allows the annot to be selected for editing, but not moved from the current position on the sheet. To move a locked annot, hold the Ctrl key, move the annot, and release the Ctrl key. Selecting a locked annot and choosing Lock Position from the menu a second time will unlock the annot position.
· Lock Selection - Locks the selected annot in both location on the sheet, and from being selectable for editing. To select a locked annot, hold the Ctrl key and click the annot, or hold the Ctrl key and drag the mouse over multiple annot to select more than one locked annotation. Selecting a locked annot and choosing Lock Selection from the right-click menu a second time will unlock the annot.
For step-by-step instructions and examples of using ReportTweak, see the following topics: