Auto Orient a View
A View annotation with a 3D DataSource image can be set up to automatically adjust how the 3D model is rotated and/or zoomed to best display the data currently loaded by the Views' DataSource. The Auto Orient option is enabled in the View tab of the annotation properties.
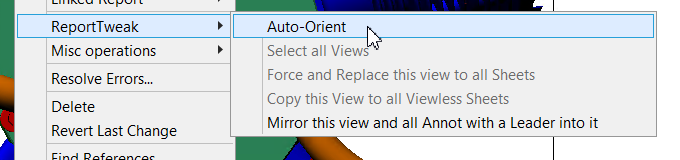
When a report is in ReportTweak mode, the View Auto Orient dialog can be accessed via the right-click menu on the View Annotation: ReportTweak>Auto-Orient ReportTweak>Auto-Orient.
How to Orient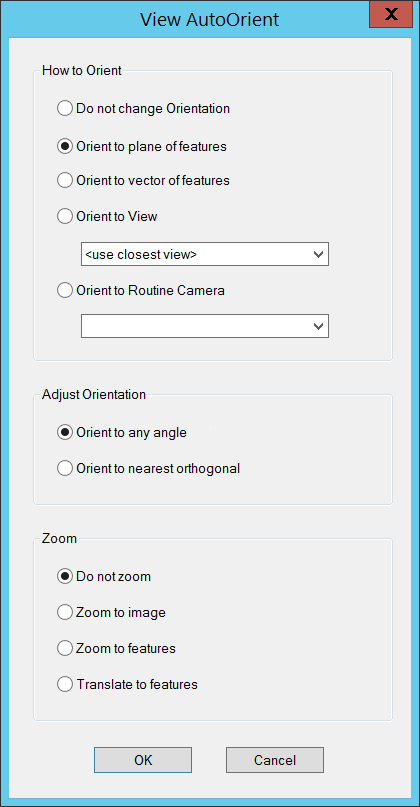
Do not change Orientation
The view will not change from the manual orientation saved in the template. This is the default setting.
Orient to plane of features
This option looks at all of the XYZs of the points loaded, calculates a best-fit plane and moves the model to show the part according to that plane.
Orient to vector of features
This option looks at all of the IJKs of the points loaded, averages those vectors and then moves the model to show the best view of that average. For examples, if you load the points on a door CM4D will look at all the features and determine what is the best way to look at all of those features.
Orient to View
Sets the view to the same orientation as another view on the same sheet. If a View is set to Orient to another view, it cannot be selected as the reference for another View.
Orient to Routine Camera
This option adjusts the model to show a view that is configured for a specific Routine. These views are saved as Routine Cameras.
For API calls to create or change Routine Cameras, see the topics QaCamera and QaCameraXML.
Reports with Views set up this way will automatically adjust the part image based on the Routine data that is loaded. In this way, you can create a single report that loads different data but still shows specific views regardless of which part is loaded.

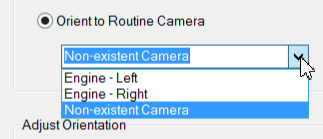
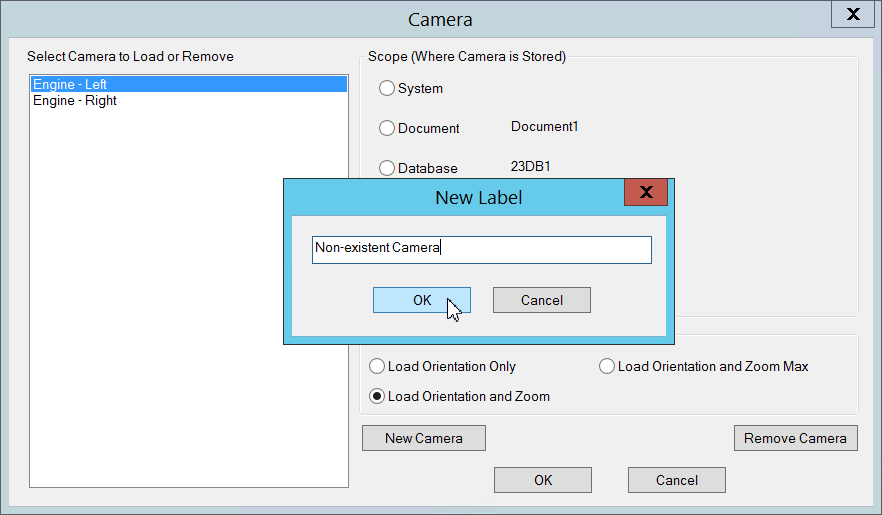
This dropdown list is populated with all Routine Cameras available for all loaded Routines. If a Camera does not exist for a Routine, you can type a label into the dropdown.
Assign a Camera Before Creating Camera
When setting up a View, you can assign a Routine Camera to the Auto Orient even if the camera does not exist. Once the Routine Camera is created, the View will begin orienting to that set Camera. If the entered Camera does not get created, the View will not automatically orient.
Adjust Orientation
Cannot be used in conjunction with the 'Orient to View' option.
Orient to any angle
Does not modify the orientation; retains the original angle in the View. This options only looks at the vectors of the loaded data.
Orient to nearest orthogonal
This option looks at the six planes and adjusts the model to 'snap' to the one that is closest to the loaded features. The six planes are top, bottom, left, right, above and below.
Zoom
Cannot be used in conjunction with the 'Orient to View' or 'Orient to Routine Camera' options.
Do not zoom
The zoom of the View is not altered.
Zoom to image
Fits the model to fill the view frame. This differs from 'Zoom Max' in that it only fits the part image, not the loaded features.
Zoom to features
Fits the loaded features to fill the view frame. This is the same as the 'Zoom Max' function.
There is an option in the Cm4d.ini file which can be set to designate a minimum zoom distance. This can be used in cases where the view zooms to a single feature or closely grouped features so the camera position does not end up too close to the model to be able to tell where the feature is on the part. When set to a larger value, the camera will stop at the set position regardless of what would otherwise be dictated by the zoom on the feature. See here for details for the INI.
Translate to features
Moves the view (horizontally/vertically) in the annotation frame to show the features on the model. The rotation of the model is not changed.
Can we improve this topic?