What are Attribute Setups and Steps?
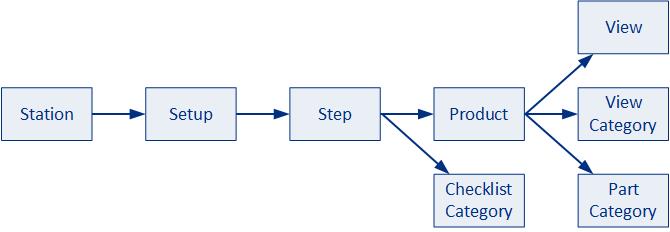
Attribute Setups determine the inspection steps that will be carried out during the inspection process as well as the products, questions, views and parts that will be presented. Once it has been created a single setup can be assigned to multiple stations.

Inspection Steps allow a highly complex inspection procedure to be broken down into more manageable steps. The operator must begin with the first inspection step and cannot proceed to the next step until the previous step has been completed. Completion will be accomplished by answering all checklist questions assigned to the step.
Inspection Steps are assigned to a Setup which, in turn, is assigned to one or more stations.
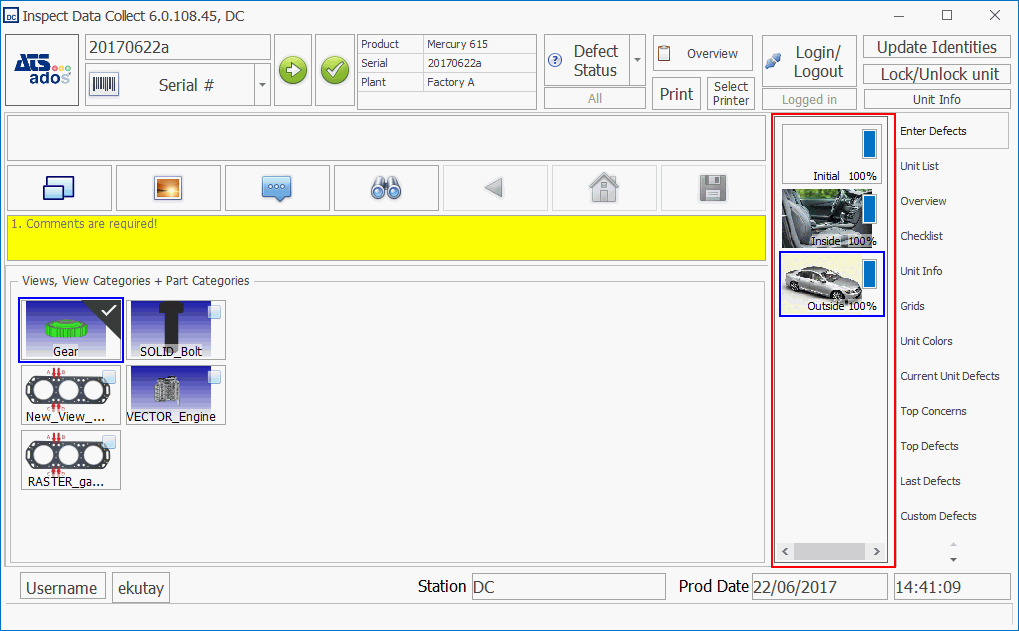
A filmstrip control helps the user to visualize where they are in the overall inspection process.
Inspection steps have a visual indicator to describe status: completed (green) and incomplete (red). If the Inspection step contains an image, it will be displayed in the control.

Inspectors may logout at any point during the inspection process and the current inspection step will be saved. Any inspector will be able to login and pull up the same unit and continue the inspection at the point where the previous inspector left off.
Each inspection step may include checklist questions, views, view categories and part categories.
Creating Inspection Setups
Select the Attribute tab.
Click Setups.
A list of the existing inspection setups is displayed.
Click the Add button (![]() ) below the left-hand pane.
) below the left-hand pane.
The setup creation window opens.
Enter a description and unique code.
Click OK.
The setup is added to the list.
Creating Inspection Steps
Select the Attribute tab.
Click Setups.
A list of the existing inspection setups is displayed.
In the right-hand pane select the Steps tab.
Click the Add button (![]() ) below the right-hand pane.
) below the right-hand pane.
The step creation window opens.
Enter a description. This will be displayed to the operator at the inspection station.
Enter a unique code.
If required, add an image in the Image tab. This can show the exact area that the operator should be inspecting.
For a description of how to add an image see here.
Click OK.
The step is added to the list.
Assigning Steps to Setups
Once an inspection step has been created it needs to be assigned to a setup. Views, parts and checklist categories can then be added to the step within the setup.
An inspection step can be assigned to more than one setup. However, the contents of the inspection step at each station can vary.
Select the Attribute tab.
Click Setups.
A list of the existing inspection setups is displayed.
In the right-hand pane select the Steps tab.
Drag and drop a step from the list onto a setup in the left-hand pane.
The step is added to the setup.
The order of the steps can be changed by dragging and dropping them into new positions..
It is now possible to assign the following items to the inspection steps:
Views, view categories and part categories (see here)
Checklist questions (see here)
Inspection steps can be copied between stations by simply dragging and dropping the step onto the destination stations. The contents of the step will be duplicated.
Assigning Setups to Stations
In order for steps to appear at a station the Setup that contains them must be assigned to the station. This is carried out within the station itself.
Select the Plants tab.
Click Stations.
The Stations window opens.
In the right-hand pane edit the station you wish to assign the Setup to.
Select the Properties tab.
Under Run/Start Options, use the Setup dropdown menu to select the setup that will be used by the station.
Click OK.
The Setup is assigned to the station.