What are Reference Documents?
Reference documents can be added to give extra information to the operators carrying out inspections. These could be documents such as operator instructions, process sheets, drawings or visual aids. For example, when entering defects, the operator can have visual indications of acceptable/non-acceptable conditions on the selected part and when repairing defects, the operator could access the repair standard procedure for the selected defect. These documents are shown with an image and caption and they can be individually zoomed (in the same way that images can be zoomed when they are attached to defects or repairs).
The files that can be displayed are limited only by the available viewers installed on the client machine. For example, if Adobe Reader is installed, PDF files can be opened.
Adding Reference Documents to the Library
Select the Management tab.
Click Reference Documents.
A list of the existing documents is displayed in the middle pane together with a preview of the currently selected document (if available) in the right pane. The list of documents can be filtered by file type using the Type drop-down list.
Click the add icon (![]() ).
).
Locate and select the document to be added and click Open.
Multiple documents can be added at the same time by pressing Ctrl and selecting multiple files.
The document creation dialog opens.
Enter descriptions for the documents or keep their existing file names.
If required, enable Store documents externally on file system to retrieve the file from the document path given rather than copying the file to the database.
If a document is stored in the database a temporary file is created. If you are adding a lot of documents to the database you may wish to clean out the directory occasionally. To locate this directory:
1. Open a command prompt.
2. Type Set and press enter.
3. In the list that appears locate Temp. This is the folder where the files will be stored.
Store documents externally should only be enabled if the document path is available to all inspection stations that require the document.
Click OK.
The documents are added to the library.
Using Folders
Reference Document folders are used to make a large list of documents more manageable by reducing the amount of scrolling you need to do.
A list of the existing document folders is displayed in the left-hand pane.
To create a new folder click the add icon (![]() ) below the left-hand pane. Then enter a description and any required comments about how the folder will be used. Click OK to save it.
) below the left-hand pane. Then enter a description and any required comments about how the folder will be used. Click OK to save it.
Drag and drop documents from the middle pane onto the folders in the left-hand pane to associate them.
Adding Web Addresses to the Library
Select the Management tab.
Click Reference Documents.
A list of the existing documents and web addresses is displayed in the left-hand pane together with a preview of the currently selected item (if available) in the right-hand pane.
Click  .
.
The Add Web Reference Documents dialog opens.
Enter a full web address (e.g. http://www.ats-inspect.com).
The buttons to the right of the web address will become enabled. They give you the following options:
Click  to preview the page.
Click  to clear the address
Enter a description of the web address in the Description box (e.g. ATS Inspect Home Page). This is a mandatory field.
Enter any comments about the web address in the Comments box. This field is optional.
Click OK.
The web addresses are added to the library.
Associating Documents and Web Addresses to an Item
When collecting data a reference document can be displayed relating to the current product being inspected.
Select the Management tab.
Click Document Relationships.
The Reference Documents/Relationships window opens.
The right-hand pane contains the available documents and web addresses. The list can be filtered by Type. Hide documents that have already been assigned to an item by enabling Hide Assigned at the bottom of the right-hand pane.
The left-hand pane contains the different items that a document can be associated to:
| Item |
Description |
| Products |
In both Data Collect and Variable Data Collect the operator can view reference documents related to the product they're currently inspecting. |
| Questions |
When the operator is viewing a question in Data Collect they can also refer to Reference Documents that can provide further information to help with selecting the correct answer. |
| Characteristics |
In Variable Data Collect the operator can view documents related to the measurement. For example, it can contain guidelines on how measurements should be taken. |
| Part/Concern/Repair |
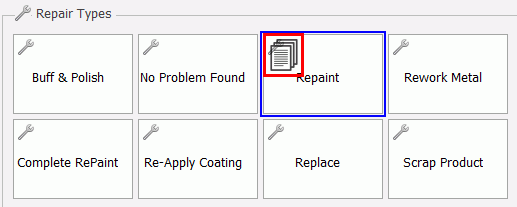
In Data Collect, if a document is associated to a part or a part/concern a document icon will be shown in the part or concern buttonwill be shown in the part or concern button when entering a defect (part documents can only be seen when using Part Categories). Documents associated to repairs can be seen in the same way when carrying out repairs. Documents can be opened by double-clicking on them.
|
Select the appropriate tab in the left-hand pane.
Associate the documents as follows:
Products, Questions and Characteristics: Drag and drop the required documents from the right-hand pane onto the appropriate items.
Part/Concern/Repair: Select the part in the left-hand pane. Expand the concern in the middle pane to display any repairs. Drag and drop the required documents from the right-hand pane onto the concerns or repairs or onto the Documents folder in the middle pane to associate them to the part.
The documents are now associated to the items.
