The Managed Datasources grid blade contains the connection information for the CM4D Databases managed by a CM4D Site Database. You can create a new Managed Datasource, add an existing datasource, edit connection information and test connections. There can be one or more Managed Datasources within a Site, but a Managed Datasource cannot belong to more than one Site. Each Managed Datasource has its own settings relating to what/how data is generated for the CM4D Results database.
What is a CM4D Managed Datasource?What is a CM4D Managed Datasource?
Managed Datasources created in Site Manger (desktop CM4D application) appear here on Refresh, and Datasources created here in the CM4D Config plug will appear in Site Manager the next time the desktop application is opened.
- Add- Create a new Managed Datasource. The form blade to create a new data source opens automatically.
- Refresh - Reloads the grid to show any updates to the current status of the contents.
- Properties - Click on a grid row to modify the properties, or use the Action menu ( Open).
 |
|
| Actions | Click the three dots
to open the menu of available actions for the selected row.
|
| Datasource | The label assigned to the Datasource. This may or may not be same as the label assigned as the database object in SQL Server. |
| Version | The current schema version of the CM4D database. If no value is present, the database is new and must have scripts run before it can be used by CM4D. |
Add New DataSource
New Datasources can be added to the Site by clicking the Add button in the top right of the Site Management card. Enter the properties of the new Datasource in the form blade. The Add Datasource blade contains the same fields as the Datasource Properties blade, only in a more compact format.
- Click Add to create a new CM4D Database connection.
- In the Properties blade, enter the following information:
- Enter a name for the Datasource.
- Select a Site from the dropdown.
- Enter the database name.
- Set your authentication type.
- Click Check Connection.
- If successful, click Save.
- If connection failed, check that the information is entered correctly and try again.
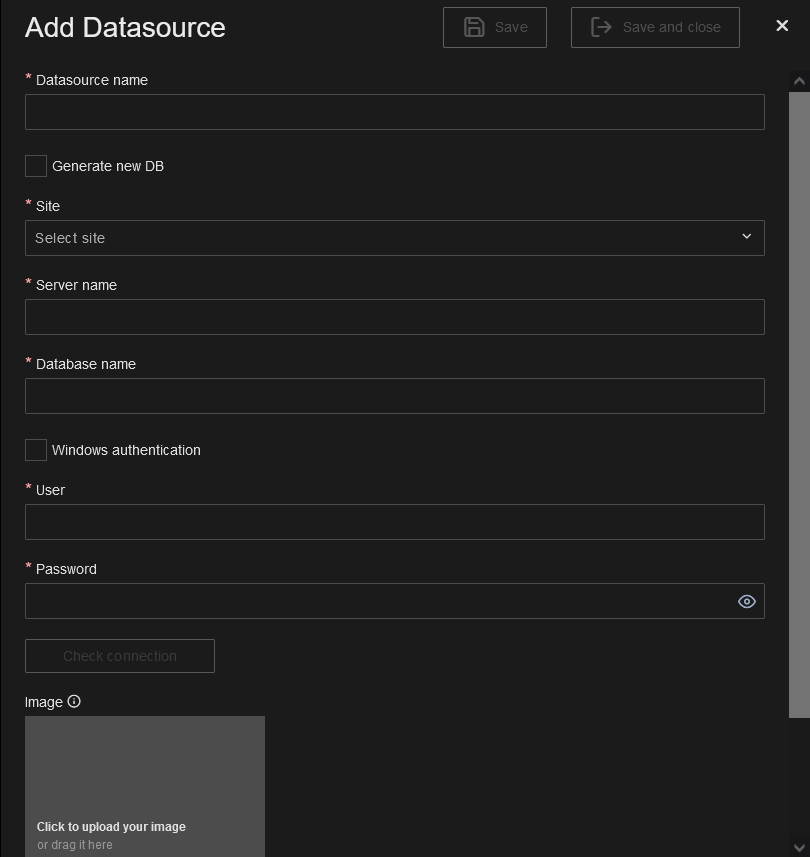
Generate New DB
A new complete CM4D datasource can be generated for you when you add a new Managed Datasource.
When adding a Managed Datasource you have the option to generate a new database. By checking the box Generate new DB, a database object is created using the information entered in the Add Datasource blade when you click Save. Creating the database requires sufficient user privileges, whether it is the user logged in to Security Manager (Windows Authentication) or the user entered in the fields (SQL Authentication).
The new Datasource is added to the Site database automatically, but without any user access privileges/rights. Assign access to the new database to the appropriate Groups/Roles.
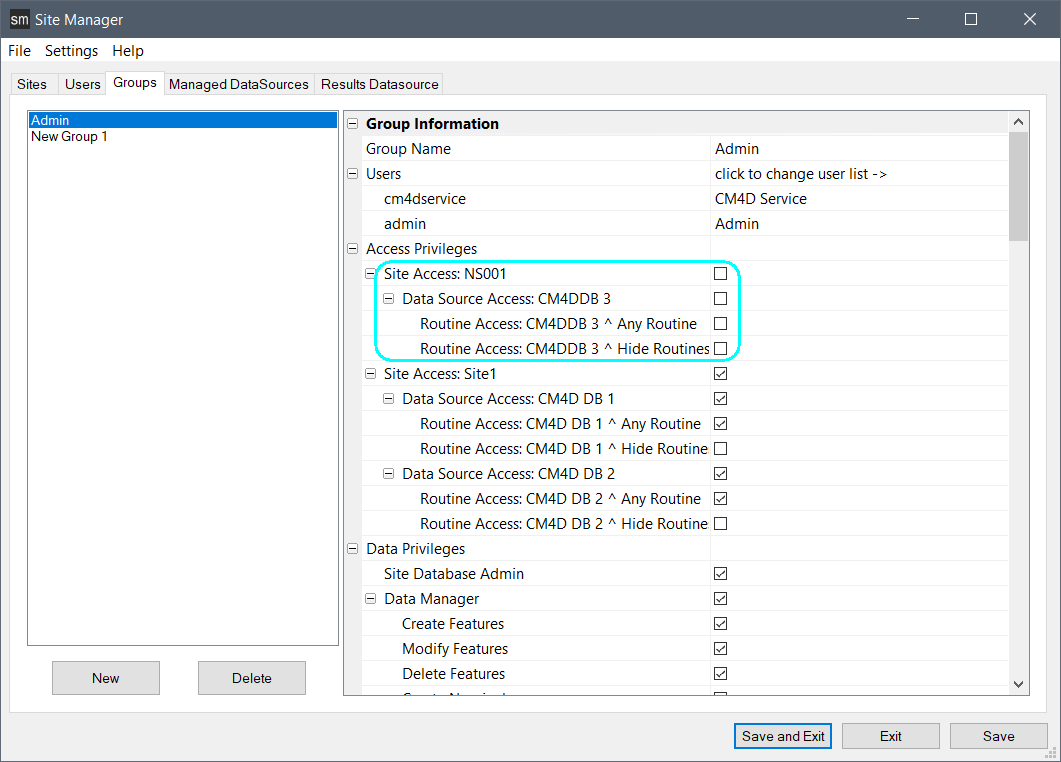
Assign Rights to Database via Groups in Site Manager (Desktop Application)
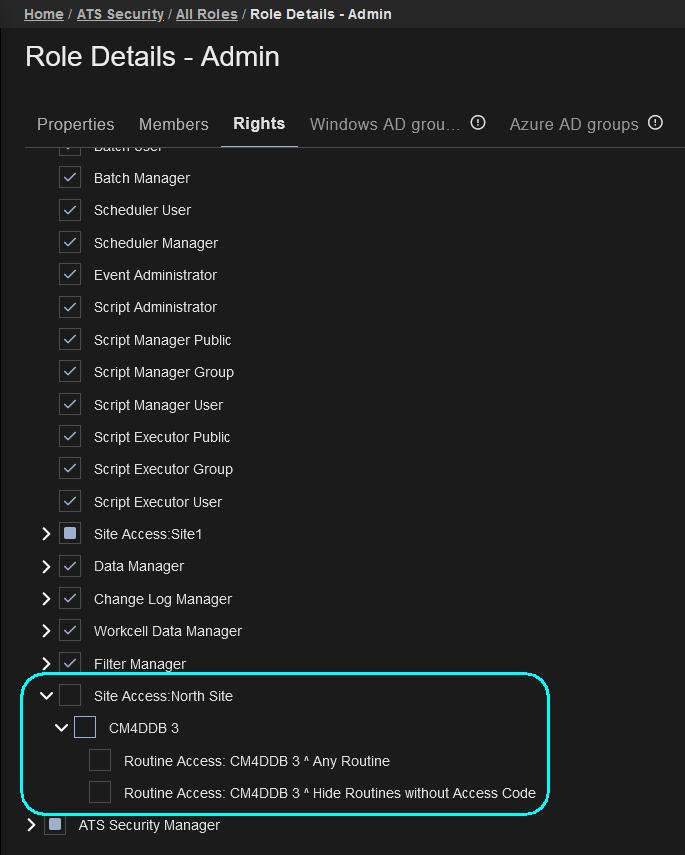
Assign Rights to Databases via Roles in ATS Security (Web Application)
For alternate methods of creating/maintaining CM4D databases, see the topic Database Utilities.
DataSource Settings
The Datasource blade contains the connection details and Results database settings for the Managed Datasource.
To open the properties blade, use the action menu ( Open) or click directly on the grid row.
DataSource | Properties
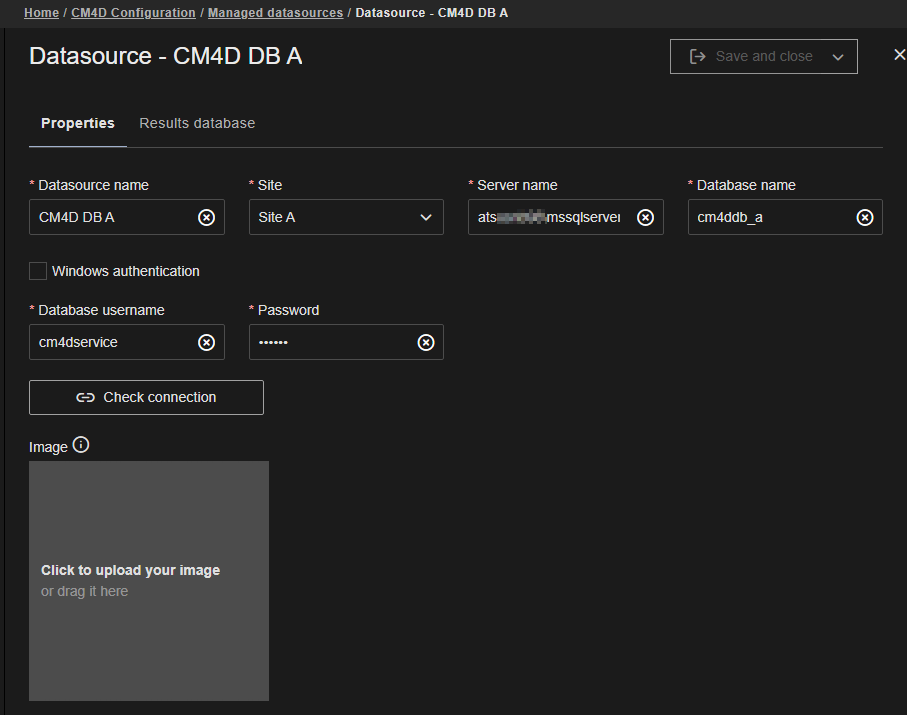
The Properties tab contains the connection details for the CM4D database. Modify properties as needed, check the connection and save the changes.
 |
|||
| Check Connection | Once you have entered all required information, you can test the connection to the DataSource to verify that your information has been entered correctly.
If on save/check connection, the connection fails: Check the information for accuracy/typos - server name, database name, user login (if SQL) Check the authentication type is correct and is valid to access SQL Server |
||
| Database Name | The label of the CM4D database, as defined in SQL Server. | ||
| DataSource Name | A unique label to identify your CM4D datasource connection. This label is displayed in CM4D applications when selecting a datasource connection; it can be the same as the database name or something that would be more recognizable to users. | ||
| Generate new DB | Enable this check box when adding a new Managed Datasource to the Site database. The user logged into the Configuration Manager must have sufficient privileges to run scripts in SQL Server. | ||
| Image | Assign an image to the datasource. | ||
| Server name | The name of the computer hosting the CM4D database. If using a named instance, include the instance name with the server name (servername\instancename). | ||
| Site | Select a Site database from the dropdown. This is the Site that will manage the CM4D database. Typically, only one Site is used, but there may be more than one listed. | ||
| Windows Authentication | Determines the connection security used by CM4D applications to connect to the CM4D database.
|
||
| SQL Authentication | The following are only required if using SQL Authentication. | ||
| SQL Username | Enter the user name of the SQL Login. This user login is used by the CM4D desktop applications to access the database. | ||
| Password | Enter the password for the SQL user. | ||
| Confirm Password | Re-enter the SQL user password to confirm it is correct. | ||
DataSource | Results Database
The Results Database tab contains settings related to how the Managed Datasource interacts with the Results Database, including excluding specific Routines and setting the Subgroups (default for the database or specific per Routine).
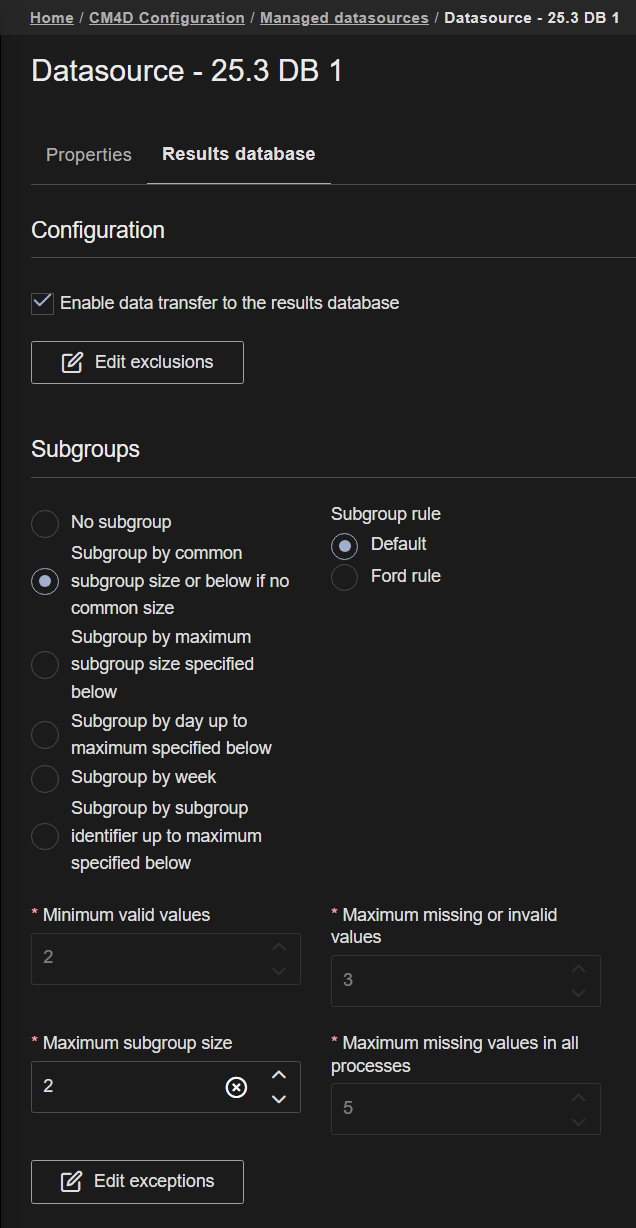
Configuration
This section allows you to enable the transfer of data from CM4D to the Results database and select which Routines, if any, are to be completely excluded from the results generation and data transfer. This is enabled by default.
- Enable data transfer to the results database - Check the box to include the Managed DataSource when generating Results data from CM4D. When enabled, Results are generated and stored in the Results data warehouse.
- Edit Exclusions - Click to add or modify the list of Routines and/or Routine Filters excluded from the data transfer to the Results database.
See the topic Configure Results Exclusions for more information.
Subgroups
Each Routine or Subroutine is assigned a Subgroup Size that is used when calculating statistics. The Results database is precalculated data, so settings like Subgrouping are applied at the time the Sample enters the Results database.
If you need to modify the Subgroup settings, all Sample data that is already in the Results database is not effected by any change until the relevant Sample data is removed from the database and regenerated using the new configuration.
The subgroup settings can be applied at two levels:
- DataSource - All Managed DataSources have Subgrouping properties that act as the default setting for all Results data for that datasource. This is applied to all Results data, unless specified by configuring a Subgroup Exception for select Routines.
- Routine - If a specific Routine requires Subgrouping that is different from the default datasource subgroup size, then you can create exceptions that define both the Subgroup settings and the Routine(s) to which that subgroup applies.
See also:
Subgroups in the Results Database
Select one of the following settings according to the requirements of the data:
- Subgroup by common subgroup size or below if no common size - If the Default Subgroup Sizes for all of the Routines/Subroutines have the same value, then that common value will be used for the subgroup size. However, if the Default Subgroup Sizes of the Routines/Subroutines are not all the same value, then it uses the Maximum Subgroup Size specified below.
- Subgroup by maximum subgroup size specified below - The Maximum Subgroup Size specified below is used as the Subgroup Size for the loaded Routines/Subroutines. Any default subroup size set on the individual routines, even if all have a common value, is overridden by the maximum size specified as the maximum subgroup size.
If you have ten samples with three different creation dates (Build One, Build Two, Build Three and Build Four were created on 14-05-2016, then Build Five, Build Six, Build Seven, Build Eight and Build Nine are created on 28-05-2016, and Build Ten is created on 28-06-2016) and the Maximum Subgroup Size is set to four, then the data will be grouped into multiple subgroups of up to four, because of the specific order of the samples loaded.
- Subgroup by day up to maximum specified below - The number of subgroups depends on the unique creation dates of the samples, where each subgroup contains maximum samples of the size specified.
- Subgroup by week - Each Subgroup includes any Samples created in the same week of a year. The total number of Subgroups depends on the amount of unique weeks for the Sample creation dates. Subgroups by week do not have a maximum size or apply the Maximum Subgroup Size setting.
- Subgroup by Subgroup Identifier up to maximum specified below - The data will be divided into subgroups, each containing up to the maximum number of samples specified in the Maximum Subgroup Size field. Subgroups are based on the S_Subgroup column in the Samples database table.
- Maximum Subgroup Size - Enter a maximum subgroup size to be used if one of the subgroup options indicating "specified below" is selected and the condition requirements are met.
The minimum number of subgroups for calculating Cpk is three, and the minimum number of values needed to calculate Cpk is ten.
Subgroup Rules
Subgroups as related to statistical calculations; how subgroups are handled for calculating statistics. The subgroup settings and exceptions are applied when the results data is generated and the calculations are done. This means data subgroups are fixed and may give different calculations than CM4D Classic. Applications like Peruse rely on pre-calculated data, whereas in CM4D Classic/Interactive the calculations are done on the fly. Therefore, it is important to understand which rule set you want to have configured for the data going into your Results database, as this effects your final calculated values.
There are two options for determining how the statistics rules are calculated (although some rules share the same methods):
- Default - Generalized rules for statistical calculations.
- Ford - Guidelines for statistical calculations according to the Statistical Process Control (SPC) Reference Manual (published by the AIAG in cooperation with Daimler Chrysler Corporation, Ford Motor Company, and General Motors Corporation), which was developed to meet the specific needs of the automotive industry.
To see a comparison, click on the Rule name below:
- Calculating CP Values (CP, CpK, CR, CpM) and PP Values (PP, PpK, PR)Calculating CP Values (CP, CpK, CR, CpM) and PP Values (PP, PpK, PR)
With the exception of Ford Rules, CP values will be calculated using estimated standard deviation where appropriate when subgroups are used. Otherwise, calculated standard deviation is used which, will make CpK the same as PpK. In all cases, the appropriate equation values must be available for CM4D to calculate CP or PP values.
Default Ford CM4D will calculate all CP and PP values having appropriate equation values present, such as specification limits, etc. Ford has both Run CP and Process Control CP values.
Run CP values are calculated when:
- Subgroup Size > 1
- Not Collecting Data
- Has control limits
- In-control
- Check Normality and is normal
- Check MSA and MSA passed or acceptable
- Has minimum of 30 points
- Has minimum of 20 subgroups
- Has specification limits (bilateral or unilateral)
- Has control limits
Process CP values calculated when:
- Has Process Control Statistics (current process or before)
- Not Collecting Data
- In-Control
- Check Normality and is normal
- Check MSA and MSA passed or acceptable
- Subgroup Size > 1
- Implied Unilateral ValuesImplied Unilateral Values
This is the value that will indicate a unilateral limit value. When the high or the low limit value is set to the implied unilateral value, then only the other value is valid. CM4D allows for document specific selections for the use and implied value of unilateral values that will override the defaults below. These defaults can be changed via the Document Default properties.
Default Ford The default implied unilateral value is zero The default implied unilateral value is -99999.99 - Invalid Lower Control LimitInvalid Lower Control Limit
Default Ford CM4D will not calculate or supply zero for control limits for any control limit that can not normally fall below zero and the calculation for that control limit is below zero or cannot be calculated due to insufficient subgroup size. This applies to control limits for range, moving range, and standard deviation. This is a common sense change from prior versions of CM4D because establishing a control limit at zero for values that will never go below zero (such as range) does not make sense. CM4D will not calculate or supply zero for invalid lower control limits for Range. - Mid-Third 40% Rule Indicates an Out-of-Control StateMid-Third 40% Rule Indicates an Out-of-Control State
Default Ford The mid-third 40% rule is violated when more than 40% or fewer points are in the upper and lower third of the control limit region. The mid-third 40% rule is violated when more than 40% or fewer points are in the upper and lower third of the control limit region. - Mid-Third 90% Rule Indicates an Out-of-Control StateMid-Third 90% Rule Indicates an Out-of-Control State
Default Ford The mid-third 90% rule is violated when more than 90% of points are in the middle third of the control limit region. The mid-third 90% rule is violated when more than 90% of points are in the middle third of the control limit region. - Minimum Number of Points Required to Calculate Control Limit for X-MRMinimum Number of Points Required to Calculate Control Limit for X-MR
Default Ford 1 or more points 30 points - Minimum Number of Points Required to Calculate CpKMinimum Number of Points Required to Calculate CpK
Default Ford 1 or more points 30 points - Minimum Number of Points Required to Calculate NormalityMinimum Number of Points Required to Calculate Normality
Default Ford 1 or more points 30 points - Minimum Number of Subgroups to Calculate Control Limit for XBar-RMinimum Number of Subgroups to Calculate Control Limit for XBar-R
Default Ford 1 or more subgroups are required 20 subgroups are required - Minimum Number of Subgroups to Calculate CpKMinimum Number of Subgroups to Calculate CpK
Default Ford 1 or more subgroups are required 20 subgroups are required - MSA% When MSA is Out-of-Control and InvalidMSA% When MSA is Out-of-Control and Invalid
Default Ford The MSA% will not be displayed if the MSA has failed. The MSA% will be shown even if the MSA has failed. - Out of Control Sequential CountOut of Control Sequential Count
Default Ford CM4D will use a run sequence count of seven points in a row to flag an out of control condition for points on one side of the mean or points trending in an up or down direction. The default side of mean sequence count can be changed to 14 or 21 via the Routine or DataSet Properties. CM4D will use a run sequence count of seven points in a row to flag an out of control condition for points on one side of the mean or points trending in an up or down direction. The default side of mean sequence count can be changed to 14 or 21 via the Routine or DataSet Properties. - Outer Fence Multiplier to Calculate the Outer Fence of Box and Whiskers ChartsOuter Fence Multiplier to Calculate the Outer Fence of Box and Whiskers Charts
Default Ford The multiplier is 3 The multiplier is 2 - Supplying Missing Subgroup ValuesSupplying Missing Subgroup Values
Default Ford CM4D will not supply missing subgroup values. CM4D will supply missing subgroup values by substituting the mean of the subgroup for missing values when at least two values in the subgroup are valid and less than three values are missing or invalid and less than five percent of the values for all subgroups in a process are missing or invalid. Substituted values will be flagged with a "%" indicator when displayed in CM4D's grid.
As masked values will appear as missing, they are treated as missing for the purpose of substitution. Values are masked when they are assigned a cause and the user chooses to mask the assigned value or values.
See also: