Site Management - Results Rules
Results Rules define what results CM4D generates for a set of data. These rules include the Feature Types and Characteristics that will be included when generating results from CM4D into the Results database. If your measurement data does not have a rule assigned to it, that data will not generate results. The Results Rules are saved in the Site database.
About CM4D Features and CharacteristicsAbout CM4D Features and Characteristics
Feature Type identifies the kind of dimension which was measured. There are two categories of feature types in CM4D:
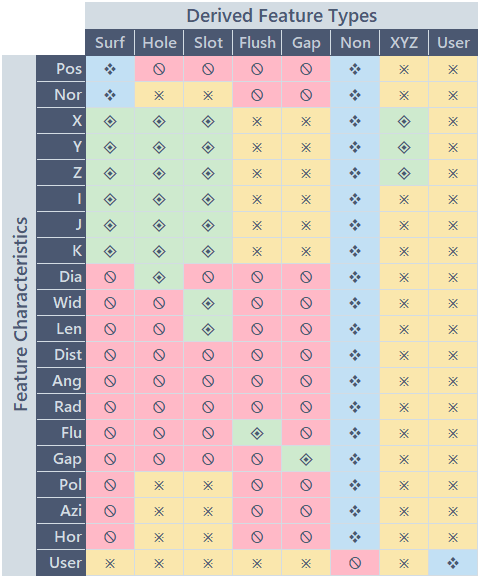
- Derived Features - Standard measurement dimensions (Surface, Hole, Flush, etc.) with data values which are input via data files processed into the database; type is determined automatically by CM4D based on present characteristics. Close Derived Feature Characteristics Criteria TableOpen Derived Feature Characteristics Criteria Table

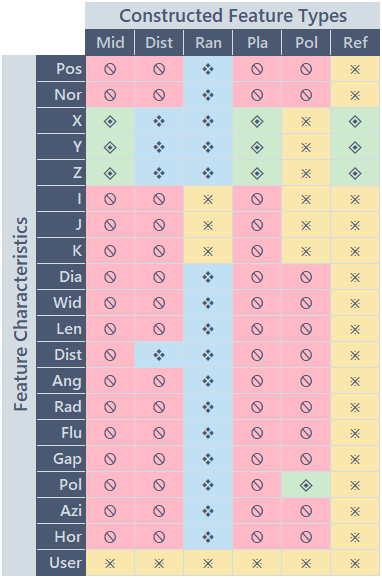
- Constructed Features - Fabricated measurement dimensions (Distance, Midpoint, etc.) with data values which are calculated by CM4D; type is determined manually by Users when feature is created. Close Constructed Feature Characteristics Criteria TableOpen Constructed Feature Characteristics Criteria Table
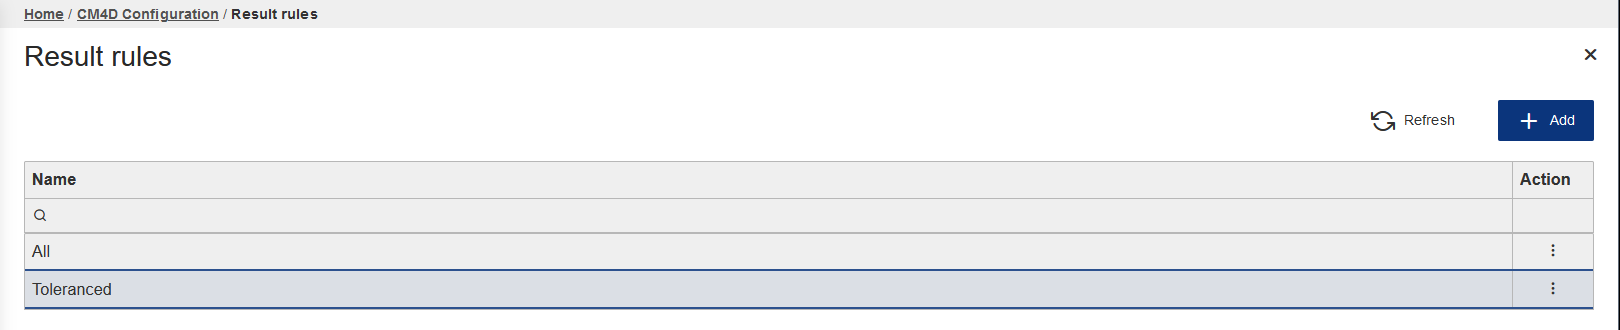
Results Rules are defined by selecting Feature types and characteristics and assigning a label. Use Search, Sort and Filter functions on the grid columns to find or narrow down your options.
- Add - Create a new Results Rule.
- Refresh - Reloads the grid to show any updates to the current status of the contents.
- Properties - Click on a grid row to modify the properties, or use the Action menu ( Open).
 |
|
| Action | Click the three dots
to open the menu of available actions for the selected row.
|
| Description | An optional description field for the rule. This could be used to provide a brief summary of the rule configuration. The description is only used in this grid. |
| Name | The label assigned to the rule. This label appears in the Results Rule dropdown menu in DataUtility or referenced in DataSmith when assigning rules to data. It may be helpful to make the label somewhat descriptive of the type of results the rule is configured to generate. For example, "Normal", "XYZ" or "Toleranced". This will make it easier to recognize which rule(s) to assign to Samples in DataUtility or DataSmith. |
How Many Results Rules Can I Have?
You can have as many rules as you require to get the results you want to be generated. However, it is recommended to keep this to the minimum number you need in order to keep the system streamlined. Remember that for every Results Rule, you could potentially get a different complete set of processes and results.
How are Results Rules Applied to Data?
Results Rules are assigned to your Sample measurement data via either DataSmith or DataUtility.
Even if you do not create Results Rules and generate Results, all Nominal data (Routines and Features) that goes into the CM4D databases will remain synchronized with the Results database (if the Results Datasource is enabled in SiteManager). However, CM4D does not generate Processes and Results for the Results database unless at least one Results Rule is assigned to the appropriate measurement (Sample) data.
Add New Results Rule
|
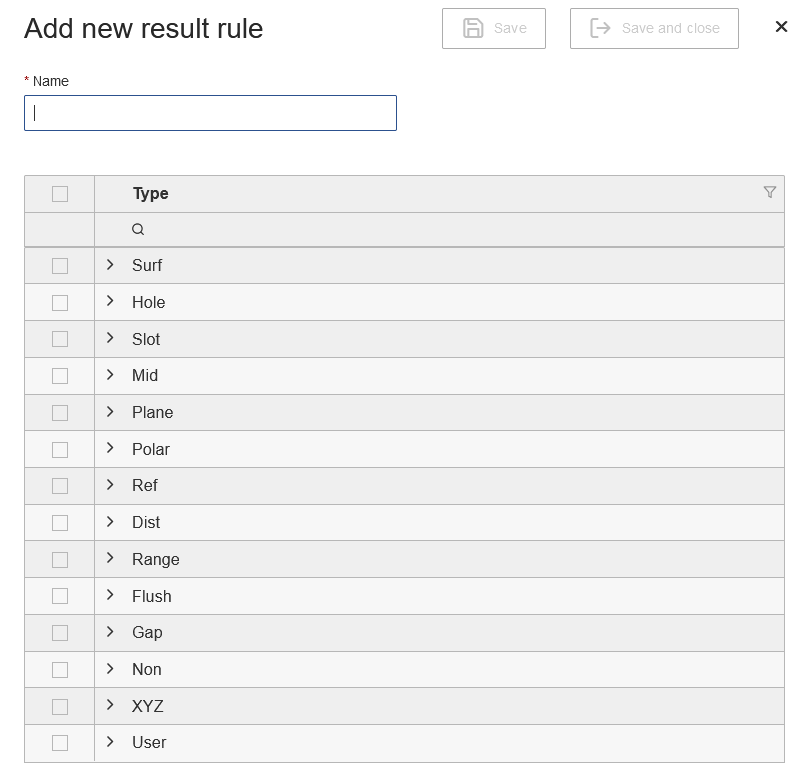
New Results Rules can be created by clicking Add in the top right of the Results Rules card. The Results Rule Properties blade is opened automatically. To exit the add new Results Rule blade without saving, close the property blade. To create a new Results Rule:
|
 |
Results Rule Properties
The Results Rule Properties blade contains the options for defining the rule. Each rule is defined by selecting a Feature Type and one or more Characteristics per Feature. Only allowed Characteristics are listed for each Feature type. If you are familiar with CM4D Classic, Results Rules are comparable to Sift Rules.
Prior to v25.2, Results Rules could only be created using a CM4D Classic document DataSet. See the topic Results Rules for more information on using CM4D to create/manage Results Rules.
Feature Types
|
To include a Feature Type (Surface, Hole, Slot, etc.) in the rule, select the check box to the left of the Feature Type name. Use Search, Sort and Filter functions on the Feature Type Name column to find or narrow down your options. Click to expand the characteristics list for a Feature. Select the check boxes next to each Characteristic Type (Position, Diameter, etc.) you want to include. Choose the Value Type (Act, Dev, Var) in the Characteristic Value Type dropdown menu. |
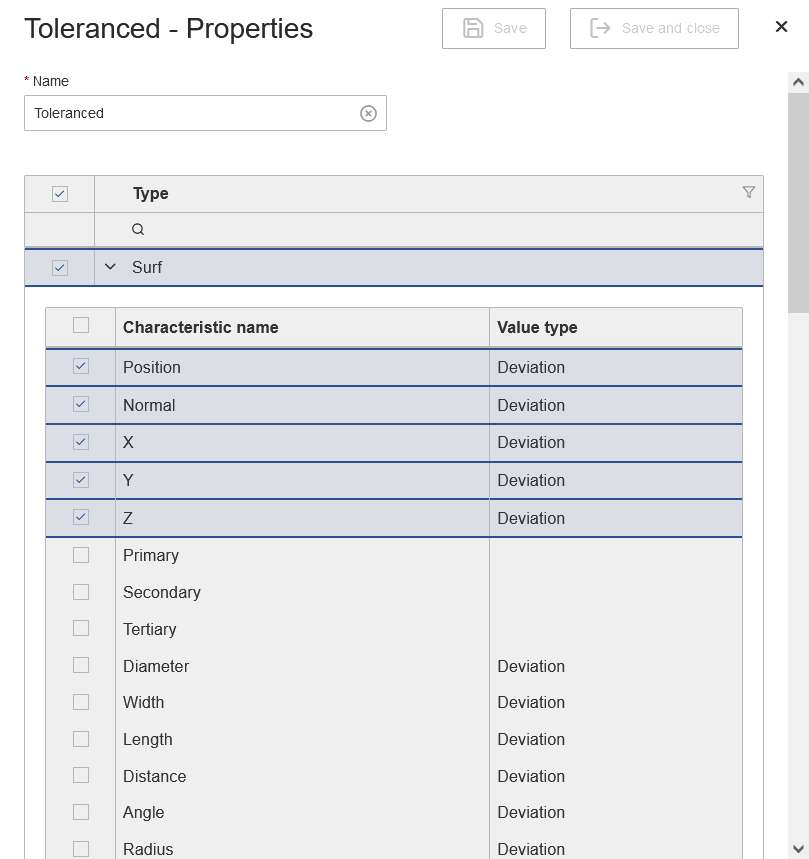 |
Characteristics
A Features' type is defined by its characteristics. Only allowed Characteristics are listed for each Feature type.
Close Feature Characteristics CriteriaOpen Feature Characteristics Criteria
![]()
The grid can be sorted by Characteristic Name or Value Type. The sorting applies only to the characteristics within the feature group.
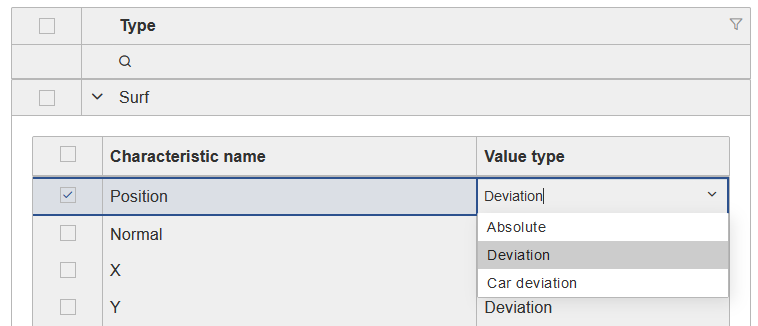
Characteristic Value Type
In addition to choosing data by Feature and/or Characteristics, you can also choose the way the data values are displayed in your reports and annotations. By default, characteristics are set to Absolute values. However, you may choose to change this type depending on your data by modifying your Characteristics Value types.
About Characteristic Value TypesAbout Characteristic Value Types
The actual measurement data values can be displayed as either Absolute (Actual), Deviation or Car Deviation.
- Absolute - The actual measurement value stored in the database. This value is not changed in the database if you choose to display the data as a deviation.
- Deviation - The difference between the actual measurement value and the nominal value (actual minus nominal). This value is not stored in the database but is calculated as needed.
- Car Deviation - Calculated the same way as Deviation, but it only applies to XYZ values. This deviation type changes the sign of the deviation value if the nominal value is negative by assuming that the center of the part is at [0,0,0]. Essentially, choosing to display data as Car Deviation turns Left/Right to In/Out.
| Vehicle | Nominal Value | Absolute (Actual) | Deviation | Car Deviation |
| Car A - Right Door | +100.0 | +100.2 | +0.2 +100.2 - (+100.0) = +0.2 | +0.2 +100.2 - (+100.0) = +0.2 |
| Car A - Left Door | -100.0 | -100.2 | -0.2 -100.2 - (-100.0) = -0.2 | +0.2 +100.2 - (+100.0) = +0.2 |
| Car B - Right Door | +100.0 | +99.2 | -0.8 +99.2 - (+100.0) = -0.8 | -0.8 +99.2 - (+100.0) = -0.8 |
| Car B - Left Door | -100.0 | -99.2 | +0.8 -99.2 - (-100.0) = +0.8 | -0.8 +99.2 - (+100.0) = -0.8 |
For example, if you normally view your data as absolute or actual values, but want the option to see its deviations, you can define a sieve to show the Deviation rather than the Absolute value.
Results Rules in CM4D Peruse
In CM4D Peruse, the configured Results Rules determine what data is available to end users. For example, if your Results Rules for Routine A has only Surface Normal selected, then only features that are Surface Features with Normal characteristic will load from the database.
See also:
Can we improve this topic?