v23 Migration Guide
These instructions are intended for use by local CM4D Administrators, DBA's, or other IT personnel that are familiar with CM4D databases and installations.
This document is a general guide that will help get you started if you are upgrading an existing CM4D installation (v21 or older) up to version 23.
There was a limited release of v22, but most upgrades will bypass that version except for running the Schema 22a Database Update scripts.
If you are installing CM4D for the first time with v23, this migration is not required. Install v23.1 CM4D using the standard installation procedure.
If you are currently running v22 (limited release), this migration is not required. Follow normal upgrade procedures to update to v23.1.
If you are currently running v21, you must be running v21.1 or newer (Site Schema 21b) before running the v23 migration. When updating your database(s) to v23.1, you will also need to run the Schema 22 update scripts between Schema 21b and Schema 23a.
If you are currently running v20, you must perform the v21 Migration Step 1 - Pre-Upgrade Tasks on a v20 (Schema 20b-20b) Database. When updating your database(s) to v23.1, you also need to run all Schema 21 and Schema 22 update scripts between Schema 20b and Schema 23a.
1. Back Up Files
Always back up all of your CM4D-related files and databases BEFORE attempting to upgrade, patch or migrate any CM4D applications, files, or databases.
For this migration, the databases and CM4D.4ds files are particularly important. In addition to the normal Schema update scripts that are run on the databases, the databases will also go through a migration that will change the encryption of passwords to allow for Unicode support. The CM4D.4ds files are required to perform the database password encryption migration. This process is expanded in Step 5. Migrate Database Passwords, here.
2. Gather Required Files
The CM4D installation directory typically has permissions that limits what is allowed to be modified in that folder. For the migration process, you need to copy all required files from the Installation folder into another folder that has modify privileges.
Configuration Files
Depending on the type of installation you have, you need to store a copy of the following files that you will copy back into your CM4D installation folder after you have upgraded.
If you are running a Server version of CM4D:
CM4D.4ds
Cm4d.ini
DataSmithBatch.settings
Scheduler.settings
Launcher.settings
If you are running a stand-alone Workstation version of CM4D:
Cm4d.4ds
Cm4d.ini
Licenses
CM4D v23 requires a new version of all CM4D license files. Contact [email protected] for help with license requests.
You should request new license files to be used before upgrading to v23 to allow time for ATS to process your license request and deliver the files to you before you upgrade to v23.
Remember that if you are upgrading from v20, you also need to upgrade your ATS Licensing Server to 4.0. or higher.
3. Update CM4D Installation
For best results for upgrading to a new major version:
Uninstall CM4D.
If you are running a v20 or older, do not uninstall CM4D until you have performed all v21 Pre-Migration Tasks.
If you are running v21, uninstall CM4D.
Clean out the install directory.
Install ATS CM4D v23.1.
Update your configuration files:
Copy the Cm4D.4ds file into the v23 install directory.
Save a copy of the Cm4d.4ds in a folder with Modify privileges for use in Step 5. Migrate Database Passwords.
Cm4d.ini file - do not overwrite the Cm4d.ini file in the new v23 CM4D install directory. The Cm4D.ini file installed with v23 is in a format that is Unicode compatible.
Open the Cm4D.ini file you backed up in Step 2. Gather Required Files.
Copy the relevant content from the old file into the new Cm4d.ini file the installer created.
Save your changes.
Settings files - do not overwrite the settings files in the new v22 CM4D install directory. The settings files installed with v23 are in a format that are Unicode compatible.
Open the *.settings files you backed up in Step 2. Gather Required Files.
Copy the relevant content from the old files into the new settings files the installer created.
Save your changes.
Import your v23 licenses into the ATS Licensing Manager.
4. Update Database
Do not update any v20 databases until you have completed all v21 Pre-Migration Analysis! See the v21 Migration Guide here for details.
Schema Update
Major version upgrades require Database Schema updates. In order to upgrade your Site and/or CM4D Databases, you must run the Update scripts provided either by your installation or downloaded from the ATS Download Portal (https://downloads.ats-global.com/).
You may have databases from one or more schema versions back that you want to upgrade to v23. To do this, you will need to migrate the databases to the latest schema version using the upgrade path(s) in the tables below. You will need to run all intermediate update scripts on your database(s) consecutively, even if you do not install the interim version of CM4D.
Site Databases
Find the column for the version you are currently running. Starting with the row with a check mark, run all scripts that have check marks in that column:
|
|
20.0-20.2 |
20.3-20.4 |
21.0 |
v21.1-21.5.10 |
21.5.11-21.9 |
22.0 |
|
UpdateSite20b.sql |
|
|
|
|
|
|
|
UpdateSite21a.sql |
|
|
|
|
|
|
|
UpdateSite21b.sql |
|
|
|
|
|
|
|
UpdateSite21c.sql |
|
|
|
|
|
|
|
UpdateSite22a.sql |
|
|
|
|
|
|
|
UpdateSite23a.sql |
|
|
|
|
|
|
|
UpdateSite23b.sql |
|
|
|
|
|
|
|
UpdateSite23c.sql |
|
|
|
|
|
|
|
UpdateSite23d.sql |
|
|
|
|
|
|
CM4D Databases
Find the column for the version you are currently running. Starting with the first available row, run all scripts that have check marks in that column:
|
|
v20.0-v20.2 |
v20.3-v20.4 |
v21.0-v21.5 |
v22.0 |
|
Update20b.sql |
 |
|
|
|
|
Update21a.sql |
|
|
|
|
|
Update22a.sql |
|
|
|
|
|
Update23a.sql |
|
|
|
|
Typically, the Grant scripts will only need to be run if you are transferring CM4D databases that use SQL Authentication between servers or restoring a backup. However, if you are getting a 'Syntax Error or Access Violation' message when attempting to connect to the database using SQL Authentication, you might try running the Grant scripts. See the topic, Troubleshooting.
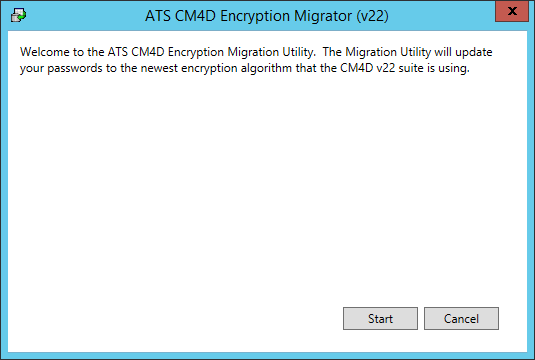
5. Migrate Database Passwords
The CM4D Password Migrator is a stand-alone tool that is used to upgrade your database connections and passwords to v23. This migration updates the encryption that is used in order to allow for Unicode support.
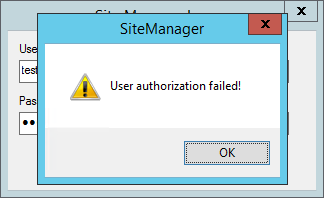
If you have not yet run the Migrator, but you have copied an existing Cm4d.4ds file into the install folder, you will not be able to see any existing connection information when you run DbConnect. Also, before you run the Migration Utility, you will not be able to run any CM4D applications. For example, if you try to log in to SiteManager, you will get the following error:
The Migration utility includes the option of creating a backup of the database tables affected by this migration. If you want to have the Migrator create database backups for you, then you must have a database Server Role that allows you to create tables in the Database.
We highly recommend that you back up your current databases and 4ds files before running the CM4D Password Migrator, especially if you choose not to have the Migrator create database table backups for you. Once you are certain everything was migrated correctly, you can delete or archive any backups you made.
The application is installed with v23 of ATS CM4D. By default, the CM4D install directory is located here: .\Program Files\Applied Tech Systems\CM4D\.
Run CM4D Password Migrator.exe.
The dialog shows v22, but it is also used for v23.
Click Start.
Browse to the CM4D.4ds file that is configured to connect to the database that will be migrated.
At this point the CM4D.4ds file should already be copied to a folder other than the CM4D install directory, as instructed in Step 3.d.i of this migration guide. The migration can be done from any folder with modify privileges as long as a successful connection can be made to the specified server and database.
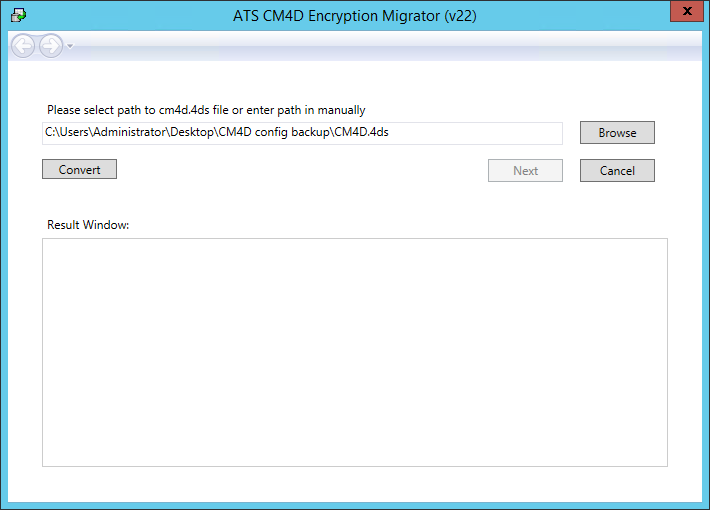
Keep in mind that running this migration will upgrade the database for all users of that database, not just the current user connection. Once the CM4D.4ds file is migrated, you copy the migrated CM4D.4ds file to all Client machines.
Click Convert.
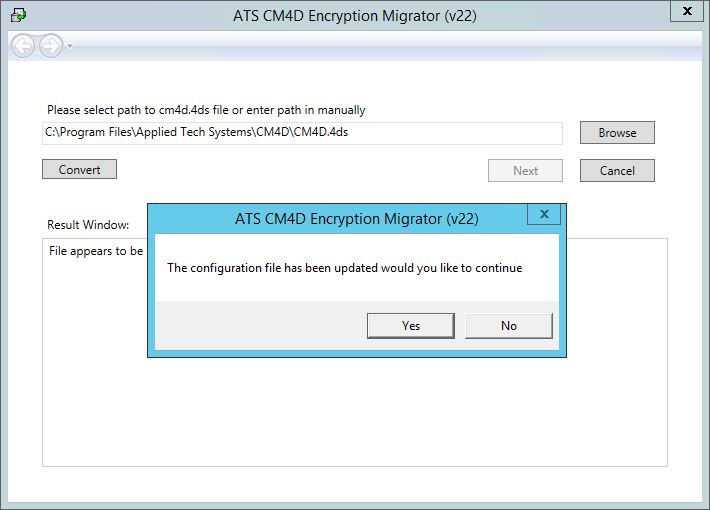
Once the conversion is complete, click Yes to continue.
Your next step will be one of the following choices:
If you have a Site Database, click Next. Go to the next step to continue the migration.
If you have an unmanaged Database, click Exit. For this database type, there are no additional steps and the migration is complete.
For Site Databases, continue here:
Choose your version from the dropdown menu. The version must correspond to the major version that you are migrating from.

Backup Database Tables: leave this option selected if you want the Migration utility to save a backup copy of the non-migrated user table in your database(s). To use this option, you must have a Server Role that allows you to create database tables.
Click Convert Passwords to execute the migration.
If your password encryption was successful, you will see messages in the Results window similar to the one pictured below.
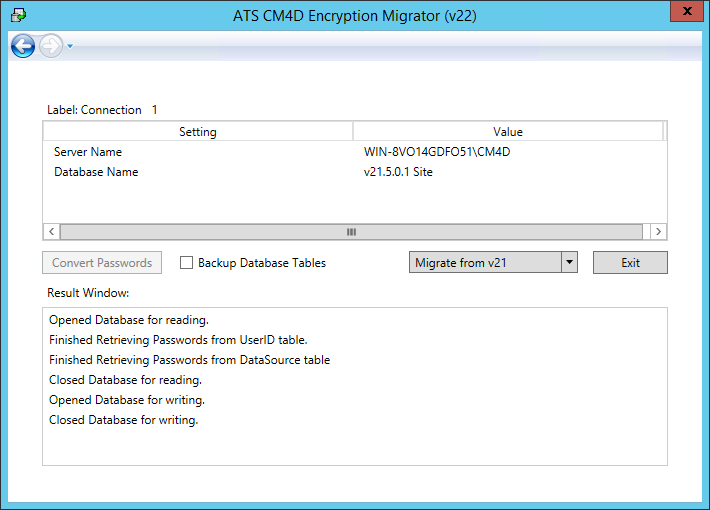
Click Exit.
The following screen will appear when your migration was successful.

Click Exit to close the Migration Utility.
6. DataSmith Translators
DataSmith instructions have changed as of v23 in order to accommodate an adjustment in Unicode character set definitions as defined by Microsoft. Because of this, any translators created before v23 must be reviewed to make sure that instructions are correct. Adjustments may need to be made to how your translators are written in order for them to work correctly going forward.
Any translators used by DataSmithBatch must be cleared of all Warnings before the job will run. Data files will remain in the Inbox until the translator is cleared of all Warnings, saved, and the DataSmithBatch service is restarted.
The new definitions apply to all 'Locate' and 'Must be' instructions, as well as a subset of the 'Mark' instructions (Label, Word, and Number). If a translator created in v21 or earlier contains any of the effected instructions, a Warning dialog will appear listing the instructions that occur in the document.
![]()
|
Instruction |
v21 Definition |
v22 Definition |
|
Alpha |
Alphabetic character (A-Z, a-z) |
Alphabetic character. Includes full-width alphabetic characters. |
|
Comma |
Comma character |
Comma character. Includes ideographic commas; does not include full-width commas. |
|
Digit |
Digit character (0-9) |
Decimal-digit character. Includes full-width decimal-digit characters. |
|
Label |
Label (A-Z,a-z,0-9,-,_); includes spaces |
Alphanumeric (alphabetic or decimal-digital) and Whitespace characters. |
|
Number |
Number character (0-9, +, -, .) |
Decimal-digit character. Includes full-width digit characters; does not include ideographic periods. |
|
Period |
Period character (.) |
Period (decimal point) character. Does not include full-width or ideographic periods. |
|
Punctuation |
Punctuation character (~, !, @, #, $, %, ^, &, *, (, ), <carriage return>, |, `, =, \, {, }, [, ], :, ", ;, ', <, >, ?, /, <comma>) |
Character that is not an alphanumeric character or a whitespace character. |
|
Sign |
Sign character (+.-) |
Positive or Negative sign characters. Does not include full-width sign characters. |
|
Space |
Space character |
Space characters. Includes narrow, non-breaking, and ideographic spaces. |
|
Tab |
Tab character |
Tab character |
|
Word |
Finds the next word (A-Z,a-z,0-9,-,_) |
Alphanumeric characters. Includes full-width alphanumeric characters. |
|
Whitespace |
<n/a> |
Spaces, tabs, line breaks, or carriage returns. |
Clear Instruction Warnings
Instructions can be cleared either individually or for the entire translator document. We highly recommended reviewing each instruction to ensure that the instruction is correct.
To clear a single instruction warning:
Select the instruction with the -=Warning=-.
Double-click the instruction to open the Instruction bar.
Modify the instruction if needed.
Click Commit.
![]()
The warning will be cleared.
Repeat steps 1 through 4 on all remaining instructions marked with the warning.
Save the translator file.
To clear all instruction warnings in a translator:
Right-click the top node in the Data tree, the name of the DataSmith translator.
![]()
Select Clear Instruction Warnings.
Save the translator file.
DataSmithBatch Translators
Any translators used by DataSmithBatch must be cleared of all Warnings before the job will run. Data files will remain in the Inbox until the translator is cleared of all Warnings, saved, and the DataSmithBatch service is restarted.
![]()
If you are seeing 'Job xx has translator warning!' messages in your DataSmithBatch log files, you have one or more Batch jobs with translators that have not been cleared of all instruction warnings.
![]()
Once all translators are cleared, restart your DataSmithBatch Service.
7. Complete ‘v21 Migration’ Steps
If you are upgrading from v20, at this point you will need to continue the migration at Step 3. Execute the Migration here.
If you are upgrading from v21, your migration is finished.
Troubleshooting
If you require further assistance with your upgrade, please contact ATS Technical Support: [email protected].
Can we improve this topic?