In this topic: Hide
The CM4D Web Installer includes CM4D Web only. All other ATS CM4D applications, including the Scheduler services required by CM4D Web, must be installed using the standard CM4D Server installer.
The server that will be hosting CM4D Web requires the following Windows features:
· IIS 7.0 (or higher)
· ASP
· ASP.NET 4.5
· Windows Authentication
If these requirements are not met, the installation will not complete successfully. See here for the full System Requirements of all CM4D Installations.
1. Run the CM4D Web installation executable.
2. Click Next to begin the installation.
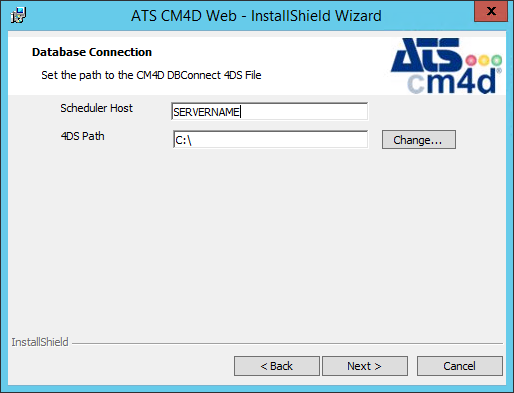
3. Enter the Scheduler Host name, the server where your CM4D Scheduler is installed. This field will be pre-populated with the name of the machine that the installer is currently being run on. However, if your CM4D Scheduler is being hosted on a different server, enter the name of that server in the Scheduler Host field.
4. Set the 4DS Path, the folder containing your Cm4D.4ds database connection file. Either type/paste in the folder path, or click Change to browse to the folder.
a. Using the folder list, locate the folder containing your Cm4d.4ds file. This is the connection file created by DbConnect containing the database connection information. If your CM4D Server installation is on a different server, place a copy of the Cm4d.4ds file into a folder local to where you are installed CM4D Web.
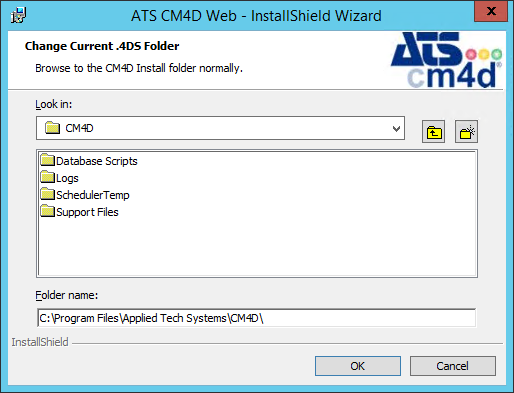
b. Click OK.
5. Click Next.
6. Click Install to complete the installation.
7. Once the installation completes, click Finish.
If you are using an Oracle database, you must install the Oracle client on the CM4D Web server.
1. Run the ATS Oracle Client xx Bit.exe.
2. Update your connections in C:\Oracle\ATS_Oracle_Instant_Client_64\network\admin\ tnsnames.ora
3. Update the following line in the Web.config. The Version must match the version of Oracle that you are using.
<qualifyAssembly fullName="Oracle.DataAccess, Version=2.121.2.0, Culture=neutral, PublicKeyToken=89b483f429c47342" partialName="Oracle.DataAccess"/>
ATS can provide you with an Oracle client that is compatible with ATS CM4D. Contact CM4D Support if you need to obtain this client.
Open the Internet Information Services (IIS) Manager Console to set the Application Pool Identity. The user that will be used to run the CM4D Web application pool has the following requirements:
· Must be a Windows User account
· Must have READ/WRITE access to the 'UserDepository' folder
· Must have READ access to any Scheduler Report Depository folders
· Must have access to the CM4D Database server
§ See here if you are using Windows Authentication for the CM4D database connection
To change the App Pool user:
1. Open the IIS Management Console (Control Panel > Administrative Tools > Internet Information Services (IIS) Manager).
2. Open the Application Pools node underneath the machine node.
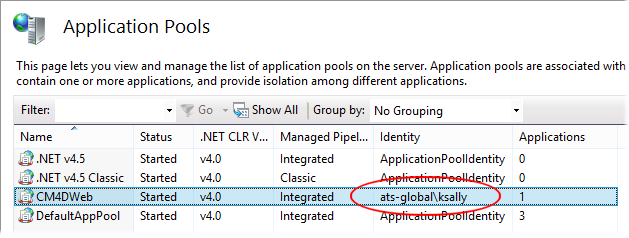
3. Select the CM4DWeb application pool.
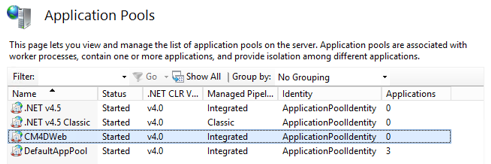
4. Right click the application pool and select Advanced Settings.
5. Select the Identity list item and click the ellipsis (the button with the three dots).
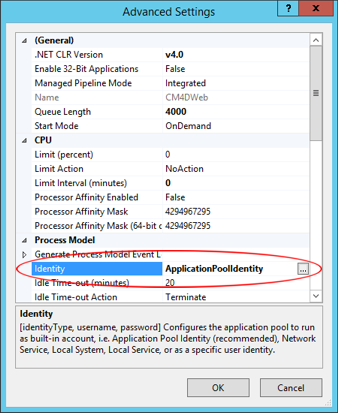
a. Select the Custom account radio button.
b. Click Set.
i. Enter the credentials for the user, including the Domain or Computer name.
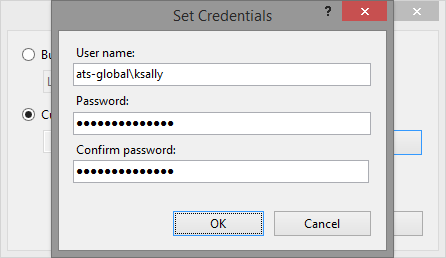
ii. Click OK.
c. Click OK.
6. Click OK again to save your changes to the CM4DWeb Application Pool settings.
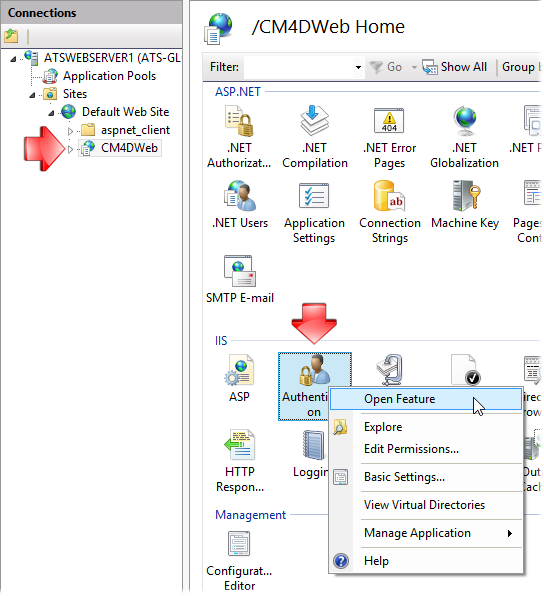
1. Expand the Connections tree until you see CM4DWeb under the list of Web Sites.
2. Select CM4DWeb to access the Features.
3. Right click Authentication
and select Open Feature.
show/hide
4. If Windows Authentication is Disabled, set it to Enabled.
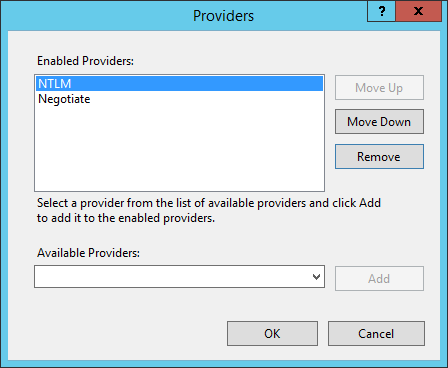
5. Right-click
Windows Authentication and select
Providers. 'NTLM'
must be first in the list of Enabled
Providers. show/hide
a. Select NTLM.
b. Click Move Up.
c. Click OK.
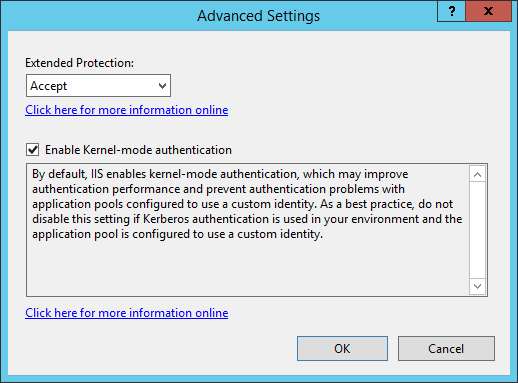
6. Right-click Windows Authentication and select Advanced Settings.
a. Set the Extended Protection dropdown to Accept.
b. Check
the box Enable Kernel-mode authentication.
show/hide
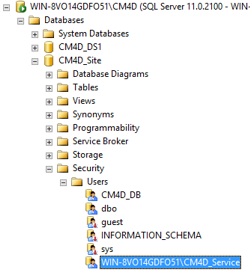
If you are using Windows Authentication to connect to the CM4D database (check your DbConnect settings if you are not sure), the same User ID that you have set to run the Application Pool Identity must also be added as a User for the CM4D Site database in Microsoft SQL Server Management Studio.
CM4D Web and CM4D Scheduler work together when printing reports, so these two systems must be configured to communicate. While typically CM4D Scheduler and CM4D Web are hosted on the same server, these may be on different servers.
The server that will be hosting CM4D Scheduler requires the following:
In addition to all of the configuration done for a typical CM4D Server installation, complete the following setup to allow the CM4D Web Host to communicate with CM4D Server.
1. Edit the CM4DScheduler.Settings file.
a. Find the line <WebHost hostName="localhost"/>.
b. Replace "localhost" with the name of the server that is the CM4D Web Host.
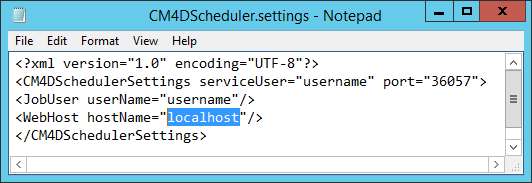
If you have upgraded from v20 without completely cleaning out the CM4D install folder, your old settings file will not be overwritten by the new installer. If this line does not appear in your CM4DScheduler.Settings file, just manually add this line as pictured. These settings are CASE SENSITIVE, so make sure to enter them exactly as pictured above.
2. Run CM4D Scheduler Manager.
a. Go to the Report Depository tab.
b. Add a new Report Depository called "UserDepository". This will be the folder that will store all web reports printed by CM4D Web users, and it must have:
i. Label - UserDepository
ii. Path - any UNC location with READ/WRITE access for the user that is running the ApplicationPoolIdentity
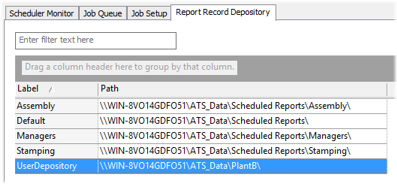
The UserDepository will only be used for Reports generated from CM4D Web; it cannot be used for Scheduler-generated reports.
1. Browse to your CM4D install folder and open the Cm4d.ini file.
a. In the [defaults] section, modify the following highlighted values:
i. EventSmith Server Refresh - The interval in which the Event Queue is checked for any new Events for which a notification email needs to be sent out. This is also the interval for how often the Event Log is checked for any entries that have expired (older than the Log Retention Days). This value is in seconds and must be between 10 and 86,400.
(1) EVENTSMITHSERVERREFRESH=30
ii. EventSmith Log Retention Days - Set the number of days that you want to keep Event Logs available to users before the log records are automatically deleted from the database. The default value of zero will result in users never seeing any logging information on their Event Logs page in CM4D Web.
(1) EVENTSMITHLOGRETENTIONDAYS=0
iii. Site SMTP Server - Enable this setting by removing the pound sign (#) at the beginning of the line and enter the name of your SMTP server. This is the server that will sends out event email notifications to subscribed users.
(1) SITESMTPSERVER = smtp.yourserver.com
2. From the Control Panel open Administrative Tools>Services.
a. Right click on "CM4D EventSmith" and select Properties.
b. In the ATS CM4D Event Smith Properties dialog:
i. In the General tab, change the Startup Type to Automatic.
ii. In the Log On tab, select This account. and enter the credentials for the Windows user that will be running the service.
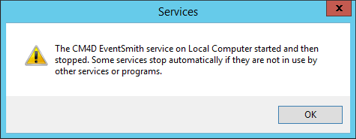
3. Start the EventSmith service.
If this service does not start, you
check that the SMTP server name in the Cm4d.ini file is valid. If
the SMTP server cannot be reached, the EventSmith service will not
start.
You may choose to allow users to self register to request access to CM4D Web. See the topic User Registration Administration for more information.
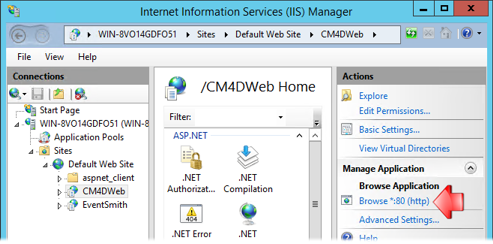
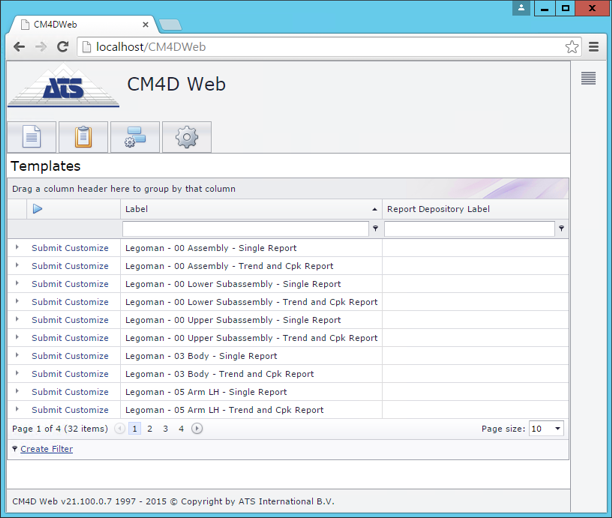
Run CM4D Web both directly on the Web Server or from a remote computer and submit a template for printing. You can launch CM4D Web from one of the following locations:
IIS Manager
(on Web Server only)
1. On the Templates page, click Submit.
a. If the report succeeds, then the setup is complete.
b. If the report fails, you need to check your configuration settings.
See here For a list of supported Web browsers.
For users that will be connecting to CM4D Web, the following is required:
· CM4D Site Database Access - In SiteManager, add all of the Users that will need access to CM4D Web and add them to groups with access to the correct database(s).
§ Standard Web Users - Most Web users will only print reports and maintain their own personal Managed Reports or Event Subscriptions. These users must not have the Document Manager, Event Manager, or Event Administrator privileges.
§ Managed Document Administrators - For users to create, modify or delete Managed Reports that are used by all users, assign the Document Manager privilege in Site Manager. See the topic Managed Report Administration.
§ EventSmith Subscription Administrators - For users to manage EventSmith Subscriptions on behalf of all users, assign the Event Administrator and Event Manager privileges in Site Manager. See the topic EventSmith Subscription Administration.
· Managed Document Access - CM4D Web Users require READ access to all Managed Documents used by the Managed Reports that they will be using to print reports.